You might want to make some internal
network services available to the outside world through your Internet
connection. You would want to do this in these situations:
You want to host a web server using Internet Information Services (IIS).
You want to enable incoming VPN access to your LAN so you can securely connect from home or afield.
You want to enable incoming Remote Desktop access to your computer.
If you have set up routed Internet service with a router,
you don’t have to worry about this because your network connection is
wide open and doesn’t use NAT. As long as the outside users know the IP
address of the computer hosting your service—or its DNS name, if you
have set up DNS service—you’re on the air already.
Otherwise,
you have either Windows Firewall, NAT, or both in the way of incoming
access. To make specific services accessible, you need to follow one of
the sets of specific instructions in the next few sections, depending
on the type of Internet connection setup you’ve used. Skip ahead to the
appropriate section.
1. Enabling Access with Internet Connection Sharing
When
you are using Microsoft’s Internet Connection Sharing feature, you need
to execute two steps to provide outside access to a given service
supplied by a computer on your network. First, you must tell the
connection-sharing system (ICS) which computer on your network is to
receive incoming connection requests for a particular service. Then, on
the computer that provides the service, you must tell Windows Firewall
to let these requests through.
Most
server-type functions, such as Remote Desktop and IIS, require manual
setup. On the computer that is providing the service itself, you must
tell Windows Firewall to allow incoming connections to the service by
following these steps:
1. | Open the Windows Firewall screen by clicking Windows Firewall in the Network and Sharing Center.
|
2. | Click
Advanced Settings. In the left pane, click Inbound Rules. See if the
service this computer is providing is already listed with Yes in the
Enabled column and Allow in the Action column. If so, you can proceed
to configure the computer that is sharing its Internet connection.
|
3. | If
the service isn’t already listed, click New Rule in the right pane.
Click Port, click Next, select TCP or UDP, and enter the specific port
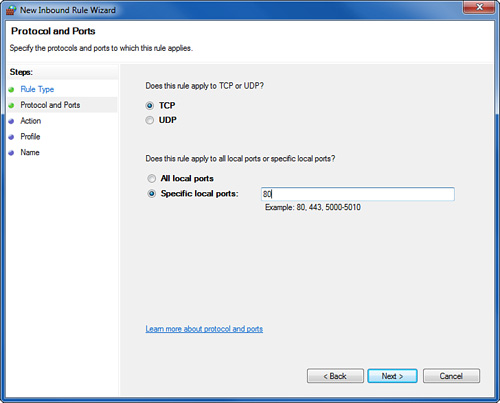
number or port number range required by the service, as shown in Figure 1. Table 1 lists common services, port numbers, and protocols. (For the FTP and DNS services, you have to make two entries.)

Table 1. Common Services and Port Numbers| Service | Protocol | Port |
|---|
| Domain Name Service (DNS) | TCP and UDP | 53 | | FTP Server | TCP | 20 and 21 | | Internet Mail Server (SMTP) | TCP | 25 | | Post-Office Protocol Version 3 (POP3) | TCP | 110 | | Remote Desktop | TCP | 3389 | | Secure Shell (SSH) | TCP | 22 | | Secure Web Server (HTTPS) | TCP | 443 | | Symantec PCAnywhere | TCP | 5631 | | Telnet Server | TCP | 23 | | Web Server (HTTP) | TCP | 80 |
|
4. | Click Next and click Allow the Connection.
|
5. | Click Next and leave all three check boxes (Domain, Private, Public) checked.
|
6. | Click Next. For the rule name, enter the name of the service you’re enabling, add an optional description, and click Finish.
|
Next,
you must instruct the computer that is sharing its Internet connection
to forward incoming requests to the designated computer. On the
computer that physically connects to the Internet, follow these steps:
1. | Click Start, Control Panel, View Network Status and Tasks, and then select Change Adapter Settings.
|
2. | Right-click
the icon for the shared Internet connection and select Properties. View
the Sharing tab and, in the Internet Connection Sharing section, click
Settings.
|
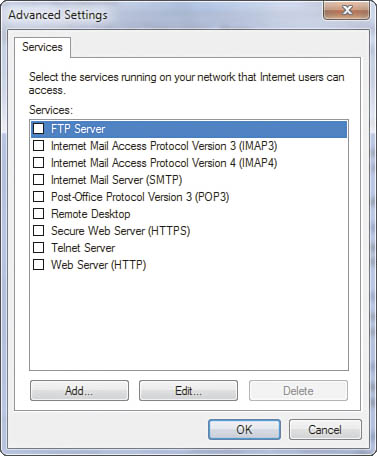
3. | In the Advanced Settings dialog box, shown in Figure 2,
check the Service entry for each service for which you want to permit
access and for which you have servers on your LAN. The most common ones
to select are Remote Desktop, FTP Server, and Web Server, if you have
set up IIS.

|
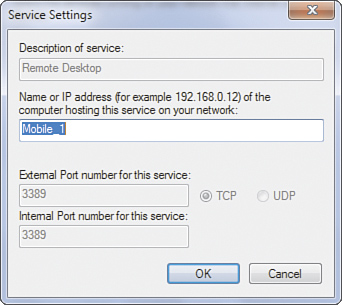
4. | When you select a check box, the Service Settings dialog box appears, as shown in Figure 3.

|
5. | Enter
the IP address of the computer that is hosting this service, if your
LAN uses fixed IP addresses. If your LAN uses automatically assigned
addresses from ICS, you can enter the computer’s name, and the software
will locate the correct computer. Click OK to save the settings.
Note If
you want to use an incoming VPN connection, you must set it up on the
computer that is sharing its Internet connection. ICS can’t forward VPN
connections to other computers. |
|
6. | If
the service you want to use isn’t listed, you need to find out what TCP
and/or UDP ports the service communicates with. You have to search
through the service software’s documentation or on the Internet to find
these port values.
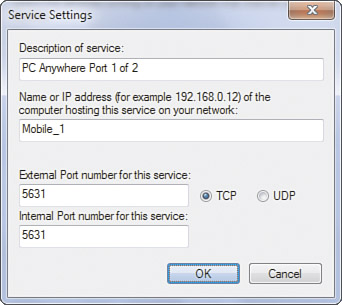
To add an unlisted service, click Add. Enter
the name of the service, the IP address or hostname of the computer
that is running this service, and the port number, as shown in Figure 4.
Generally, you’ll want to use the same number for the port number the
public sees (external port) and the port number used on the LAN
(internal port). Check TCP or UDP, and then click OK.

If the service you’re adding uses more than one protocol type or port number, you’ll have to make multiple entries.
|
Caution
With
the exception of incoming VPN connection service, I suggest that you
don’t run any other services on the computer that manages your firewall
and/or ICS, especially IIS. There’s too great a risk that a security
flaw in the service might let hackers compromise the firewall. |
When
you’ve enabled the desired services, incoming requests using the
selected service ports will be forwarded to the appropriate computer on
your LAN. Windows Firewall will know to let these services through.