2. Windows Internet Connection Sharing with a Broadband Connection
The
procedure for configuring a shared high-speed cable or DSL Internet
connection with Windows ICS is very similar to that for setting up a
shared dial-up connection. To prepare, be sure to install and test your DSL or cable connection on the computer you’ll use to host the shared connection. It’s essential that you have this working before you proceed to set up your LAN and the shared connection.
Tip
If
your broadband service uses a LAN adapter instead of USB to connect
your computer to the DSL or cable modem, you’ll be installing two LAN
adapters in this computer: one for the LAN and one for the modem. I
suggest that you install them one at a time. Install the one that
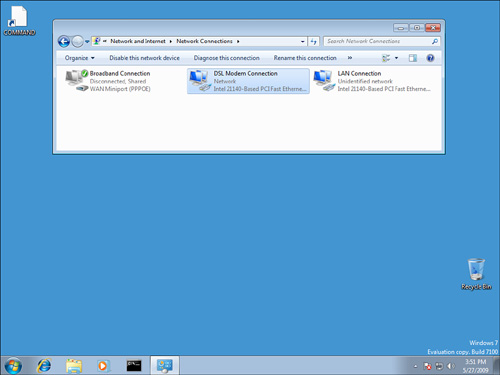
you’ll use for your broadband connection first. From the Network and
Sharing Center, select Change Adapter Settings, right-click the network
adapter’s icon, and rename it DSL Modem Connection or Cable Internet
Connection, or some other name that indicates what it’s used for, as
shown in Figure 4.
Configure and test the Internet connection. Then install the network
adapter that you’ll use to connect to your LAN. Rename this connection
LAN Connection or leave it as Local Area Connection. This will help you
later in the setup process, when you need to know which connection goes
to your ISP.

|
Verify that the broadband Internet connection is labeled as a Public network. To do this, follow these steps:
1. | Click Start, Control Panel, View Network Status and Tasks (under Network and Internet).
|
2. | If your broadband connection is not active, click Connect to a Network and make the connection.
|
3. | In the Network and Sharing Center window, be sure that your Internet connection’s location is labeled “Public Network.”
|
When your broadband connection is configured correctly and is working, follow these steps:
1. | Open
the Network Connections window by clicking Start, Control Panel, View
Network Status and Tasks. Select Change Adapter Settings.
|
2. | Locate the icon that corresponds to your broadband connection.
If you have cable Internet service, this will probably be a network
adapter. Earlier, I suggested that you rename it something like
“Internet Connection,” or it may still be labeled Local Area
Connection. If you use DSL service that requires a username and
password to sign on, locate the connection icon that you set up for
your ISP; it might be named “Broadband Connection.” Right-click this
icon and select Properties.
|
3. | Choose the Sharing tab. Check all the boxes, as shown earlier in Figure 1.
|
4. | Select the Networking tab. In the list of components used by the connection, be sure that only
Internet Protocol Version 6 (TCP/IPv6), Internet Protocol Version 4
(TCP/IPv4), and QoS Packet Scheduler, if present, are checked. This
will prevent file sharing from being exposed to the Internet. (Windows
Firewall will do that, too, but it doesn’t hurt to be extra safe.)
|
5. | Click OK.
|
6. | Click Windows Firewall in the Network and Sharing window. Make sure Windows Firewall is On.
|
7. | Restart Windows and try to view any web page (such as www.google.com).
If it doesn’t appear, you’ll have to resolve the problem before
proceeding. You should check the appropriate connection icon to be sure
it’s still configured correctly for your ISP.
|