You can share any of your “local” printers
so that other people on the network can use it. A “local” printer is
any printer that is directly cabled to your computer, or to which you
connected via the network using LPR or other direct network protocols.
To be sure that printer sharing is enabled, do the following. You should only need to do this once.
1. | Click
the network icon in the taskbar and select Open Network and Sharing
Center; or click Start, Control Panel, View Network Status and Tasks
(under Network and Internet).
|
2. | Look
to see what type of network you’re attached to. If your network is
labeled Public Network, and you really are connected to a public
network (for example, in a café, hotel, or school), you should not
enable file and printer sharing—this would expose your computer to
hackers. If the label says Public Network but you really are on a safe,
protected home or office network, click the Public Network label and
change it to Home or Work, as appropriate.
|
3. | At the left, click Change Advanced Sharing Settings.
|
4. | Under
File and Printer Sharing, make sure Turn On File and Printer Sharing is
selected. If it isn’t, select it and click Save Changes; otherwise,
click Cancel. This will take you back to the Network and Sharing Center.
|
5. | If
your computer is part of a homegroup, click Choose Homegroup and
Sharing Options. If Printers isn’t checked, check it and click Save
Changes; otherwise click Cancel.
|
6. | Close the Network and Sharing Center window.
|
Now you can share any printer that is attached to your computer. To share a printer, follow these steps:
1. | Click Start, Devices and Printers.
|
2. | Right-click
a printer that you’d like to share and select Printer Properties. This
is near the middle of the right-click menu; you don’t want the last
entry labeled just “Properties.”
|
3. | Select the Sharing tab.
|
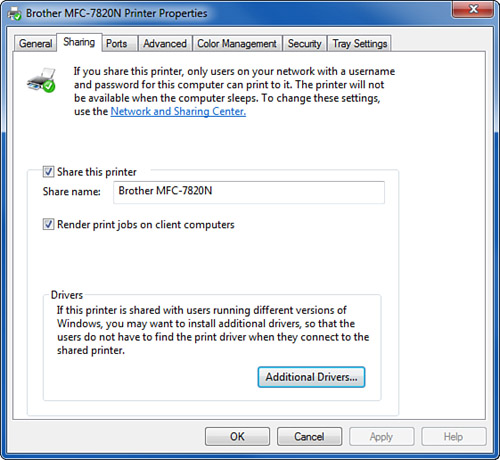
4. | If Share This Printer isn’t already checked, check it. Windows will fill in a share name for the printer, as shown in Figure 1. If you like, you can shorten or simplify it.

|
5. | Click OK.
|
In
most cases, that’s all you need to do. In some cases you might wish to
change some the advanced settings described in the next few sections,
but these are optional.
Setting Printer Permissions
If
you have a workgroup network and have disabled Password Protected
Sharing, or if you have set up a homegroup, you don’t need to worry
about setting permissions for printers: anyone can use your shared
printer. If you’re on a domain network, or have chosen to use detailed
user-level permissions on your workgroup network, you can control
access to your shared printers with security attributes that can be
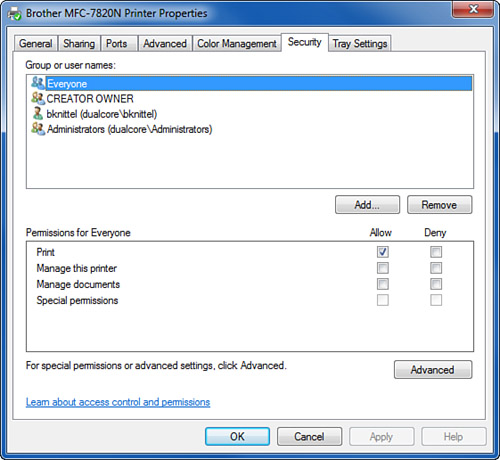
assigned to users or groups, as shown in Figure 2 and described next:
| Permission | Lets User or Group... |
|---|
| Print | Send output to the printer. |
| Manage this printer | Change printer configuration settings, and share or unshare a printer. |
| Manage documents | For
the CREATOR OWNER entry, this permission lets a user suspend or delete
his or her own print jobs. For other users and groups, this permission
lets the user cancel or suspend other users’ print jobs. |
| Special permissions | Don’t bother with this entry; it just controls whether a user can change the permission settings. |

You
don’t have to change any of the default permission settings, unless you
want to restrict the use of the printer to just specific users on your
network. If this is the case, open Devices and Printers, right-click
the printer whose settings you want to change, and select Printer
Properties. View the Security tab. Select group Everyone, and click
Remove. Then, click Add to add specific users or groups, and give them
Print permission. (You could also give someone Manage This Printer or
Manage Documents, if you really do want to let them change the
printer’s settings or delete other users’ print jobs.)
Don’t
change the CREATOR OWNER entry, however. It should have the Manage
Documents permission checked so that a user can delete his or her own
print jobs from the queue.
Changing the Location of the Spool Directory
When
jobs are queued up to print, Windows stores the data it has prepared
for the printer in a folder on the computer that’s sharing the printer.
Data for your own print jobs and for any network users will all end up
on your hard drive temporarily. If the drive holding your Windows
folder is getting full and you’d rather house this print data on
another drive, you can change the location of the spool directory.
To change the location of the Windows print spooler folder, follow these steps:
1. | Open the Devices and Printers window.
|
2. | Click on any printer, then, in the upper task menu, click Print Server Properties.
|
3. | Select the Advanced tab, and click Change Advanced Settings.
|
4. | Enter a new location for the Spool Folder and click OK.
|
Printer Pooling
If
your network involves heavy-duty printing, you might find that your
printers are the bottleneck in getting your work done. One solution is
to get faster printers, and another is to add multiple printers. But,
if you have two printers shared separately, you’ll have to choose one
for your printing, and you’ll almost certainly encounter bank-line
syndrome: The other line always seems to move faster.
The
way around this problem is to use printer pooling. You can set up one
printer queue that sends its output to two or more printers. The
documents line up in one list, and the printers take jobs from the
front of the line, first come, first served.
To set up pooled printers, follow these steps:
1. | Buy identical printers—at least, they must be identical from the software point of view.
|
2. | Set up and test one printer, and configure network sharing for it.
|
3. | Install
the extra printer(s) on the same computer as the first. If you use
network-connected printers, you need to add the necessary additional
network ports.
|
4. | View
the printer’s Properties dialog box and select the Ports tab. Mark
Enable Printer Pooling and mark the ports for the additional printers.
|
That’s all there is to it; Windows passes print jobs to as many printers as you select on the Ports tab.