On a large corporate LAN, most important
network resources, shared folders, and printers are set up and tightly
controlled by network managers. You might not be able to share
resources from your own computer, although in many companies you can,
and it’s useful to know how to do this so that you can easily give
co-workers access to files that you use in common.
On
the other hand, on a home or office workgroup network, any Computer
Administrator user can set up and manage file and printer sharing.
Before
you decide to share resources, you should give some thought to just
what you want to share, how you want to organize it, and who should
have permission to see, use, or change files you’ve published in the
shared folders.
You can elect to share your files with others in several different ways:
If
your computer is part of a homegroup, you can store files you’d like to
share in one of your libraries, and share your libraries with the
homegroup.
You can move files to a folder under \Users\Public,
which is called the Public user profile folder. Here, anyone can access
them automatically without your having to do anything else but enable
sharing the Public folder, as described shortly.
You
can elect to share any folder anywhere within your own user profile;
the files or folders can reside anywhere within your own profile folder
found under \Users on the hard disk.
You can create new, separate folders on your hard disk and share them under their own share names.
In
the past, it was more common to create separate folders and share them
independently. To some extent this makes it easier for other users to
locate shared folders, since each folder has its own name. Starting
with Windows 7, Microsoft suggests “sharing in place,” using any of the
first three methods. These are easier to set up, but it’s perhaps a bit
harder on people who want to use shared materials, since it all has to
be found within the single shared Users folder. Any of the methods are
acceptable, though; it really just depends on how you prefer to
organize your files.
The next sections describe how to share folders these various ways.
1. Sharing with a Homegroup
If
your computer is a member of a homegroup, you can share the entire
contents of any of your libraries so that the other members of the
homegroup can see and use files in your libraries, but not change them.
Use the following procedure:
1. | Click
the network icon in the taskbar and select Open Network and Sharing
Center, or click Start, Control Panel, View Network Status and Tasks
(under Network and Internet).
|
2. | Click Choose Homegroup and Sharing Options.
|
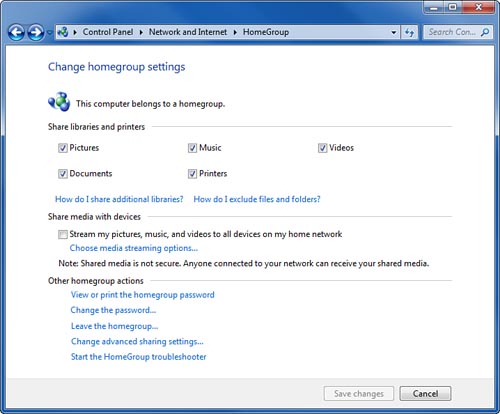
3. | Check the libraries that you want to share, and uncheck any that you don’t want to share, as shown in Figure 1. Click Save Changes when you’re done.

|
This method shares libraries read-only:
All other homegroup members can see, view, play, and print any of the
files in your shared libraries, but they can’t change, delete, rename,
or add to them.
Setting Permissions for HomeGroup Sharing
If
you want to let other users change the files in one of your libraries,
or if you want to enable or prevent access to a specific library,
folder, or individual file, use this procedure:
1. | Locate the library, folder, or file in Windows Explorer, right-click its icon, and select Share With.
|
2. | Select one of these choices:
- Nobody— Keeps everyone else out of the library, file, or folder.
- Homegroup (Read)— Lets everyone else in the homegroup read, but not change, rename, delete, or add to the file(s).
- Homegroup (Read/Write)—
Lets all other homegroup users not only view, but make changes to the
selected library, folder, or file. This includes adding new files,
deleting files, and so on.
- Specific People— Enables you to choose access levels for individual users. This may not work quite as you might guess, as I’ll explain next.
|
Note
The
first time you share a new folder, use one of the two Share With
Homegroup options. This makes the folder appear in the Homegroup
listing on everyone else’s computer. Then,
if you want to customize access for specific people, right-click again
and select Share With Specific People to make adjustments. |
Editing Permissions for Specific People
The
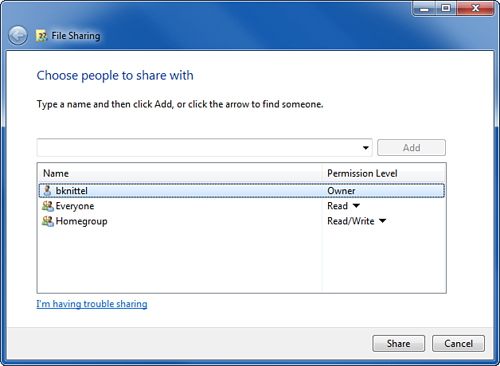
fourth choice, Specific People, lets you set permissions for yourself,
for the homegroup, for Everyone, and for individual user accounts,
using the permissions list shown in the File Sharing dialog box, shown
in Figure 2.

Any entries that you add for individual users won’t
apply when other users in your homegroup try to use the shared
resource, because member computers always use a common built-in
account. Entries for individual users only affect access from computers
that aren’t members of the homegroup, and from computers not running
Windows 7.
If
you have computers on your network that run older versions of Windows,
and thus can’t be members of the homegroup, you can give their users
easy access to your shared files in either of two ways:
You
can turn off Password Protected Sharing on your computer. Then, add
Everyone to the permission list. The other computers will get access to
the files this way.
If you want to leave
Password Protected Sharing turned on on your computer, either create
accounts for each of the other computers’ users on your computer, using
their account names and passwords, or create a single user account
named, for example, “sharing” on your computer, assign a password to
it, and have all of the other users use this account when they connect
over the network. Add this account to the permissions list, and grant
it Read or Read/Write access.
To change the permissions granted to a user or group listed in the File Sharing dialog box, shown in Figure 2,
change the entry in the Permission Level column to Read, Read/Write, or
Remove, which removes the entry from the list. To add a new entry,
select a name from the drop-down list next to the Add button, then
click the Add button. You can then change the new entry’s Permission
Level.
Note
If
you add Everyone to the list, the permissions you give to it will set
the minimum access level granted to, well, everyone. Specifically, if
you grant Everyone Read/Write access, this trumps any other settings in
the list. Anyone will be able to change the files. |
Your account is listed as the file’s or folder’s owner, and you can’t change this entry.