Implementing security across a network is a
“weakest link” proposition. That is, your network as a whole is only as
secure as the most vulnerable of the clients. So although you may now
have Windows Home Server locked down, you still have to get your
security up to snuff on each computer. This section takes you through a
few features and techniques that enhance the security of the rest of
your network.
1. Monitoring Home Computer Security
Windows Home Server displays various
network health notifications via the Windows Home Server Status icon,
which appears in the notification area. If you have a Windows 7 or
Vista PC, the Windows Home Server Status icon can check the current
Security Center settings for the computer’s firewall, automatic
updating, and antispyware and antivirus programs. If any of these is
turned off or, in the case of antispyware and antivirus programs, out
of date, the Windows Home Server Status icon displays a notification. Table 1 shows the four security-related notifications that you might see.
Table 1. Security-Related Network Health Notifications Displayed by the Windows Home Server Status Icon
| Notification | Description |
|---|
|
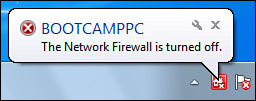
| Windows Firewall has been turned off on the specified computer. |
|
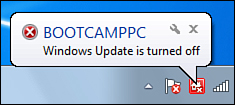
| Automatic updating has been turned off on the specified computer. |
|

| The antivirus program on the specified computer has either been turned off, or its virus definitions are out-of-date. |
|

| The antispyware program on the specified computer has either been turned off, or its spyware definitions are out-of-date. |
2. Thwarting Spyware with Windows Defender
Malware is the generic term for malicious software such as viruses and Trojan horses. The worst malware offender by far these days is spyware.
It’s generally defined as any program that surreptitiously monitors a
user’s computer activities—particularly the typing of passwords, PINs,
and credit card numbers—or harvests sensitive data on the user’s
computer and then sends that information to an individual or a company
via the user’s Internet connection (the so-called back channel) without the user’s consent.
You might think that having a robust firewall
between you and the bad guys would make malware a problem of the past.
Unfortunately, that’s not true. These programs piggyback on other
legitimate programs that users actually want to download, such as file-sharing programs, download managers, and screensavers. A drive-by download is the download and installation of a program without a user’s knowledge or consent. This relates closely to a pop-up download—the
download and installation of a program after the user clicks an option
in a pop-up browser window, particularly when the option’s intent is
vaguely or misleadingly worded.
To make matters even worse, most spyware embeds
itself deep into a system, and removing it is a delicate and
time-consuming operation beyond the abilities of even some experienced
users. Some programs actually come with an Uninstall option, but it’s
nothing but a ruse, of course. The program appears to remove itself
from the system, but what it actually does is a covert reinstall—it surreptitiously reinstalls a fresh version of itself when the computer is idle.
All this means that you need to buttress your
firewall with an antispyware program that can watch out for these
unwanted programs and prevent them from getting their hooks into your
system. In early versions of Windows, you needed to install a
third-party program. However, Windows 7 and Vista come with an
antispyware program named Windows Defender.
Tip
Many security experts recommend installing multiple
antispyware programs on the premise that one program may miss one or
two examples of spyware, but two or three programs are highly unlikely
to miss any. So, in addition to Windows Defender, you might consider
installing antispyware programs such as SuperAntiSpyware (www.superantispyware.com), Lavasoft Ad-Aware (www.lavasoft.com), and PC Tools Spyware Doctor (www.pctools.com).
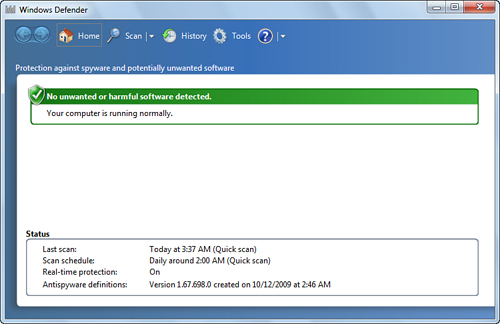
To open Windows Defender, select Start, type defender, and then click Windows Defender in the search results. You end up at the Windows Defender Home screen, shown in Figure 1. This window shows you the date, time, and results of your last scan, as well as the current Windows Defender status.
Spyware Scanning
Windows Defender protects your computer from spyware
in two ways. It can scan your system for evidence of installed spyware
programs (and remove or disable those programs,
if necessary), and it can monitor your system in real time to watch for
activities that indicate the presence of spyware (such as a drive-by
download or data being sent via a back channel).
For the scanning portion of its defenses, Windows Defender supports three different scan types:
Quick Scan—
This scan checks just those areas of your system where it is likely to
find evidence of spyware. This scan usually takes just a couple of
minutes. Quick Scan is the default, and you can initiate one at any
time by clicking the Scan link.
Full Scan—
This scan checks for evidence of spyware in system memory, all running
processes, and the system drive (usually drive C:), and it performs a
deep scan on all folders. This scan might take 30 minutes or more,
depending on your system. To run this scan, pull down the Scan menu and
click Full Scan.
Custom Scan—
This scan checks just the drives and folders that you select. The
length of the scan depends on the number of locations you select and
the number of objects in those locations. To run this scan, pull down
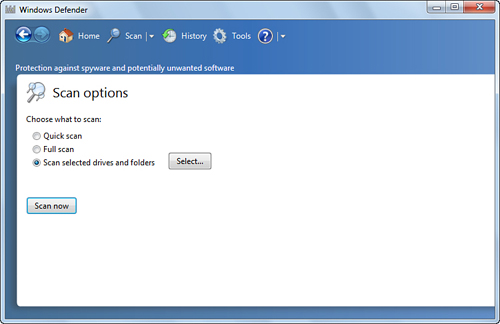
the Scan menu and click Custom Scan, which displays the Select Scan
Options page shown in Figure 2. Click Select, activate the check boxes for the drives you want scanned, and then click OK. Click Scan Now to start the scan.
Windows Defender Settings
By default, Windows Defender is set up to perform a
Quick Scan of your system every morning at 2:00 a.m. To change this,
click Tools, and then click Options to display the Options page shown
in Figure 3. Use the controls in the Automatic Scanning section to specify the scan frequency time and type.
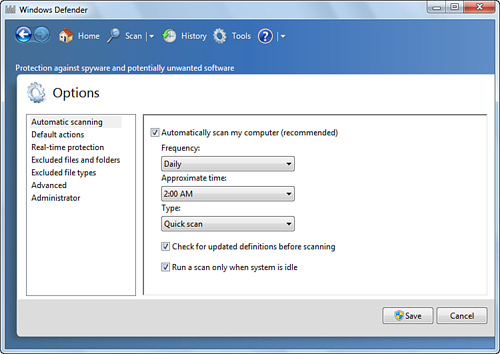
The rest of the Options page offers options for customizing Windows Defender. The remaining options include the following:
Default Actions—
Set the action that Windows Defender should take if it finds alert
items (potential spyware) in the High, Medium, and Low categories:
Default Action (the action prescribed in the definition file for the
detected spyware), Ignore, or Remove.
Real-Time Protection— Enables and disables real-time protection. You can also toggle security agents on and off. Security agents
monitor Windows components that are frequent targets of spyware
activity. For example, activating the Auto Start security agent tells
Windows Defender to monitor the list of startup programs to ensure that
spyware doesn’t add itself to this list and run automatically at
startup.
Tip
Windows Defender often warns you that a program
might be spyware and asks whether you want to allow the program to
operate normally or to block it. If you accidentally allow an unsafe
program, click Tools, Allowed Items; select the program in the Allowed
Items list; and then click Remove from List. Similarly, if you
accidentally blocked a safe program, click Tools, Quarantined Items;
select the program in the Quarantined Items list; and then click Remove.
Advanced—
Use these options to enable scanning inside compressed archives. In
Windows 7, you can also elect to scan email and removable drives; in
Windows Vista, you can prevent Windows Defender from scanning specific
folders.
Administrator— This
section has a check box that toggles Windows Defender on and off. In
Windows 7, you can activate a check box that lets you see other users’
Windows Defender items; in Windows Vista, you see a check box that,
when activated, allows all non-Administrators to use Windows Defender.