SBS supports the 32-bit and 64-bit versions of Windows XP
Professional; the Business, Enterprise, and Ultimate editions of
Windows Vista; and the Professional, Enterprise, and Ultimate editions
of Windows 7. Windows Server 2003 and Windows Server 2008 are also
supported, either as member servers or secondary domain controllers, but they can’t be joined to the
domain using the SBS wizards.
|
There has been a longstanding misunderstanding about
additional domain controllers on an SBS network: many people believe
that the main SBS server is the only domain
controller allowed on an SBS network. This simply isn’t true. You
can have additional domain controllers on an SBS network. The only
requirement is that these secondary domain controllers must not hold
any of the Flexible Single Master Operations (FSMO, pronounced fizmo) roles.
Those FSMO roles must all remain on the original SBS
server.
With SBS 2011, this requirement becomes even clearer because
the Premium Add-on of SBS 2011 includes a second copy of Windows
Server 2008 R2 and the right to install it on the SBS network. You
can use this second server to support Microsoft SQL Server (the
default behavior) or to support Remote Desktop Services, including
RemoteApps—or you can use it as a secondary domain controller.
Having a secondary domain controller
sounds like a really good idea, but it can lead
to complications when trying to recover from a catastrophic event.
The primary reasons for having more than one domain controller (load
balancing and geographic redundancy) make a lot of sense for a large
organization, but really don’t make much sense for most small
businesses.
However, if you’re supporting a remote site, such as a branch
office, using a secondary domain controller is a very good idea. We
like to take advantage of the new Read-Only Domain Controller
(RODC), introduced in Windows Server 2008, for that branch
office.
|
1. Creating Computer Accounts
Unlike previous versions of SBS, with SBS 2011 you don’t need
to create a computer account ahead of time. Instead, you (or the
user of the computer) plug the computer into the SBS network, you’re
assigned an IP address from the DHCP server, and you’re then joined to the SBS domain
when you use the http://connectLauncher.exe application from a USB key. page to connect
the client. Or you can manually run the
Before you try to connect a new computer to the network, first
create the user account(s) that will have access to the computer.
This simplifies the setup process for the computer account, and
ensures that the correct user accounts are given permission to log
on to the new computer.
2. Establishing Basic Network Connectivity
The first step in connecting a computer to an SBS network is to connect
to the network and obtain a valid IP address. This process is pretty
simple: plug the computer into an Ethernet switch on the network,
and configure the system for Dynamic Host Control Protocol (DHCP).
Wireless clients must first associate with an access point and
provide a WPA key.
2.1. Configuring Windows 7, Windows Vista, and Windows Server
2008 to Use DHCP
By default, Windows 7, Windows Vista, and Windows Server
2008 will use DHCP to configure TCP/IP, and you shouldn’t have to
change anything. However, if the client has been set to use a
fixed IP address, you can change it back to using DHCP by
completing the following steps:
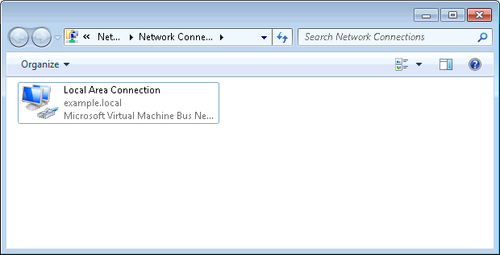
Open the Network Connections folder shown in Figure 1. The
easiest way to get to this in Windows 7 and Windows Vista is
to type ncpa.cpl in a command window or in the Search field on
the Start menu.

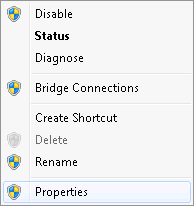
Select the network card, and right-click to open the
Action menu shown in Figure 2.

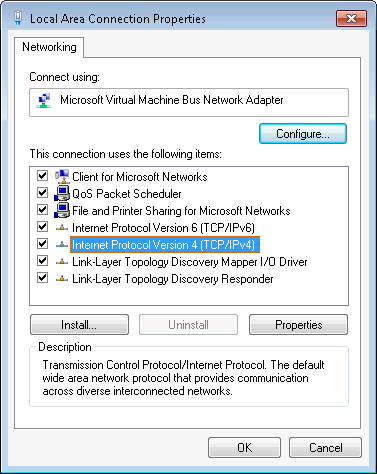
Select Properties to open the properties of the Local
Area Connection, as shown in Figure 3.

Select Internet Protocol Version 4 (TCP/IPv4), and click
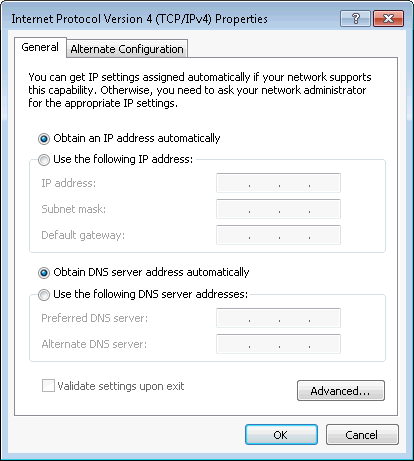
Properties to open the Internet Protocol Version 4 (TCP/IPv4)
Properties page. Select Obtain An IP Address Automatically and
Obtain DNS Server Address Automatically, as shown in Figure 4.

Click OK and then click Close to configure the
network connection to use DHCP.
For Windows Server 2008, the steps are much the same. If
your server needs to have a fixed IP address, either provide a
reservation in DHCP (preferred) or assign a static IP address that
is within the same subnet range as your SBS server and that is
excluded from the DHCP address range offered by SBS.
2.2. Configuring Windows XP and Windows Server 2003 to Use
DHCP
By default, Windows XP (including x64 Edition) and Windows
Server 2003 use DHCP to configure TCP/IP, and you shouldn’t have
to change anything. However, if the computer has been set to use a
fixed IP address, you can change it back to using DHCP by
completing the following steps:
In the Network Connections folder (available in Control
Panel), right-click the appropriate network adapter (usually
Local Area Connection) and choose Properties.
In the Local Area Connection Properties dialog box,
select the Internet Protocol (TCP/IP) component, and click
Properties to open the Internet Protocol (TCP/IP) Properties
dialog box, shown in Figure 5.

Verify that the Obtain An IP Address Automatically and
Obtain DNS Server Address Automatically options are selected,
and then click OK.
Note:
If your SBS environment includes more than one server, the
secondary servers are good candidates for static
IP addresses. If you use a static IP address, configure the
server with an IP address in the excluded IP address range of
192.168.yyy.3 through 192.168.yyy.9 (where yyy is the subnet
used by your SBS network), or add an appropriate exclusion in
DHCP.