Disconnecting a Mapped Network Folder
If you no longer need to map a Windows Home Server share, you should disconnect it by following these steps:
1. | Select Start, Computer (or My Computer in XP).
|
2. | Right-click the mapped drive, and then click Disconnect.
|
3. | If
files are open from the server share, Windows displays a warning to let
you know that it’s unsafe to disconnect the share. You have two
choices:
- Click No, close all open files from the mapped folder, and then repeat steps 1 and 2.
- If you’re sure there are no open files, click Yes to disconnect the share.
|
Creating a Network Location in Windows 7 and Windows Vista
When you map a Windows Home Server shared folder to a
drive on your computer, Windows 7 and Windows Vista create an icon for
the mapped drive in the Computer folder’s Network Locations group. You
can also add your own icons to this group. These are similar to the
network places you can create in Windows XP (as described in the next
section). That is, after you create a network location, you can access
that location by double-clicking the icon. This is usually a lot faster
than drilling down through several layers of folders on the server, so
create network locations for those Windows Home Server shares you access
most often.
Follow these steps to create a network location in Windows 7 and Vista:
1. | Select Start, Computer to open the Computer window.
|
2. | Right-click an empty section of the Computer folder, and then click Add a Network Location. Windows launches the Add Network Location Wizard.
|
3. | Click Next in the initial wizard dialog box.
|
4. | Click Choose a Custom Network Location, and then click Next.
|
5. | Type the UNC address of the Windows Home Server shared folder (see Figure 3; you can also click Browse to use the Browse for Folder dialog box to select it), and then click Next.

|
6. | Type a name for the network location, and click Next.
|
7. | Click Finish.
|
Creating a Network Place in Windows XP
In Windows XP, a network place
is a shared folder on a network computer. (It can also be a location on
a web or FTP server.) The name of each network place uses the following
format:
Share on Description (Computer)
Here, Share is the name of the shared resource, Description is the description of the computer where the network place resides, and Computer
is the name of that computer. For Windows Home Server 2011 (which,
unlike earlier versions of Windows Home Server, does come with a
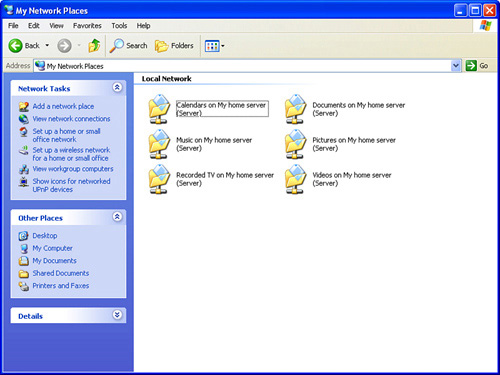
description), the name of each network place appears as follows. (See Figure 4; again, I created the extra Calendars share on my Windows Home Server.)
Share on My home server (Server)

Whenever a workgroup computer shares a folder,
Windows XP detects the new share and adds it automatically to My Network
Places. This means that the main Windows Home Server shares should
appear in My Network Places. However, you might want to create a new
network place for a subfolder of a server share. To do this, follow
these steps:
Tip
You can tell Windows XP not to add new shared
resources to My Network Places automatically. To do this, launch Control
Panel’s Folder Options icon, display the View tab, and then deactivate
the Automatically Search for Network Folders and Printers check box.
1. | In the My Network Places (or any network folder) task pane, click Add a Network Place to launch the Add Network Place Wizard.
|
2. | Click Next.
|
3. | Click Choose Another Network Location, and click Next.
|
4. | Either
use the Internet or Network Address text box to type the UNC address of
the shared Windows Home Server folder, or click Browse to select the
folder using the Browse for Folder dialog box. Click Next.
|
5. | Modify the name in the Type a Name for This Network Place, if desired, and then click Next.
|
6. | To open the network place in a folder window, leave the Open This Network Place When I Click Finish check box activated.
|
7. | Click Finish.
|
Accessing Shared Folders on Your Mac
If you have the MacConnector software installed on
your Mac, you can use the Launchpad to access a shared folder. Follow
these steps:
1. | Open Launchpad on your Mac.
|
2. | Type the username and password of a Windows Home Server account.
|
3. | If you want Launchpad to save your credentials, click Options and then click Remember Me on This Computer.
|
4. | Press Return. The Launchpad window appears.
|
5. | Click Shared Folders. If this is the first time you’ve connected to the shared folders, your Mac asks you to log on.
|
6. | Type
the username and password for a Windows Home Server account, activate
the Remember This Password in My Keychain, and then click Connect. Your
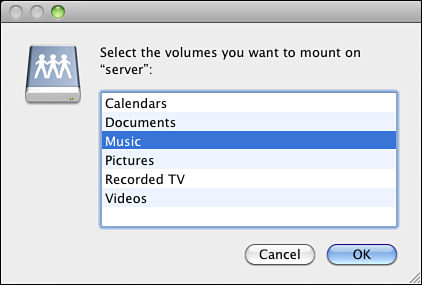
Mac displays a list of the Windows Home Server shared folders, as shown
in Figure 5.

|
7. | Click the shared folder you want to access.
|
8. | Click OK. Your Mac opens a Finder window for the shared folder. |