7. Massage the Start MenuThe
Start menu has gotten a face-lift for Vista, and not a moment too soon.
It's easier to configure and its arrangement makes quite a bit more
sense than its predecessor, and if you find it too cluttered, you can
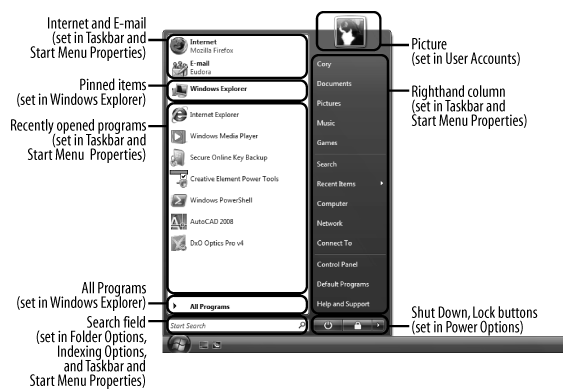
get rid of just about anything you don't use. Unfortunately, each element—or rather, elements in each region—are configured in slightly different ways, as shown in Figure 5. 
The contents of Vista's standard Start menu are divided into seven sections:
Pinned items
At the top of the lefthand
column, above the horizontal line, is a list of programs you can
customize. Right-click any application executable (.exe file) and select Pin to Start Menu
to add it to the list (the command isn't available if you're using the
"classic" Start menu discussed later). You can also drag shortcuts to
add them to the list, right-click unwanted items and select Remove from this list to delete them, or drag the entries to rearrange them. At
the top of the list, you'll see two special entries—Internet and
E-Mail—that aren't actually "pinned," but rather put in place by special
settings in the Taskbar and Start Menu window in Control Panel. To get
rid of them, right-click each one and select Remove from this list.
You can replace them with ordinary pinned items, or use the settings
designed for this purpose by right-clicking an empty area of the Start
menu, selecting Properties, and then clicking Customize. |
|
The pinned items list is peculiar because, unlike the All Programs folders and the Quick Launch toolbar, the pinned items aren't shortcuts on your hard disk. Rather, the pinned items are stored in the Registry in a format that makes them impractical to edit by hand. This means
that application installers can't litter your pinned items list with
unwanted icons, but it also introduces some annoying limitations for
day-to-day use. For example, if you rename a pinned item, Windows renames the target file! This means that if you pin Photoshop.exe or diskmgmt.msc—the executables for Adobe Photoshop and the Disk Management console file —and then remove the filename extensions to pretty up the
pinned entries, you'll render the programs inaccessible. To work around
this, create shortcuts to these items somewhere out of the way—perhaps a
subfolder of All Programs, discussed shortly—and then pin the shortcuts instead.
Recently used applications
Below the pinned items on
the left side is a dynamic list of recently used programs. The problem
with this list is that it is always changing, making it a poor choice to
store shortcuts to programs you need to use frequently. To remove the list entirely, right-click an empty area of the Start menu, select Properties, and turn off the Store and display a list of recently opened programs option. Or, to change the size of the list, click the Customize button here, and in the Start menu size box toward the bottom, adjust the Number of recent programs to display value. (If the section is grayed out, it's because the aforementioned Store and display option is turned off.)
All Programs
At the very bottom of the left column is a single entry, All Programs,
which contains the icons for the applications you've installed on your
PC, and is the most customizable area of the Start menu. The items in the All Programs menu are shortcuts on your hard disk, compiled from two sources. First, there are your personal shortcuts here: -
C:\Users\{username}\AppData\Roaming\Microsoft\Windows\Start Menu\Programs
and then there's the common (or "All users") folder here: -
C:\ProgramData\Microsoft\Windows\Start Menu\Programs
Although you can drag and drop
shortcuts in this list, it's usually a whole lot easier to work with the
folders directly in Windows Explorer, especially if you have a lot of
things to change. Resist
the temptation to consolidate your personal Start menu shortcuts and
the All Users shortcuts. Among other things, this can mess with
applications that place shortcuts in these locations automatically, and
can cause problems like the same program being run more than once each
time you start windows. Instead, just delete unwanted items from both
places, and add your own items only to your personal Programs folder. |
|
To remove the All Programs item from the Start menu, open the Group Policy Object Editor (gpedit.msc, which is not present on the Vista Home editions), and expand the branches to User Configuration\Administrative Templates\Start Menu and Taskbar. Double-click Remove All Programs list from the Start menu, select Enabled, and click OK. You'll have to log out and then log back in for this change to take effect. You can customize some of the aspects of this menu by right-clicking an empty area of the Start menu, selecting Properties, and then clicking Customize. If you turn on the Enable context menus and dragging and dropping
option, you'll be able to drag shortcuts and even right-click them to
customize them; turn off this option if you want them to stay put. Next,
turn on the Sort All Programs menu by name
option to keep the list sorted; or, if you turn it off, you can sort a
single folder on the fly by right-clicking any entry and selecting Sort by Name.
Search box
This is more than just a Search
box; it's also a quick and dirty replacement for the Run window. You
can type any program here—either the application name or the executable
filename—and press Enter to run the
program. Or, type the first few letters of the program to launch, and
then click the desired entry in the search results above. If
you've started a search you want to cancel, click the blue × button to
the right of the search text field to get your Start menu back. By default, search results here are limited to your personal documents, items in your All Programs
menu, and special locations like Control Panel. To broaden your
searches to include the entire index, right-click an empty area of the
Start menu, select Properties, and then click Customize. Scroll down the list to the Search files branch, and select Search entire index. Also in the Customize Start Menu window, you'll find three other search-related options. The first, Search, allows you to show or hide the Search entry in the righthand column of the Start menu (discussed shortly). The second, Search communications, includes email mailboxes and contacts from the Windows Mail program, and the third, Search favorites and history,
adds Internet Explorer bookmarks and recently visited web sites to your
searches. Turn off the latter two options to speed up searches made
from your Start menu.
The Picture Box
To change the picture, open the User Accounts page in Control Panel (or just click the picture), and then click Change your picture.
There's no way to remove the picture box—it's also used to provide
visual feedback as you hover the mouse over items in the righthand
column, as discussed next—but you can click Browse for more pictures and then choose a .bmp, .jpg, or .gif file of a solid color box if you want to de-emphasize it. You can, however, remove your name from beneath the picture by right-clicking an empty area of the Start menu, selecting Properties, and then clicking Customize. Under the Personal folder branch, select Don't display this item, and then click OK.
Righthand column
You have control over everything in the right column, but not directly. To get rid of any unwanted entries, right-click an empty area of the Start menu, select Properties, and then click Customize.
In the list you'll find each of these items—there are 15 in
all—interspersed with settings that affect other aspects of the Start
menu. In most cases, just clear the checkbox for the item, or if it's
shown as a folder here, just select Don't display this item to get rid of it. The only right-column entry you won't see in the Customize Start Menu window is Recent Items. To get rid of this entry, close the Customize Start Menu window, and turn off the Store and display a list of recently opened files option, something you may want to do anyway for privacy and security purposes. |
|
Among these items is also the Run command, which you may choose to hide even if you frequently use this feature. For one, the Search
box, discussed earlier in this section, is a more convenient "run"
tool; just type the filename or command you wish to run, and press Enter. Or, if you want the drop-down list of recently run items, you can hold the Windows logo key and R (Winkey+R) to open the Run window, even if Run isn't present in your Start menu.
Shut Down button
Last but not least is the red Shut Down button, which appears at the bottom of the right column along with a Lock this computer button and the tiny arrow that lets you switch users, restart, log off, put your PC to sleep , and shut down.
By
default, Windows puts your PC to sleep when you click the red button. |
|
To remove the Shut Down button et al., open the Group Policy editor (gpedit.msc, which is not present on the Vista Home editions), and expand the branches to User Configuration\Administrative Templates\Start Menu and Taskbar. Double-click Remove and prevent access to the Shut Down, Restart, Sleep, and Hibernate commands, select Enabled, and click OK.
You'll have to log out and then log back in for this change to take
effect. Of course, once that's done, the only way to shut down or
restart (necessary to undo the change) is to use the shutdown command-line tool , or press the physical power switch on your PC. When
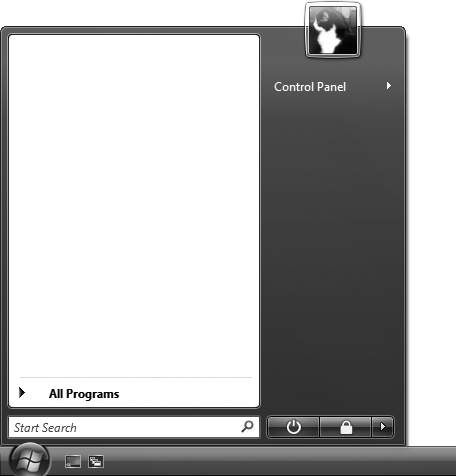
all is said and done, you'll have a leaner, cleaner Start menu that
contains only the items you actually want and use. If you like, you can
basically wipe the Start menu completely clean so that it looks like the
one in Figure 6, adorned only with the Search box and your custom picture. 
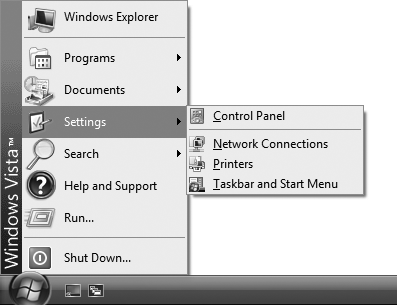
7.1. Customize the Classic Start menuThe
Classic Start menu style is not quite as flexible as the standard Vista
Start menu in terms of the items that can be removed, but it's more
flexible in the custom items you can add to the top level. The Classic
Start menu is also simpler and smaller, and will feel more familiar to
those coming from Windows 2000 or Windows 98. Figure 7 shows a somewhat slimmed-down Classic Start menu. 
The Classic Start menu is divided into only three sections:
Custom programs
The space above the
horizontal bar is a fully customizable free-for-all, and somewhat of a
saving grace for the Classic Start menu. In Figure 2-9,
there's a single shortcut to Explorer, but you can place any type of
shortcut here, and even include folders for further organization. These
entries are merely the shortcuts stored in your personal Start Menu folder: -
C:\Users\{username}\AppData\Roaming\Microsoft\Windows\Start Menu
and the common (or "All users") folder here: -
C:\ProgramData\Microsoft\Windows\Start Menu
To get to these folders quickly, right-click the Start button and select Explore. Inside each of these locations is a Programs folder, containing the items shown in the Programs menu, discussed next.
Programs
At the top of the lower section is a single entry, Programs, which is the "classic" counterpart to the All Programs menu covered in the previous section. When there are too many items in the Programs
menu to fit on the screen, one of two things can happen. Either the
menu "scrolls," which means you have to use the tiny arrows at the top
and bottom of the menu to navigate, or the items are clumsily spread
across multiple columns. To change this, right-click the Start button, select Properties, click Customize, and turn on or off the Scroll programs option. While you're here, you can also turn off the Use Personalized Menus option, which instructs Windows to stop hiding program icons you haven't used recently.
Windows items
The remaining entries in
the lower part of the Start menu are all seemingly "hardcoded," in that
you can't easily customize or hide most of them. To hide the Favorites or Log Off entries, right-click the Start button, select Properties, click Customize, and turn off the Display favorites or Display log off options, respectively. To remove any other entries here, like Search or Run, open the Group Policy Object Editor (gpedit.msc, which is not present on the Vista Home editions), and expand the branches to User Configuration\Administrative Templates\Start Menu and Taskbar. For instance, to remove the Documents menu, double-click the Remove Documents icon from Start Menu entry, select Enabled, and click OK. If you hide the Documents menu, you may also want to double-click the Do not keep history of recently opened documents entry and select Enabled; this not only stops Windows from tracking what you do on your PC, but it clears the history lists shown in some applications' File → Open and File → Save windows. |
|
Close the Group Policy Object Editor when you're done, and log out and then back in again for the changes to take effect. 8. Clean Up the TrayThe notification area as Microsoft calls it—or more commonly, the tray—is the box full of tiny icons on the far right side of your taskbar, next to the clock. It
made its first appearance in Windows 95, but it didn't take long for
most trays to get cluttered with junk from every program installed on
your PC. And since Microsoft wasn't too careful about establishing
standards for the icons put there, applications weren't too careful
about giving their customers control over those icons. As a result, many
applications won't let you remove their icons, and of those that do,
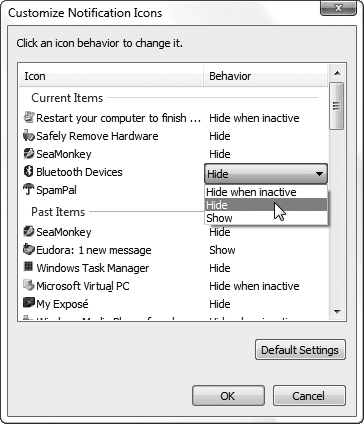
the process is different for each one. Microsoft snapped into action to solve the problem, and five years later came up with the Hide inactive icons feature. To clean up your tray, right-click an empty area of the taskbar, select Properties, and choose the Notification Area tab. Turn on the Hide inactive icons option, and then click Customize to open the Customize Notification Icons window shown in Figure 8. 
The active icons in your tray appear under Current Items, while those that have come and gone show up further down, under Past Items. To hide an icon, highlight it in the list, and then select Hide in the Behavior column. Click OK when you're done; the change takes effect right away. If
you've hidden at least one icon, a little white arrow appears to the
left of the tray (meaning that you won't save any space if you hide only
one icon). Just click the arrow to temporarily show hidden tray icons;
move the mouse away, and the arrow hides them again. Tired
of dealing with tray icons on a one-by-one basis? If you're using the
Vista Business or Ultimate edition, you can turn off the tray
completely. Open the Group Policy Object Editor (gpedit.msc, which is not present on the Vista Home editions), and expand the branches to User Configuration\Administrative Templates\Start Menu and Taskbar. Double-click Hide the notification area, select Enabled, and click OK. You'll have to log out and then log back in for this change to take effect. 9. Make Your Own Windows Startup LogoThe
pompous Microsoft Windows Vista logo that appears for the 30 seconds or
so it takes to boot your computer can be replaced with any image you
choose; it just takes a little hacking. First,
find an image you'd like to use. It can be a photo you took with a
digital camera or a picture you got off the Web. When you've got one,
use your favorite image-editing application—or, barring that, Vista's
Paint program (mspaint.exe)—to convert the file to the .bmp format. You'll actually need two .bmp
files, one resized to 800×600 and the other resized to 1024×768, but
both must have a 24-bit color depth. (If your photo doesn't conform to
the 4:3 aspect ratio, you'll need to crop it or add padding so that it
does.) Next, download and install the free Vista Boot Logo Generator from http://www.computa.co.uk/staff/dan/. (Note that at the time of this writing, this program only works with the 32-bit edition of Vista.) Start the program, click Browse for image on the left side, and locate the 800×600 .bmp file you just made. Then, click Browse for image on the right side, and locate the 1024×768 version. When that's done, select File → Save Boot Screen File As, name the file winload.exe.mui (the default) and save it to your desktop, and then close the Vista Boot Logo Generator. Open Windows Explorer and navigate to the C:\Windows\System32\en-US\ folder (if you're not using the United States-English edition of Windows Vista, choose the appropriate folder in place of en-US). Take ownership of the winload.exe.mui file in this folder, and then rename it to winload.exe.mui.backup. Now that the original file is out of the way, drag your custom winload.exe.mui file into the C:\Windows\System32\en-US\ folder. There's one more step: open the Start menu, type msconfig in the Search box, and press Enter to open the System Configuration window. Choose the Boot tab, and from the Boot options section, turn on the No GUI boot option. Click OK and then close the System Configuration window when you're done. To try out your new boot screen, restart Windows!
|