1. Selecting the Windows Home Server Region
In
Windows Home Server, you can specify the region you’re in. This
determines how Windows Home Server formats data such as numbers,
currency values, dates, and times. For example, depending on the region,
Windows Home Server would display August 7, 2011 in the short date
format as 8/7/2011 or as 7/8/2011.
Changing the Region in the Windows Home Server Dashboard
Here are the steps to follow to use the Windows Home Server Dashboard to change the current region setting:
1. | Launch the Windows Home Server Dashboard.
|
2. | Click Server Settings to open the Windows Home Server Settings dialog box.
|
3. | Click the General tab.
|
4. | Use the Country/Region Location of Server list to select the region and the language within that region.
|
5. | Click OK to put the new setting into effect.
|
Customizing the Region Formats
The Windows Home
Server Dashboard only enables you to switch from one region setting to
another. However, you might need to customize a particular region’s
formats. For example, you may select a region where the short date
format is d/m/yyyy but you’d rather use m/d/yyyy. Windows Home Server
enables you to customize the format not only of dates, but of times,
numbers, and currency values. Follow these steps:
1. | Log
in to the Windows Home Server machine and select Start, Control Panel,
Region and Language. Windows Home Server displays the Region and
Language dialog box.
|
2. | In the Formats tab, use the Format list to select a region and language, if you want something other than the displayed value.
|
3. | Use the Date and Time Formats lists to select the date formats and time formats you want to use.
|
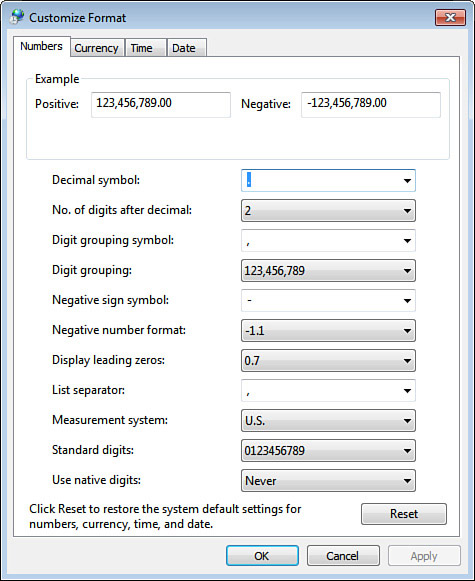
4. | Click Additional Settings. Windows Home Server displays the Customize Format dialog box, shown in Figure 1.

|
5. | Use the lists in the Numbers tab to customize how Windows Home Server displays numeric values.
|
6. | Use the lists in the Currency tab to customize how Windows Home Server displays monetary values.
|
7. | Use the lists in the Time tab to customize how Windows Home Server displays time values.
|
8. | Use the lists in the Date tab to customize how Windows Home Server displays date values.
|
9. | Click OK to return to the Region and Language dialog box.
|
10. | Click OK to put the new settings into effect. |
2. Configuring Windows Update
Windows
Update is a feature that keeps Windows Home Server up-to-date by
offering power packs, operating system fixes, security patches,
enhancements, and new features for download. You can check for new
updates at any time by selecting Start, All Programs, Windows Update to
load the Microsoft Windows Update website into the browser.
Rather than you
remembering to check for updates and then trying to figure out which
ones to download and install, Windows Home Server offers the Automatic
Updates feature. This takes the guesswork out of updating the server by
automatically checking to see whether updates are available, downloading
those that are, and then installing them, all without intervention on
your part. The next few sections show you how to configure Automatic
Updates and how to check for updates from within Windows Home Server.
Configuring Windows Update
When you started Windows
Home Server, the OOBE program asked you to choose a Windows Update
setting. If you want to change that setting, you can do it using the
Windows Home Server Dashboard, as described in the following steps:
1. | Launch the Windows Home Server Dashboard.
|
2. | Click Server Settings to open the Windows Home Server Settings dialog box.
|
3. | Click the General tab.
|
4. | Click
Change/Install Updates. The Dashboard opens the Windows Update window
for the server. (This looks like your local Windows Update window, but
it really is the server version.)
|
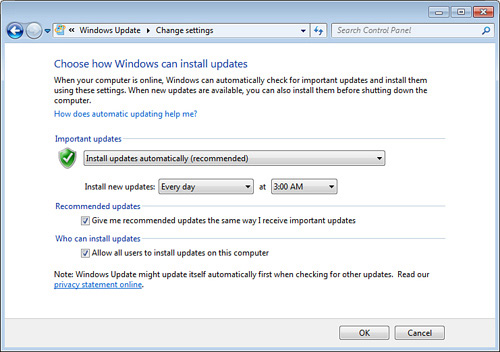
5. | Click Change Settings to open the Change Settings window, shown in Figure 2.

|
6. | Use the Important Updates list to select one of the following options:
- Install Updates Automatically—This
option tells Windows Home Server to download and install updates
automatically. Windows Home Server checks for new updates on the date
(such as Every Day or Every Sunday) and time you specify. For example,
you might prefer to choose a time when you won’t be using your computer.
Caution
Some updates require your
server to be rebooted to put them into effect. In such cases, if you
activate the Automatic option, Windows Home Server automatically reboots
your system. This might lead to problems if you have a particular
program that you need to be running at all times. You can work around
this problem by setting up an automatic logon and by setting up the
program to run automatically at startup. - Download Updates but Let Me Choose When to Install Them—If
you activate this option, Windows Home Server checks for new updates
and then automatically downloads any updates that are available. Windows
Home Server then displays an icon in the notification area to let you
know that the updates are ready to install. Click the icon to see the
list of updates. If you see an update that you don’t want to install,
deactivate its check box. Click Install to install the selected updates.
Tip
An update that you choose
not to install still appears in the Select Updates to Install window.
If you’d prefer not to see that update, right-click the update and click
Hide Update. If you later want to unhide the update, display the
Windows Update window and click the Restore Hidden Updates link. In the
Restore Hidden Updates window, activate the update’s check box, and then
click Restore.
- Check for Updates but Let Me Choose Whether to Download and Install Them—If
you activate this option, Windows Home Server checks for new updates
and then, if any are available, displays an icon in the notification
area to let you know that the updates are ready to download. Click the
icon to see the list of updates. If you see an update that you don’t
want to download, deactivate its check box. Click Start Download to
initiate the download. When the
download is complete, Windows Home Server displays an icon in the
notification area to let you know that the updates are ready to install.
Click the icon, and then click Install to install the updates.
- Never Check for Updates—Activate this option to prevent Windows Home Server from checking for new updates.
Caution
I strongly recommend that you not
choose to turn Windows Update off. All recent versions of Windows have
been plagued with security vulnerabilities, and Windows Home Server (or,
more accurately in this case, Windows Server 2008, which underlies
Windows Home Server) isn’t an exception. You need to keep your server
updated to avoid having your system—and, almost certainly, your entire
home network—compromised or damaged by malicious hackers.
|
7. | Click OK to put the new setting into effect.
|
Updating Windows Home Server
If you elected not to use
automatic updating, you need to watch out for available updates and
install the ones you want by hand. How do you watch for updates? The
easiest method is to watch the alert icons either in the Launchpad or
the Dashboard. When updates are ready for download, you see a warning
alert (a black exclamation mark on a yellow triangle). To make sure this
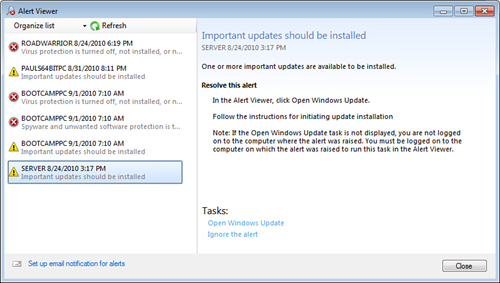
warning is update related, click the alert icon to open the Alert
Viewer, and then look for an alert similar to the one displayed in Figure 3.

Follow these steps to update the server:
1. | Launch the Windows Home Server Dashboard.
|
2. | Click Server Settings to open the Windows Home Server Settings dialog box.
|
3. | Click the General tab.
|
4. | Click Change/Install Updates. The Dashboard opens the Windows Update window for the server.
|
5. | Click Install Updates. Windows Home Server then downloads and installs the updates. |