1. Connecting a Printer or Other Device
It’s
easy to connect a printer either directly to your computer or to the
network to which your computer is connected, and to specify how it is to
be shared:
1. | Connect
the printer to your computer or to the network adapter you’ll be using.
Directions for this are usually on a small pamphlet that comes with
your printer.
|
2. | Make
sure the appropriate driver for your printer is installed on your
computer. (A driver is a piece of software that interprets the data
coming from a computer to the printer. Each type of printer needs its
own driver.) Install the printer driver by choosing the manufacturer and
model of the printer you’ll be using. If you don’t see it, click the
Windows Update button.
If you already
have the CD containing the printer driver for this printer, insert the
disc in the CD or DVD drive and click the Have Disk button. You’ll be
walked through the steps necessary to install the printer driver. When
you’re done, click Next. If
you choose to have Windows find and install the driver, Windows 7 will
do so and ask you for the name of the printer and whether you want to
share this printer with other computers in your HomeGroup. When that
process is finished, you’ll also be asked to print a test page to make
sure the printer is working properly. When you click the Finish button,
Windows returns you to the Devices and Printers page.
|
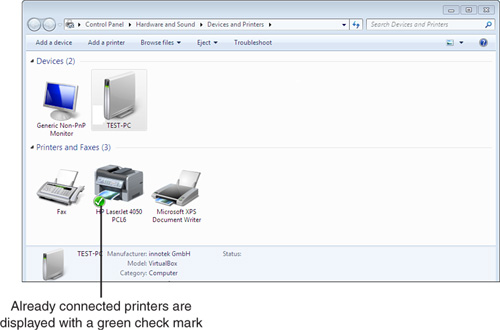
3. | You’ll see a screen similar to that shown in Figure 1,
with icons for the various computers and other devices Windows 7 has
detected are connected or available to either your computer or the
network to which your computer is connected. Those devices already
connected also have a green check mark.

|
4. | If
you double-click one of the icons with the green check mark, you’ll get
a description of the device and its network connection, and you’ll be
able to see what documents are in queue, whether the device is ready,
and other information. If you double-click one of the icons without the
green check mark, you’ll be able to configure it and connect it to your
computer or network.
Note
You
don’t have to add USB printer (one that connects directly to your
computer via the USB port) because Windows 7 scans for and automatically
detects such a printer at startup.
|
5. | If
you’re adding a local printer, you’ll be asked which port to use. Most
printers use the printer ports in the order shown (LPT1, LPT2, or LPT3).
If you’re adding another printer to a computer that already has a
printer attached, use LPT2 or LPT3. Then click Next.
|
Uninstalling a Printer
To uninstall a printer
(actually, you’ll just uninstall the printer driver; you can unplug the
printer anytime), click the question mark in the upper-right corner of
the page to bring up the Help menu, and type Uninstall. Follow the directions that appear, including clicking the appropriate links in the Help material.
Adding a Device Not Shown
If you want to add a device
that isn’t shown, such as a downloader for pictures taken on your
digital camera or cell phone, first connect the device, and then click
Add a Device.
Windows
searches for connected devices it hasn’t yet noted and displays icons
corresponding to them. Click the device and follow the instructions for
installing any device drivers.
2. Your HomeGroup
If
you are setting up a home network, Windows 7 can make the whole process
easier via a new facility called HomeGroup. A HomeGroup is a kind of
Windows 7 networking interface which makes it easy to share printers,
storage, and media in a home environment.
To set up your HomeGroup
1. | Select HomeGroup from the Control Panel.
|
2. | Next, click the Create a HomeGroup button.
|
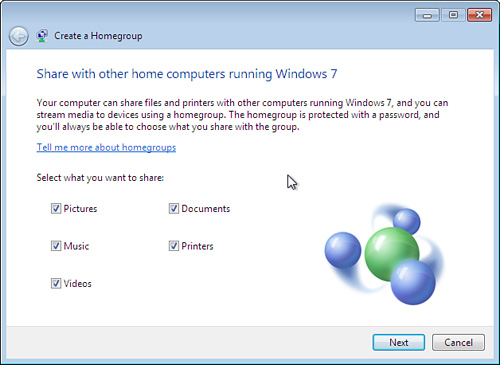
3. | On the next screen, select what kinds of information you want to share with others at home. See Figure 2.

|
4. | When done, click the Next button.
|
5. | Windows
7 displays a password screen that will let you share access to other
computers. Since this is a temporary password, write it down, including
capitalization. You can change it later.
|
6. | Click the Finish button. You have now added your computer to the network called HomeGroup.
Note
Note
that you can share libraries of files and folders and pictures, music,
and videos with other devices (such as wide-screen TV sets in the living
room, cell phones, or your children’s computers). And note that this
sharing is not secure, meaning that anyone connected to your HomeGroup
has access to these files.
|
7. | If
you want to set up streaming media to other devices, this is the place
to do it. Check the Stream My Pictures, Music, and Videos to All Devices
on my Home Network box and click the Save Changes button.
Otherwise, return to the Create a HomeGroup screen by clicking the left arrow in the upper-left corner of the screen.
|
8. | Next,
it’s important to change the password to one you’ll remember. Scroll
down to the lower half of the screen and click Change the Password.
You’ll need to confirm that you want to change the password.
|
9. | The
system will ask you for the new password, but will display a suggested
password. If you want to use the suggestion, simply click the Next
button. Otherwise, enter your own password (minimum eight characters),
one you’ll remember, and then click the Next button.
|
Tip
Every time a new user is
added to your HomeGroup, that user will need to enter the password
you’ve specified. Once you’ve logged into the HomeGroup, however, you
can select View or Print the Homegroup Password to give it to someone
else.
|
Strong passwords are a
combination of letters and numbers that make it difficult for a hacker
or an automatic password attacker to guess the right password. How
strong your password is depends on its length, complexity, and
randomness. It also depends on how well someone else can guess personal
details about you, such as the names and birthdates of your children,
your previous addresses or phone numbers, or pet names. And finally it
depends on whether you write down the password and store the information
in a place that could be found by others. Finally, viruses and other
forms of malware can log your keystrokes or invite you to enter personal
information in a bogus site; your networks can be wiretapped; and
dumpster diving means that someone else can go through your trash and
find personal data you’ve discarded.
In personal passwords, the most common number used is 1, and the most common letters are a, e, o, and r.
|
Tip
Adding
another computer to your HomeGroup is not quite the same as adding
another computer to your Home network. A HomeGroup is more about
securely sharing information, such as files, pictures, music, and video.
If a printer is connected through a USB connection to your computer,
only those who have the password to connect to the HomeGroup will have
access to it. A Home network is more about sharing devices, such as
printers, scanners, or faxes, or sharing a direct connection to another
computer, and doesn’t necessarily require knowledge of a password to use
these devices.
Changing Your Homegroup Password
At this point, anyone
with the right password will be able to access your HomeGroup and share
in the use of devices, files, pictures, music, and videos. So the most
important thing for you to do is to change the password, unless you feel
that the automatically assigned password is one you and your family
will easily remember.
To
change the password, on the HomeGroup screen click Change the Password.
Enter a password you’ll remember in the spaces provided and click Save
Changes. Now you can discard the automatically assigned password.