1. Inserting Special Characters
Windows 7 provides a special accessory program called Character Map that lets you insert into your programs those characters and symbols that aren't available on your keyboard. Character Map displays all the characters that are available for each of the fonts on your computer.
1.1. Find and Insert a Character
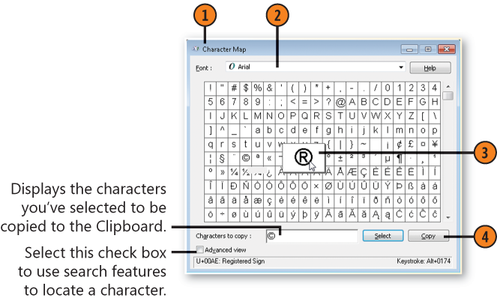
Start Character Map from the System Tools folder of the Start menu, or click the Start button, type char in the Search box of the Start menu, and choose Character Map from the menu to start the program.
Double-click the character you want to insert. Double-click any other characters that you want to insert at the same time.
Click Copy to place the character or characters on the Clipboard.
Switch
to your program, click where you want to insert the character or
characters, and paste the character or characters from the Clipboard
into your document. Format and edit the inserted text as desired.
Tip:
Some programs, such as
Microsoft Word, have their own tools for inserting special symbols. If
the program you're using has this feature, try it first to see whether
you prefer an alternative way of inserting symbols. The Character Map
program, however, works in any program that lets you paste text from the
Clipboard.

Note:
Try This!
In
Character Map, select a character you insert frequently, and note the
keyboard shortcut for the character in the bottom-right corner of the
Character Map dialog box. Switch to the program into which you want to
insert the character, hold down the Alt key, and use the numeric keypad, with NumLock turned on, to enter the numbers. Format the inserted character with a different font or font size if desired.
2. Crunching Numbers
Calculator
has two main modes—the basic configuration for standard number
crunching, and an expanded configuration that includes specialized
operations. The basic configuration includes a Standard calculator used for basic arithmetic operations, a Scientific calculator
that includes more advanced operations including geometric and
algebraic operations, a Programmer calculator to deal with bits, bytes,
and such, and a Statistics calculator for basic statistical analysis.
2.1. Use Calculator
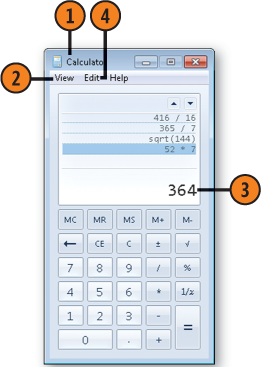
Start Calculator from the Accessories folder on the Start menu, or click the Start button, type calc
in the Search box of the Start menu, and choose Calculator from the
menu to start the program. If the Standard calculator isn't shown,
choose Standard from the Mode menu.
If you want a record of all your calculations, open the View menu and, if there is no check mark next to the History command, click History.
Use
Calculator as you would any calculator, either by clicking the number
buttons or by typing the numerals you want. Click or type the functions
you want to use, and enter any additional numbers. Click Equal or press
Enter when all numbers and functions have been entered.
If you want to copy your work, open the Edit menu and do either of the following:
Choose Copy to copy the current result.
Point to History, and choose Copy History to copy all your calculations.
Note:
Try This!
With History turned on, enter a series of calculations.
Use the up and down arrows to highlight the past calculations and see
the results of the highlighted calculations. With one calculation
highlighted, open the Edit menu, point to History, and choose Edit.
Modify the calculation and press Enter.
2.2. Make Advanced Calculations
From the View menu, choose any of the advanced modes to calculate your values:
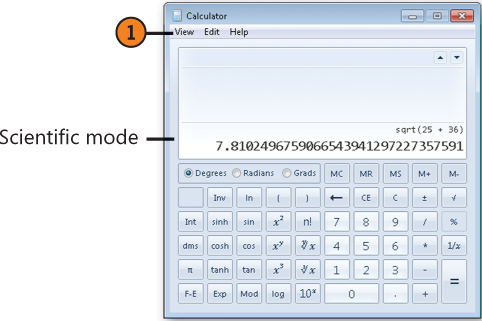
Choose Scientific, select your numbering system, enter values, and use the function keys to calculate your values.
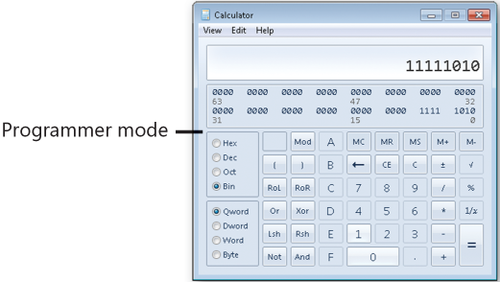
Choose Programmer, and use the numbering systems, enter values, and use the functions to calculate values.
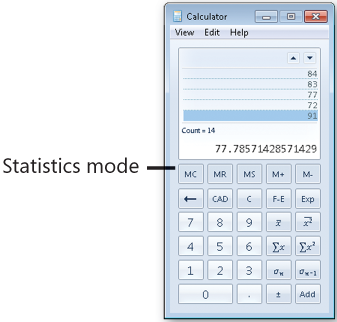
Choose
Statistics, and either enter your values, clicking Add after each value
to create your data set, or choose Paste from the Edit menu to paste a
data set that you had copied. Use the Dataset submenu on the Edit menu
to copy, edit, or clear the data set. Use the functions to calculate
your desired statistics on the existing data set.
