Until recently, it was a rare
household that included a Linux box as part of its computer collection.
That is changing rapidly, however, thanks to easy-to-use and
easy-to-install Linux distributions such as Ubuntu and new Linux-based
offerings from mainstream computer manufacturers such as Dell.
The good news is that Linux,
like OS X, supports SMB natively (via Samba, a free implementation of
the SMB protocols), so it’s possible for Linux machines to coexist on
your Windows Home Server network. In the sections that follow, I use the
Ubuntu distribution (specifically, Ubuntu 10.10, also known as Maverick
Meerkat) to access the Windows Home Server network. The procedures for
your Linux distribution should be similar.
Viewing the Windows Home Server Network in Ubuntu
Ubuntu isn’t set up
out-of-the-box to view and work with Windows shares that use NTFS. This
is a problem for Windows Home Server because all your shares are NTFS.
To fix this problem, you need to install the NTFS Configuration tool in
Ubuntu:
1. | Select Applications, Ubuntu Software Center to open the Ubuntu Software Center window.
|
2. | Type ntfs in the Search box. You should see NTFS Configuration Tool appear in the search results.
|
3. | Click NTFS Configuration Tool, and then click Install. Ubuntu asks you to authenticate the install.
|
4. | Enter your administrative password, and then click Authenticate.
|
Here are the steps to follow to open your workgroup and view the Windows Home Server shares:
1. | Select
Places, Network. The File Browser program opens and displays the
Network folder. If you see your network computers, skip to step 4.
|
2. | Double-click the Windows Network icon. You should now see the icon for your Windows Home Server workgroup.
|
3. | Double-click the workgroup icon. You should now see icons for each computer in your workgroup, as shown in Figure 1.

|
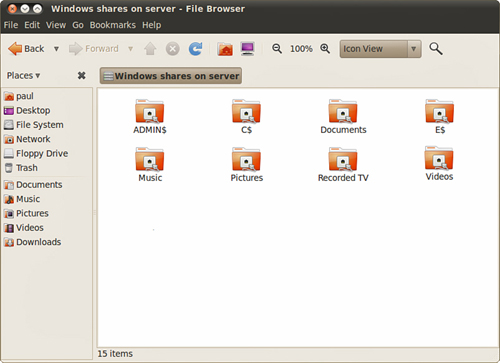
4. | Double-click the icon for the Windows Home Server computer. File Browser prompts you for your username and password.
|
5. | Type
your Windows Home Server username and password, leave the workgroup
name in the Domain field, and then click Connect. File Browser displays
the Windows Home Server shares, as shown in Figure 2.

|
Letting Windows Computers See Your Ubuntu Shares
The Linux support for SMB
cuts both ways, meaning that not only can you see and work with Windows
shares in Ubuntu, you can configure Ubuntu as a file server and enable
Windows computers to see and work with Ubuntu shares. The next few
sections show you how to set this up in Ubuntu.
Installing Samba in Ubuntu
Your first step is to install Samba by following this procedure:
1. | Select System, Administration, Synaptic Package Manager, enter your administrator password, and click OK.
|
2. | In the Quick Search text box, type samba. You see a list of packages that include “samba” in the name.
|
3. | In the Package list, click the check box beside samba and then click Mark for Installation.
|
4. | Click Apply.
|
5. | Synaptic Package Manager displays a list of the changes to be applied.
|
6. | Click Apply. Synaptic Package Manager downloads and installs the software.
|
7. | Click Close.
|
Defining Samba Users in Ubuntu
Next, you need to define one or
more users who can access Samba shares. For this to work, you need to
set up the same username and account on both the Ubuntu box and the
Windows PC.
Tip
The
following couple of sections use Terminal to configure Samba. If using
the command line seems too retro, there is a graphical Samba interface
that you can use. Run the Synaptic Package Manager, search for
system-config-samba, and then install that package. You can then select
System, Administration, Samba to configure the Samba users, the
workgroup name, and even the Samba shared folders.
Assuming you already have your Windows users configured, follow these steps to add a user in Ubuntu:
1. | Select System, Administration, Users and Groups.
|
2. | Click Add. Ubuntu asks you to authenticate.
|
3. | Type your administrator password, and click Authenticate.
|
4. | Type
the person’s name and the account’s short name (that is, the username).
Again, make sure this is a username that exists on the Windows PC
you’ll be using to access the Ubuntu shares.
|
5. | Click OK. Ubuntu asks for the user’s password.
|
6. | Type the user password and the password confirmation.
|
7. | Click OK to add the user.
|
8. | Repeat steps 2–7 to add other users.
|
9. | Click Close.
|
Now you can add these users to Samba. Here are the steps to follow:
1. | Select Applications, Accessories, Terminal to launch a terminal session.
|
2. | Type the following command (where user is the username), and then enter your administrative password when prompted:
|
3. | Ubuntu displays the following prompt:
[sudo] password for user:
|
4. | Type
the user account’s password (you won’t see characters onscreen while
you type), and then press Enter. Ubuntu displays the following prompt:
|
5. | Type the user account’s password, and then press Enter. Ubuntu displays the following prompt:
|
6. | Type the user account’s password again, and press Enter. Ubuntu adds the user.
|
7. | Reload Samba by typing the following command and pressing Enter:
|
8. | Repeat steps 2–7 to add the other users to Samba.
|
You need the terminal session for the next setup task, so leave the session running for now.
Changing the Samba Workgroup Name in Ubuntu
In the latest versions of
Samba, the default Samba workgroup name is WORKGROUP, which is likely to
be the same as the workgroup name you use for your Windows Home Server
network. However, older versions of Samba used MSHOME as the default
workgroup name. If you’re running an older version of Samba, or if your
Windows Home Server workgroup name is something other than Workgroup,
then for easier access to the Ubuntu shares, you should configure Samba
to use the same workgroup name that you use for your Windows network.
Here are the steps to follow:
1. | If you don’t already have a terminal session running from the previous section, select Applications, Accessories, Terminal.
|
2. | Type the following command, and press Enter:
sudo gedit /etc/samba/smb.conf
|
3. | If you see the Password prompt, type your Ubuntu password, and press Enter. The gedit text editor loads and opens smb.conf, which is the configuration file for Samba.
|
4. | Locate
the workgroup line, and change the value of the workgroup parameter to
the name of your Windows Home Server workgroup. For example, if your
network uses the name workgroup, the line should appear as follows:
|
5. | Select File, Save (or press Ctrl+S or click the Save button).
|
6. | Select File, Quit (or press Ctrl+Q) to return to the terminal session.
|
7. | Select File, Close Window (or press Ctrl+Shift+Q).
|
Tip
If you want to change the
name of the Ubuntu computer, you must install the gnome-network-admin
package using Synaptic Package Manager. Once that’s done, select System,
Administration, Network to open the Network Settings dialog box. Click
Unlock, and then enter your administrative password. Display the General
tab, modify the Host Name setting, and then click Close.
Sharing a Folder in Ubuntu
You’re now ready to share a folder or two for Windows users to access. Use these steps:
1. | Select Places, Home Folder to open File Browser and display your Ubuntu home folder.
|
2. | Display the icon for the folder you want to share.
|
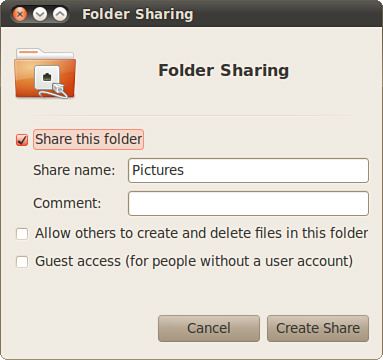
3. | Right-click the icon, and then click Sharing Options. Ubuntu displays the Folder Sharing dialog box.
|
4. | Click to activate the Share This Folder check box, as shown in Figure 3.

|
5. | Modify the name, if necessary.
|
6. | If
you want Windows users to be able to change the contents of the folder,
activate the Allow Others to Create and Delete Files in This Folder
check box.
|
7. | Click Create Share. Ubuntu lets you know that it needs to add some permissions.
|
8. | Click Add the Permissions Automatically.
|
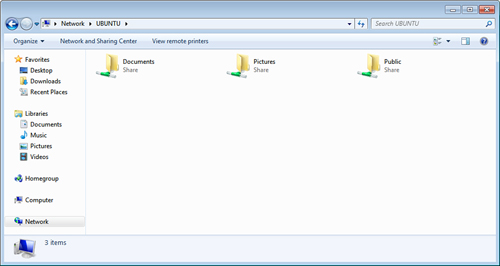
To work with the Ubuntu machine, open your workgroup as shown in Figure 4
and look for the icon that has the same name as the Ubuntu computer.
Double-click that icon, and Windows displays the Ubuntu shares, as shown
in Figure 5. Double-click a share icon, and then enter the username and password of a Samba account on the Ubuntu box to access the share.

