Creating Data Redundancy Using Mirrored Volumes
A spanned volume is an easy way to set up a dynamic
storage pool using multiple drives, which is great if you don’t want
your data needs being cramped by a single hard drive. However, what if
your concerns are more about data redundancy? That is, if you want to
minimize server downtime, then the best way to do that is to have a
redundant set of data on another hard drive. That way, if the original
hard drive goes down for the count, you can still keep the server
running off the redundant data on the other drives.
Drive Extender accomplished this by using folder
duplication to maintain two copies of any shared folder file on multiple
hard drives. You can replicate this data redundancy fairly well by
setting up another drive or partition as a mirror
of the original. Windows Home Server maintains exact copies of the data
on the mirror drive, and if the original drive dies, the server still
continues to function by using the mirrored data.
There are a couple of ways you can go about this:
If you have a single hard drive and plan on
leaving your system files and data on that drive, then you can add a
second hard drive of the same size (or larger) and use this new hard
drive as a mirror for your original data.
If
you’ve added a second hard drive and are using it to store important
data (such as ripped movies or recorded TV shows), then you can add a
third drive of the same size (or larger) and use this new drive as a
mirror of the data drive.
Of course, there’s nothing stopping you from
combining both techniques, depending on your data needs (and your hard
drive budget!).
Here are the steps to follow to mirror a partition:
1. | Log on to the Windows Home Server machine.
|
2. | In the taskbar, click Server Manager to open the Server Manager window.
|
3. | Select Storage, Disk Management to display the Disk Management snap-in.
|
4. | Make
sure the disk you want to use for the mirror has no current partitions.
If it does have partitions, then for each one right-click the partition
and click Delete Volume.
|
5. | In
the list of partitions in the lower half of the Disk Management pane,
right-click the partition you want to mirror, and then click Add Mirror.
The Add Mirror dialog box appears.
|
6. | Click
the disk you want to use for the mirror, and then click Add Mirror.
Disk Management warns you that the disk to be mirrored must be converted
to a dynamic disk and asks you to confirm this conversion.
|
7. | Click Yes. Disk Management converts the disk to dynamic and then starts mirror the partition to the other hard drive.
|
8. | Repeat steps 5 to 7 for any other partitions you also want to mirror. Figure 4
shows the Disk Management snap-in with two mirrors: On Disk 0, drives
C: and E: are being mirrored to same sized partitions on Disk 1. The
original sync might take as little as a few minutes or as much as a few
tens of hours, depending on how much data is to be mirrored.

|
Mimicking Drive Extender by Creating a RAID 5 Volume
So far you’ve seen that you can mimic Drive
Extender’s expandable storage pool by creating a spanned volume that
stores data in a single storage area that encompasses two or more hard
drives.
Similarly, you saw that you can mimic Drive Extender’s folder
duplication by creating mirrored volumes that store each file and folder
on two or more hard drives . These are easy-to-implement techniques that can be really useful, depending on your data and safety needs.
However, there’s a third technique that I want to
show you that combines spanning and mirroring, and also includes a bit
of load balancing (writing to a second hard drive if one hard drive is
busy), so it comes closest to mimicking all the features of Drive
Extender. This is called RAID (Redundant Array of Inexpensive Disks)
level 5, and it has the following characteristics:
Three-drive minimum— The implement a RAID 5 volume, you require at least three empty drives.
Expandable storage pool—
A RAID volume is expandable, so you can add more drives to increase the
size of the storage pool. In a three-drive RAID setup, the total
available storage space in the volume will be twice the size of the
smallest drive, in a four-drive setup it will be three times the
smallest drive, and so on. Therefore, it’s best to use drives that are
the same size to maximum the available storage area.
Data protection— One of the RAID drives is used as a so-called parity volume, means which it monitors data integrity to prevent data corruption.
Data redundancy—
The other RAID drives are used to store data, with each file and folder
being stored multiple times. This means that if one of the data drives
fails, you don’t lose any data.
Load balancing—
RAID monitors drive activity, and if one of the data drives is busy
reading or writing data, RAID uses the other drive to perform the
current read or write operation.
Fault tolerance—
In a RAID setup, if any hard drive goes down, the entire array remains
operational and you don’t lose any data. However, it’s always best to
replace the faulty drive as soon as possible, because if a second drive
goes down, you lose everything.
Are there negatives to consider? Yes, as usual:
Not applicable to the system drive—
You can’t incorporate the Windows Home Server system drive into a RAID
volume, so the RAID advantages don’t apply to the system files partition
(drive C:). However, once you’ve built the array, you can move the
Windows Home Server client backups and shared folders to the RAID
volume.
Slow— The type of RAID we’re talking about here is called software RAID
because the entire array is maintained and utilized by a software
program. Software is inherently slower that hardware, so you might see
quite a performance drop when you use a RAID volume, particularly for
things like streaming media files.
Tip
What’s the solution to slow software RAID? Speedy hardware RAID!
This means that you add a RAID-dedicated hardware device to your
server, and that device manages the array. Because the device works
directly with the drives (bypassing the CPU), hardware RAID is many
times faster than software RAID. Although several types of hardware RAID
are available, the most common solution is to insert a RAID controller
card inside your server. These cards usually come with multiple SATA
ports (usually 2, 4, or 8) and you attach your hard drives directly to
these controller card ports instead of the motherboard SATA ports. When
you start your server, you see an option to invoke the controller card
setup routine, which enables you to choose the disks you want in the
array and what type of RAID level you prefer.
Expensive— Since RAID 5 requires a minimum of three hard drives (not including the Windows Home Server system drive), it can get quite expensive.
Possibly not available for backup— If your RAID 5 volume exceeds 2TB, Windows Home Server won’t include it in the server backup.
With all that in mind, if you want to implement a RAID 5 volume on your server, follow these steps to set it up:
1. | Log on to the Windows Home Server machine.
|
2. | In the taskbar, click Server Manager to open the Server Manager window.
|
3. | Select Storage, Disk Management to display the Disk Management snap-in.
|
4. | In
the list of hard drives in the lower half of the Disk Management pane,
right-click one of the drives you want to include in the RAID 5 volume
and then click New RAID-5 Volume. Disk Management runs the New RAID-5
Volume Wizard.
|
5. | Click Next. The Select Disks dialog box appears.
|
6. | In the Available list, click a disk you want to include in the volume, and then click Add.
|
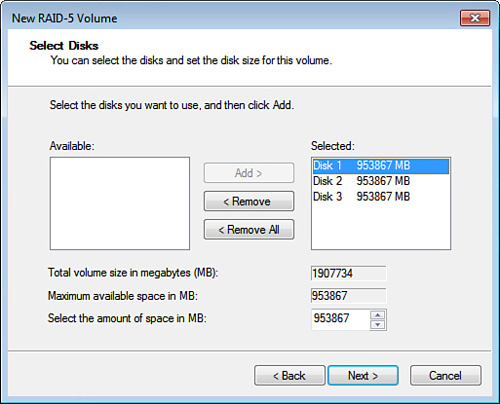
7. | Repeat step 6 to add any other drives you want to include in the volume. Figure 5 shows a RAID 5 volume with three disks added (the minimum).

|
8. | Click Next. The Assign Drive Letter or Path dialog box appears.
|
9. | Choose a drive letter and then click Next. The Format Volume dialog box appears.
|
10. | Assign a Volume Label, if needed, leave the other options as is, and then click Next. The last wizard dialog box appears.
|
11. | Click Finish. Disk Management warns you that it must convert the disks to dynamic disks and asks you to confirm.
|
12. | Click Yes. Disk Management creates the RAID 5 volume.
|
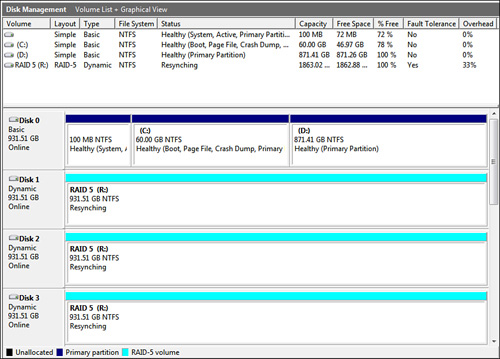
Figure 6 shows how the new RAID 5 volume (drive R:, in this case, combining Disk 1, Disk 2, and Disk 3) appears in Disk Management.

With
your RAID 5 volume at the ready, you can move Windows Home Server’s
Client Computer Backups folder and its shared folders from their default
locations to the RAID 5 volume.