Letting Windows Computers See Your Mac Shares
SMB not only lets your Mac
see shares on the Windows Home Server network, it also can let Windows
PCs see folders shared by the Mac. This feature is turned off by default
in OS X, but you can follow these steps to turn it on:
1. | Click the System Preferences icon in the Dock.
|
2. | Click Sharing to open the Sharing preferences.
|
3. | Click to activate the File Sharing check box.
|
4. | Click Options to open the Options sheet.
|
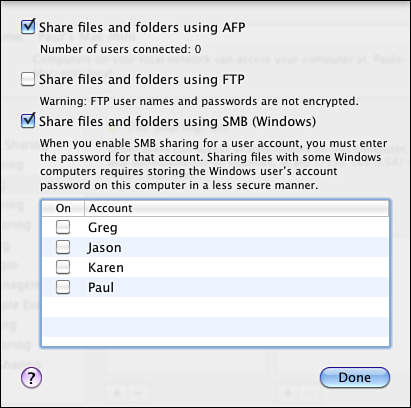
5. | Click to activate the Share Files and Folders Using SMB (Windows) check box, as shown in Figure 9.

|
6. | Click
to activate the check box beside a user to enable SMB sharing for that
user, enter the user’s password when prompted, and then click OK.
Tip
For easiest sharing, enable SMB sharing for accounts that also exist on the Windows machines.
|
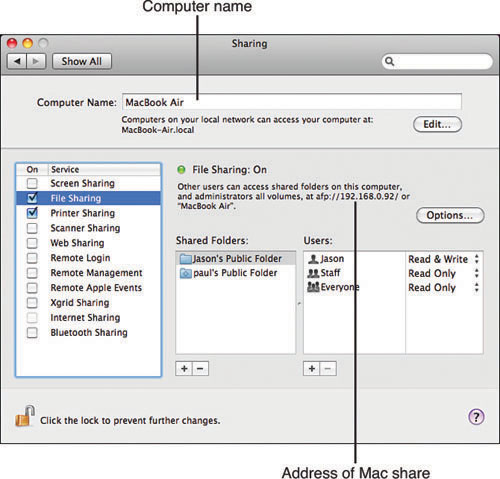
7. | Click Done. The Sharing window shows you the address that Windows PCs can use to access your Mac shares directly, as shown in Figure 10.

Tip
Macs often end up with
long-winded computer names such as Paul McFedries’ Computer. Because you
need to use the computer name to log on to the share, consider editing
the Computer Name field to something shorter.
|
8. | Select System Preferences, Quit System Preferences.
|
One way to access the Mac
shares from a Windows PC is to enter the share address directly, using
either the Run dialog box or Windows Explorer’s address bar. You have
two choices:
\\IP\user
\\Computer\user
Here, IP is the IP address shown in the OS X Sharing window (see Figure 11), Computer is the Mac’s computer name (also shown in the OS X Sharing window), and in both cases, user
is the username of the account enabled for Windows Sharing. For
example, I can use either of the following addresses to access my Mac:
\\192.168.0.92\paul
\\Pauls-Mac-mini\paul

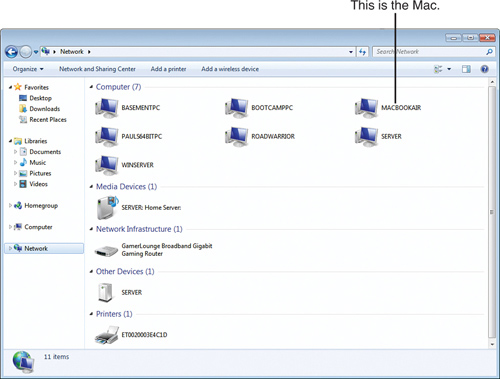
Alternatively, open your workgroup as shown in Figure 3.13 and look for the icon that has the same name as the Mac’s computer name (shown in Figure 10). Double-click that icon.
Note
If you don’t see the icon for
your Mac, it could be that the Mac isn’t set up to use the same
workgroup as your Windows Home Server network. (Both OS X and Windows
Home Server use the name Workgroup by default, but you never know.) To
check this, open System Preferences, click the Network icon, click the
network interface you’re using (usually either Ethernet or AirPort), and
then click Advanced. Click the WINS tab, make sure the Workgroup value
is the same as your Windows Home Server workgroup name, click OK, and
then click Apply.
Either way, you’re
prompted for the username and password of the Mac account that you
enabled for SMB sharing. (If your Windows user account uses the same
username and password, you go directly to the Mac share.) For the
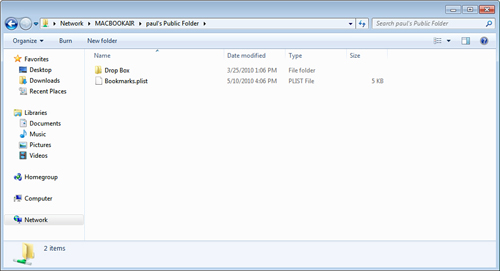
username, use the form Computer\UserName, where Computer is the name of your Mac and UserName is the name of the SMB sharing account. Figure 12 shows a Mac share opened in Windows Home Server.

Tip
If
you have trouble logging on to your Mac from Windows Vista, the problem
is likely caused by Vista’s use of NT LAN Manager version 2 (NTLMv2)
authentication, which doesn’t work properly when negotiated between some
versions of Vista and some versions of OS X. To fix this, on the Vista
PC, press Windows Logo+R (or select Start, All Programs, Accessories,
Run), type secpol.msc,
click OK to open the Local Security Policy snap-in, and enter your User
Account Control (UAC) credentials. Open the Security Settings, Local
Policies, Security Options branch. Double-click the Network Security:
LAN Manager Authentication Level policy, change the authentication level
to Send LM & NTLM - Use NTLMv2 Session Security If Negotiated, and
then click OK.
If your version of Vista
doesn’t come with the Local Security snap-in (it’s not available in Home
and Home Premium), open the Registry Editor (press Windows Logo+R, type
regedit, and click OK), and navigate to the following key:
HLM\SYSTEM\CurrentControlSet\Control\Lsa\
Change the value of the LMCompatibilityLevel setting to 1.