3. Creating Quotas and Auto Quotas
To create a quota or auto quotas, follow these steps.
In the File Server Resource Manager, expand Quota
Management.
Right-click Quotas in the console tree and choose Create
Quota.
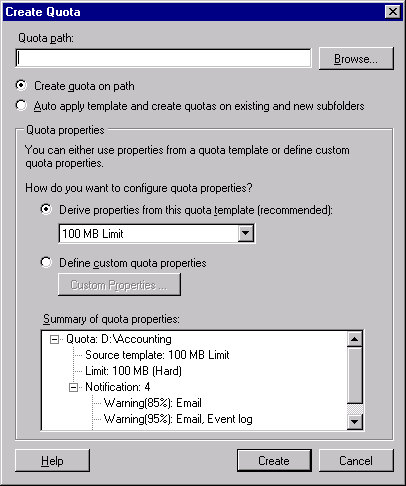
The Create Quota dialog box opens, as shown in Figure 4.

Click Browse, select the folder to which you want to apply
a quota, and then click OK.
To create a quota that limits the size of a folder,
including all subfolders, select the Create Quota On Path
option. To create an auto quota, which limits the size of
subfolders individually (useful for setting quotas on the \Users
folder), select the Auto Apply Template And Create Quotas On
Existing And New Subfolders option.
Select the quota template you want to apply, or choose
Define Custom Quota Properties and click Custom Properties to
create a custom quota. (You cannot create custom quotas for
auto quotas.) Click Create when you are
finished.
If you chose to create a custom quota, the Save Custom
Properties As A Template dialog box appears. Use this dialog box
to save the custom quota as a quota template, or choose Save The
Custom Quota Without Creating A Template.
To create a directory auto quota from a command prompt, use
the Dirquota Quota Add command. For example, open a command
prompt window and then type the following command:
Dirquota AutoQuota Add /Path:E:\Users /SourceTemplate:"200 MB Limit Reports
To User" /Remote:Srv1
Note:
Use quota templates instead of custom quotas whenever
possible. A quota template allows you to make changes to the
template that apply to all quotas derived from the template. For
example, to change the administrator email address for all quotas
on a server, edit the appropriate quota templates and then apply
these changes to all quotas. This eliminates the need to manually
update each quota.
4. Viewing and Managing Quotas
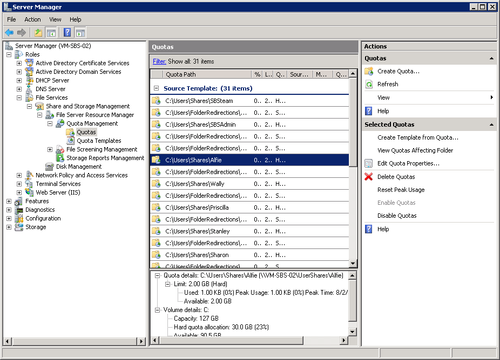
To view the particulars of a quota, highlight it in the File
Server Resource Manager and view the details in the lower pane as
shown in Figure 5.

Use the following sections for additional quota
management.
To filter the display by quota type or path, click the
Filter hyperlink and then use the Quota Filter dialog
box.
To disable a quota, right-click the quota and select
Disable Quotas. To enable a quota, right-click the quota
and select Enable Quotas.
To reset the peak-usage data, select the quota,
right-click, and select Reset Peak Usage.
5. Creating and Editing Quota Templates
Quota templates enable you to quickly apply standardized quota
settings, as well as simultaneously update all quotas that make use
of a template—when you edit a quota template, Windows gives you the
option to update all quotas based on the template. To create or edit
a quota template, follow these steps:
In the File Server Resource Manager console, right-click
Quota Templates and choose Create Quota Template, or right-click
an existing quota template and choose Edit Template Properties.
To create a quota template based on an existing quota,
right-click the quota and choose Create Quota From
Template.
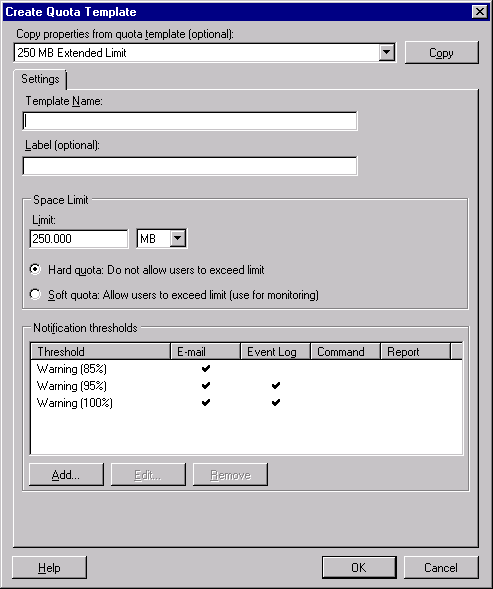
To base the template on an existing template, in the
Create Quota Template dialog box choose a template from the Copy
Properties From Quota Template box and then click Copy, as shown
in Figure 6.

Type a name and label for the template in the Template
Name and Label boxes.
In the Limit box, type the maximum amount of disk space
each user can utilize in the specified folder.
Choose Hard Quota to prevent users from exceeding the
limit you specify, or Soft Quota to use the quota only for
monitoring.
In the Notification Thresholds section of the dialog box,
click Add to create a new notification, or select an existing
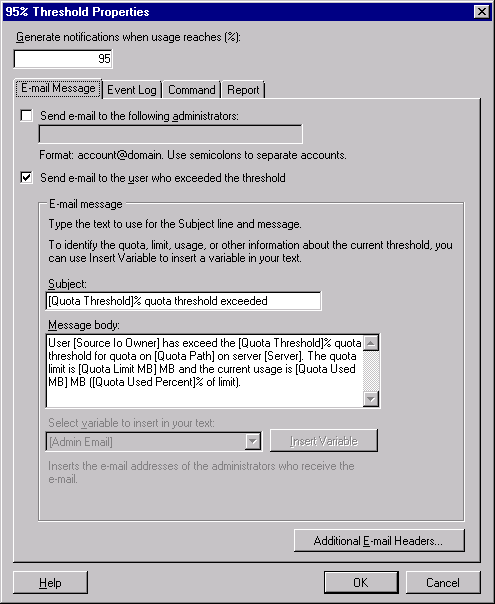
notification, and then click Edit to open the properties for the
threshold, as shown in Figure 7.

In the Generate Notifications When Usage Reaches box,
specify when to notify users. A typical configuration is to use
three notification thresholds, which are often set at 85
percent, 95 percent, and 100 percent.
Specify what actions to take when a user exceeds the
threshold you specify, and click OK when you are
finished:
Use the E-Mail Message tab to send an email
notification to users who exceed the threshold. (You can
also choose to send the notification to an administrator.)
Use the E-Mail Message section of the tab to customize the
message that Windows generates.
Use the Event Log tab to record a log entry on the
server when a user exceeds the threshold.
Use the Command tab to run a command or script when a
user exceeds the threshold.
Use the Report tab to generate a storage report when a
user exceeds the threshold.
Click OK when you’re finished. If you’re editing an
existing template, the Update Quotas Derived From Template dialog box opens.
Choose one of the following options and then click OK:
Apply Template Only To Derived
Quotas That Match The Original Template Updates quotas based on the
quota template only if you have not customized
them.
Apply Template To All Derived
Quotas Updates all quotas based on the quota
template.
Do Not Apply Template To Derived
Quotas Does not update any quotas based on the
template.