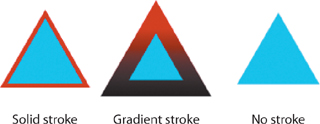
Change stroke color and weight
Stroke
is the line or outline that defines a shape you draw in Flash
Catalyst—as in the “stroke of the pen” or “brush strokes.” In Flash
Catalyst, you can choose a solid stroke, a gradient stroke, or no stroke
at all.
A gradient is when two or
more colors gradually blend together. A gradient stroke may seem
strange, but if you make the weight of the stroke heavy enough, it
becomes almost like an outer shape surrounding an inner shape.
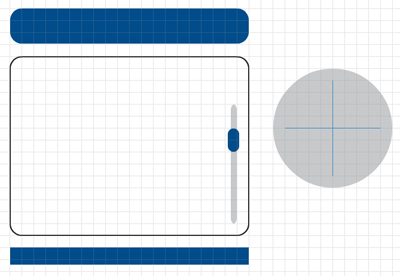
Our panel design doesn’t
require any fancy gradient strokes, but we do need to make a few minor
modifications, beginning with the panel background.
1. | Select the Panel Background rectangle (the larger rectangle).
|
2. | In
the Properties panel, make sure the Solid Stroke property is selected.
Click the Stroke color swatch, and change the stroke color to black #000000.
|
3. | Change the Weight value to 2.

|
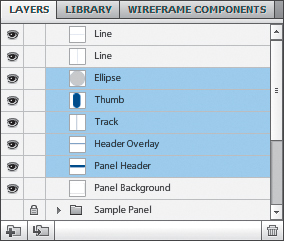
4. | Use the Layers panel to select the Ellipse, Thumb, Track, Header Overlay, and Panel Header.
|
5. | In the Properties panel, click the No Stroke property to remove the stroke from all five selected shapes.
|
6. | Choose Edit > Deselect All so that you can see the change a little better.
Note
Removing the stroke from a rectangle reduces its overall height and width.
|
Add and modify gradient fills
Let’s add a gradient fill to
the Panel Header and the Header Overlay. Then, we’ll place the overlay
on top of the header to hide the bottom rounded corners.
1. | Select the Panel Header rectangle.
|
2. | In the Properties panel, select the Gradient fill property.
A gradient swatch displays a preview of the gradient from left to right.
Beneath the swatch are gradient color stops. They’re called stops
because they control where one color stops and the next one begins.
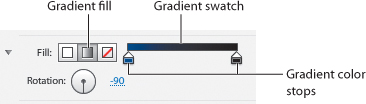
By default, there are two color stops. The first stop is the current
shape’s fill color (blue). The last stop is black. The artboard shows a
gradient fade from blue to black.

|
3. | Click anywhere in the gradient swatch to add another color stop.
A new color stop takes on the color of the stop to its left.
|
4. | Click directly on the new stop to open the Color Picker.
You can change the color and the opacity of each color stop.
|
5. | Select white in the color palette.
The new stop color is white. In the artboard, the fill color fades from blue to white and then to black.
|
6. | Drag the white color stop left and right to see how this affects the gradient fill in the artboard.
You can add more color stops. You can also move the first and last stops to adjust where the fades begin and end.
|
7. | Drag the white color stop (and any other extra stops you’ve added) away from the gradient swatch to remove it.
You’re back to where you started, with a blue and black color stop.
Note
You cannot remove stops when
there are only two stops left. You can remove the first or last stops
as long as other stops exist in the middle.
|
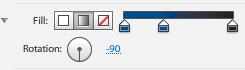
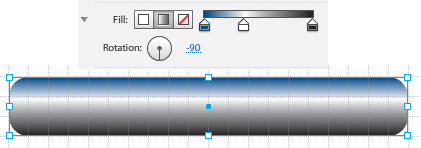
8. | In the Properties panel, change the Fill Rotation value to 80. Make sure you change the Fill Rotation, not the Rotation for the shape.
The gradient fades from blue to black at an angle, making it a little more interesting.

|
9. | Select the Header Overlay rectangle.
|
10. | In the Properties panel, select the Gradient Fill property and change its Fill Rotation value to 80.
The same blue to black gradient is added to the Header Overlay rectangle.
|
11. | Shift-click the Panel Header rectangle to add it to the selection.
|
12. | With both parts of the header selected, choose Modify > Align > Bottom. Then choose Modify > Align > Left.
|
13. | Choose Edit > Deselect All.
|
14. | Choose View > Grid > Show Grid to deselect it and hide the grid.
The combined shapes make a panel header that’s square on the bottom with
rounded top corners. The shapes are different sizes so the gradient
rotation creates a seam. To hide the seam, you can change the Rotation
value for one of the shapes until the gradient patterns line up
perfectly.

|
15. | Select
the Header Overlay rectangle (the smaller of the two rectangles). In
the Properties panel, change the Fill Rotation value to 5.
Note
If you select multiple
objects with different gradients (or some with no gradients), the
properties show that no gradient is applied. Clicking the blank gradient
swatch resets all items to the default black-and-white gradient.
|
16. | Choose Edit > Deselect All.
The gradient patterns line up and the seam is gone.

|
Note
A checkerboard pattern in the gradient swatch indicates areas of transparency.