1. Changing the Default Document
Each time you open a new
document in Dreamweaver, a blank page is created. The code that makes up
that blank page depends on which document type you choose — HTML, XML,
ColdFusion, or ASP.NET, among others. The default documents on which the
new pages are based are all stored in the Dreamweaver
CS5\Configuration\DocumentTypes\NewDocuments folder. A selected default
page works in a similar fashion to the templates in that you can create
new documents from it, but no editable or locked regions exist —
everything in the page can always be altered. For example, the basic
HTML document is a bare-bones structure with only a few properties
specified — a document type and a character set:
<!DOCTYPE html PUBLIC "-//W3C//DTD XHTML 1.0 Transitional//EN" i"http://www.w3.org/TR/xhtml1/DTD/xhtml1-transitional.dtd">
<html xmlns="http://www.w3.org/1999/xhtml">
<head>
<meta http-equiv="Content-Type" content="text/html; charset=utf-8" />
<title>Untitled Document</title>
</head>

<body>
</body>
</html>
Naturally, you can change any of
these elements — and add many, many more — after you've opened a page.
But what if you want to have a <meta>
tag with creator information in every page that comes out of your Web
design company? You can do it in Dreamweaver manually, but it's a
bother; and chances are good that you'll forget. Luckily, Dreamweaver
provides a more efficient solution.
In keeping with its
overall design philosophy of extensibility, Dreamweaver enables you to
modify the default file as you would any other file. Just choose File =>
Open and select the appropriate file from the Dreamweaver
CS5\Configuration\DocumentTypes\NewDocuments folder. After you have made
your changes, save the file as you would normally. Now, to test your
modifications, choose File => New and select your document type. Your modifications appear in the new document.
2. Editing Content in the Browser
One of the primary uses of
Dreamweaver templates is updating client sites. With primary portions of
the design, such as the logo and navigation, locked targeted editable
areas, Web page content can quickly be modified. However, to make any
changes on pages derived from Dreamweaver, you'd typically need a
desktop tool such as Adobe Contribute or Dreamweaver itself. Many site
owners are more business-oriented than Web savvy and don't have the
skills or time to devote to mastering a software package. For them, the
solution is Adobe InContext Editing.
InContext Editing is an
in-browser editing service, using Web pages with special markup from
Dreamweaver. These pages can be modified using any modern browser,
starting from Internet Explorer 6, Firefox 3, and Safari 3.1. Clients
can change or add text, images, or links. Specially designated sections,
such as event listings, can be repeated and modified or reordered.
Despite all this access, designers maintain a high degree of control.
Not only can they establish which areas are editable and which are not,
but they can also control the level of editability — from full stylistic
freedom to plain text editing only.
The workflow for creating, publishing, and editing InContext Editing pages goes like this:
The designer creates a page in Dreamweaver.
InContext Editing editable and repeating regions are added to the page through Dreamweaver tools.
The designer publishes the page to a site that has been registered with the Adobe InContext Editing service.
The client navigates to the InContext Editing-enabled page and presses a keyboard shortcut to log in.
Once logged in, the client makes any desired changes to the site, saves the page, and clicks Publish.
As noted, InContext Editing is
an Adobe service, which, as of this writing, is available at no
additional charge. All you need to set up an account is an Adobe ID at http://incontextediting.adobe.com.
Next, you learn how to integrate InContext Editing controls into your Web pages.
NOTE
You may be saying to
yourself, "What about Contribute?' Adobe Contribute is another solution
intended to shift the task of content management from the designer to
the client or user. However, Contribute is primarily targeted to
companies and organizations requiring advanced user administration such
as content approval and audit trails. Moreover, Contribute supports a
range of content not available to InContext Editing pages, such as Flash
movies and video.
2.1. Setting up InContext Editing templates
Unlike Dreamweaver templates,
you don't have to save an InContext Editing-enabled page as a template
to make it functional. All you need to do is to add one or more
InContext Editing regions to the page and, when you publish the page to
your site, put a number of InContext Editing-related files online. From a
designer's standpoint, it only takes a few minutes to make an existing
page client-editable.
Dreamweaver includes an InContext Editing category in the Insert panel with two entries:
Create Editable Region: Adds a <div> tag or tag attribute that allows the enclosed content to be modified through InContext Editing.
Create Repeating Region:
Adds code that allows an InContext Editing user to repeat a specific
section of code and change it. Users can also reorder code blocks within
the repeating region.
Although the objects are very
straightforward to apply, they do permit the designers to exercise a
fair amount of control. Each object is discussed in turn, during the
following sections.
NOTE
It's important to realize
that InContext Editing pages are not the same as Dreamweaver templates. You cannot, as a designer, create
pages based on InContext Editing-enabled pages, and, therefore, you
can't update a master template to change derived pages. You (or the
client) can, however, duplicate a page once it has been published and
add new content through the InContext Editing toolbar in the browser.
2.1.1. Adding an editable region
An InContext Editing
editable region can be applied to any portion of the page. Once applied,
Dreamweaver adds a single attribute to the code, like this:
<div ice:editable="*">
The value of the ice:editable
attribute is initially set to an asterisk, which indicates that all
editing options are available. If you turn off all the options, so that
the content can only be changed but not styled, the ice:editing value is empty. Selecting one or more options will cause the available options to be written into the code, like this:
<div ice:editable="bold,align_right,align_center,align_left">
To add an InContext Editing editable region to the page, follow these steps:
Place your cursor in the area you want to make editable.
From the Insert panel, choose the InContext Editing category.
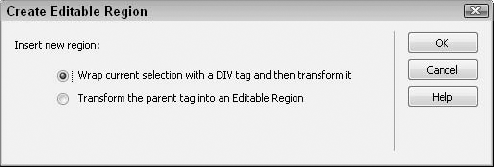
Select Create Editable Region.
In the Create Editable Region dialog box (see Figure 1), choose to wrap the current selection with a <div> tag or transform the parent tag into an editable region by adding the InContext Editing attribute. Click OK.
Which option you choose depends on your design. Sometimes wrapping a new <div>
tag around existing content causes elements to shift and it is better
to take the attribute route by transforming the parent tag.
NOTE
Unlike with standard Dreamweaver templates, you can't add editable regions within <heading>
or other tags. Therefore, if you don't want clients to modify the
format or style of the content, select Uncheck All in the InContext
Editing Property inspector to disable all editing options.
Select the desired options in the Editable Region Property inspector.
InContext Editing gives you a wide variety of options to choose from, as shown in Figure 2.
You can quickly eliminate all of them by choosing Uncheck All or bring
them all back by clicking Check All. The available options are listed in
Table 1.

Table 1. InContext Editing Property Inspector Options
| Icon | Name | Description |
|---|
 | Bold | Displays a bold button to add a <span> tag with the inline CSS property font-weight: bold. |
 | Italic | Displays an italic button to add a <span> tag with the inline CSS property font-style: italic. |
 | Underline | Displays an underline button to insert <u> tags. |
 | Alignment buttons | Displays left, center, right, and justify buttons. |
 | Font Face | Displays a drop-down list with a standard selection of Web font families. |
 | Font Size | Displays a drop-down list of seven font sizes, from 10 px to 48 px. |
 | Indent and Outdent buttons | Displays buttons to move the text in by adding a <blockquote> tag or out by removing a <blockquote> tag. |
 | Numbered List and Bulleted List | Displays buttons for converting paragraphs to an ordered or unordered list. |
 | Paragraph Styles | Displays a drop-down list of HTML formats, including paragraph and Heading 1 through Heading 6. |
 | Background Color | Displays a color picker for adding a background color to a selection. |
 | Font Color | Displays a color picker for adding a color to a selection. |
 | CSS Styles | Displays a drop-down list of CSS classes, as chosen through the Manage Available CSS Classes object. |
 | Image/Media | Displays controls for adding and managing images and other media. |
 | Link | Displays controls for adding and managing links. |
You can also use the
Class drop-down list included in the InContext Editing Property
inspector to specify a CSS class for any InContext Editing added <div> tag.
Like standard editable
regions and Spry elements, an InContext Editing region is identified by a
tab and blue border, as shown in Figure 3. Unlike editable regions, you don't need to name them separately.

NOTE
If you'd like to get a jump
start on your pages — and incorporate InContext Editing — Dreamweaver
has just the feature for you. When you create a new HTML page with one
of Dreamweaver's pre-built CSS layouts (available through the New dialog
box), you'll see an option to Enable InContext Editing. Click that
checkbox and Dreamweaver will generate a CSS standards-compliant page
where the main content area is already enclosed in an InContext Editing
editable region. Customize the page however you like, save, and you are
ready to post to the InContext Editing server.
To remove a selected InContext Editing editable region from your page, choose Remove Region from the Property inspector.
|
When you remove an
InContext Editing editable region through the Property inspector, only
the ice:editable region is removed. If code such as <div ice:editable="*"> is wrapped around the content, the <div> tag remains. To remove both tag and attribute, right-click the <div> tag in the Tag Selector and choose Remove Tag.
|
|
2.1.2. Repeating page sections
The InContext Editing
repeating region works in exactly the same way as the Dreamweaver
template repeating region. Add a repeating region to a section of the
page that includes at least one editable region and, when published, the
user can add more instances of the section and change the content,
reorder them, or delete them. Repeating regions are excellent for page
sections such as blog posts, event listings, and news items.
To add an InContext Editing repeating region to the page, follow these steps:
Make sure that you have added InContext Editing editable regions to any section of the page you want to repeat.
Select the outermost section of the element you want to repeat in the Tag Selector or in Code view.
Typically, a <div>
tag is used as a containing element for a repeating section. You can
include as many editable and non-editable sections within the containing
<div> tag as you like.
From the Insert panel's InContext Editing category, choose Create Repeating Region.
Dreamweaver adds an attribute to the selected tag, ice:repeating="true", and also adds another attribute, ice:repeatinggroup="*", to the parent tag. This parent tag will contain all instances of the repeating region.
In the Repeating Regions Group Property inspector, deselect either of the default options: Reorder or Add/Remove, as shown in Figure 4.

With the Reorder
option enabled, controls that allow the client to move items up and down
appear above the repeating region in the browser. This functionality is
useful, for example, to place a new item before an existing item. When
the Add/Remove option is checked, similar controls for inserting and
deleting a repeating section are made available.
You can use the InContext
Editing repeating region facility in combination with non-editable
sections of the page as well. Imagine, for instance, that you have a
number of news items that you do not want to allow the client to remove.
If you create a dummy news item to which you apply the InContext
Editing editable regions and then the repeating region, Dreamweaver will
mark the entire news section — with both editable and non-editable
items — as the Repeating Regions Group. When the client goes to edit
this section in the browser, only the editable item can be deleted or
reordered.