QuarkXPress provides two ways to flow text through
text boxes and pages—using the automatic text box or linking boxes
manually. The text in a series of linked boxes is referred to as a
story, and you can perform operations such as spell check and search and
replace on a story rather than an entire layout.
Using the automatic text box
When you import or enter text into the automatic text box, QuarkXPress automatically adds enough pages to contain all the text (Figure 1).
The automatic text box is generally used to quickly flow the text of
longer publications . To create one, check Automatic Text
Box in the New Project or New Layout dialog box. The automatic text box
is placed within the specified margin and column guides on the default
master page.

You
can also create an automatic text box on a master page later. Display
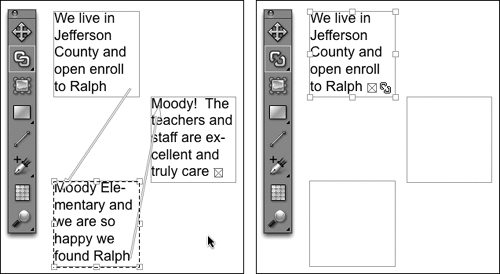
the master page (Page > Display) and select the Linking tool  . Click the broken link icon in the upper-left corner, then click a text box on the page (Figure 2). To flow text through a spread, do this on both pages.

Tip: Controlling Automatic Page Insertion
By
default, when you use the automatic text box, pages are inserted at the
end of the story. You can, however, change the location where pages are
inserted—or turn this feature off to stop adding pages. For example, in
a magazine, you might want all the stories that overflow to be placed
on pages at the back of the magazine. In the Print Layout > General
pane of the Preferences dialog box, choose an option from the Auto Page
Insertion menu: Off, End of Story, End of Section, or End of Document.
Linking and unlinking
To flow text from box to box, you need to link boxes with the Linking tool . The Linking tool is in a pop-out of the Text Content tool  on the Tools palette. You can only link boxes that are already
text boxes—if you want to link boxes drawn with a no-content box tool,
click on them first with the Text Content tool. In addition to linking
text boxes, you can link any text container to any other text container,
including linking text boxes to text paths and linking text paths to
each other. You cannot link to boxes (or other text containers) that
already contain text. Text in a series of linked items is referred to as
a chain. To link text boxes:
on the Tools palette. You can only link boxes that are already
text boxes—if you want to link boxes drawn with a no-content box tool,
click on them first with the Text Content tool. In addition to linking
text boxes, you can link any text container to any other text container,
including linking text boxes to text paths and linking text paths to
each other. You cannot link to boxes (or other text containers) that
already contain text. Text in a series of linked items is referred to as
a chain. To link text boxes:
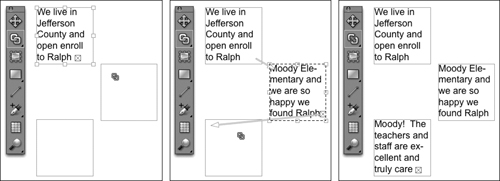
1. | Create the text boxes you want in the text chain.
|
2. | Select the first box.
|
3. | Using the Linking tool, click the text boxes in the order you want the text to flow (Figure 3).
|
4. | If you need to reroute links—for example if you accidentally click the wrong box—Shift+click the Linking tool.
|
5. | When you’re finished linking boxes, select another tool.
|
If you delete a text box
in a chain, the text will flow through the remaining boxes. You can
break box links using the Unlinking tool , which is next to the Linking tool in the pop-out of the Text Content tool (Figure 4). When you break a text box link, all subsequent links in the chain are broken as well.