Use the Type Preferences controls for working with text
 .
.
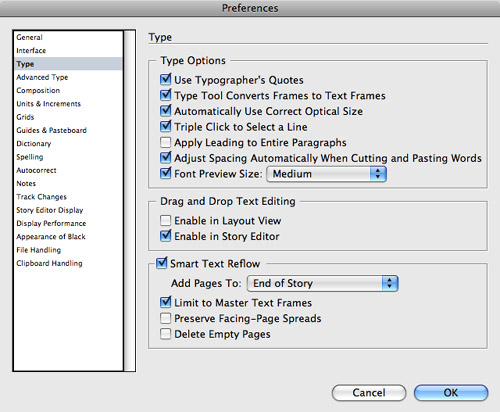
 The Type settings of the Preferences dialog box.

To set the Type Options preferences
1. | Use Typographer’s Quotes automatically changes typewriter quotes into the proper curly quote characters
 .
.
 An example of using typographer’s quotes.

|
2. | Type
Tool Converts Frames to Text Frames lets you double-click inside a
frame to change from the selection tools to the Type tool.
|
3. | Automatically Use Correct Optical Size sets the correct value for the optical size of Multiple Master fonts.
|
4. | Select
the Triple Click to Select a Line checkbox so that three clicks selects
a line, four clicks selects a paragraph, and five clicks selects the
story.
Tip
If this option is deselected, three clicks selects the paragraph and four clicks selects the story.
|
5. | Apply Leading to Entire Paragraphs lets InDesign work more like QuarkXPress.
|
6. | Adjust Spacing Automatically When Cutting and Pasting Words avoids adding two spaces when pasting text.
|
7. | |
Tip
Deselect this option to turn off the font preview and make the menu display faster.
You can also control whether or not drag-and-drop text is activated.
To turn on drag-and-drop text
1. | Select Enable in Layout View to drag selected text when working within frames.
|
2. | Select Enable in Story Editor to drag selected text within the Story Editor.
|
The Smart Text Reflow options control how new pages and frames are created when text overflows a frame.
To set the Smart Text Reflow options
1. | Turn on Smart Text Reflow to automatically add pages when a story spans at least two pages.
|
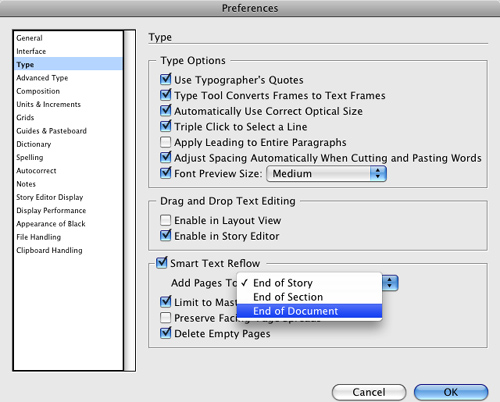
2. | Use the Add Pages To menu to choose where the new pages will be added as follows
 :
:
End of Story adds pages directly after the page that contains the story. End of Section adds pages to the last page in that section of the document. This can cause the story to skip pages. End of Document adds pages after the last page in the document. This can cause the story to skip pages.
 Use the Add Pages To menu to control where new pages are added for Smart Text Reflow.
|
I’m a typist. So the idea of
being able to type in InDesign and add or delete pages as I work is very
appealing. However, I have modified the default settings for Smart Text
Reflow.
First, I have turned off the
setting for Limit to Master Text Frames. This way I can place text
directly onto a page without using master text frames.
Next, I always add pages at
the end of the story. It is too confusing to go find linked pages that
might appear way at the end of the document or section.
Next, I have Preserve Facing-Page Spreads turned off. I don’t mind adding another right-hand page to my document as I add pages.
Finally, I always select Delete Empty Pages. It’s so cathartic to watch InDesign delete empty pages that I no longer need.
|
|
3. | Choose Limit to Master Text Frames to only add pages when copy overflows master text frames.
|
4. | Choose
Preserve Facing-Page Spreads to ensure that the number of right- or
left-hand pages remains constant when new pages are added.
|
5. | Select Delete Empty Pages to have InDesign automatically delete any pages where the linked text frame no longer contains text.
|
Tip
Pages are deleted only if the text frame is the only object on the page.
I grew up using computer
word processing programs that have drag and drop text features. So I
always have Drag and Drop Text turned on for both Story Editor View as
well as Layout View.
However, I understand
that many designers find drag and drop gets in the way when they work.
So I suggest turning it on for the Story Editor and off for the Layout
View.
You get the benefits of drag and drop without messing up your layouts.