Flash Catalyst offers four main aids to assist you
while drawing. These include the rulers, the custom guides, a visible
grid for measuring and aligning artwork, and the Properties panel for
positioning and sizing objects down to the exact pixel.
Show and hide rulers
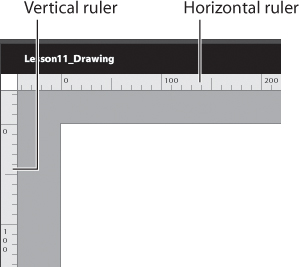
By default, rulers appear
above and to the left of the artboard. The rulers help you position
artwork, but they’re even more useful when placing custom guides. You
can hide the rulers to gain a little extra room in the workspace, but
they take up so little space you’ll probably want to leave them turned
on all the time.
1. | Browse to the Lesson11 folder on your hard drive and open the Lesson11_Drawing.fxp file.
Rulers appear above and to the left of the artboard in the Design workspace.
|
2. | Choose View > Show Rulers to deselect it and hide the rulers.
The rulers disappear, creating a little more space above and to the left of the artboard.
|
3. | Choose View > Show Rulers to turn the rulers back on.
Rulers measure the height and width of the artboard in pixels. At 100%
magnification, tick marks appear every 10 pixels and numbers appear at
100-pixel intervals.
|
4. | Change the Zoom Magnification to 800%.
As you zoom in or out, the tick marks and numbers in the ruler scale to accommodate the new magnification.
|
5. | Return the zoom magnification to 100%.
|
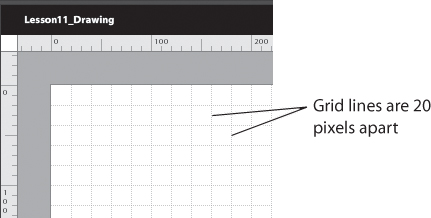
Edit grid and guide settings
Using the grid is similar to
placing a transparent sheet of graph paper over the artboard. The grid
includes perfectly spaced vertical and horizontal lines that help you
align and draw perfectly measured artwork. You can change the default
settings for all grid lines and guides in one location—the Grid &
Guide Settings dialog box.
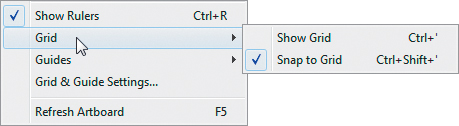
1. | Open the View menu and point to Grid.
Note
The grid does not appear in your published application.
|
2. | In the View menu, point to Guides.
The Guides submenu appears. You can show and hide the guides, lock the
guides in place, turn the Snap To Guides feature on and off, or clear
all guides from the application.
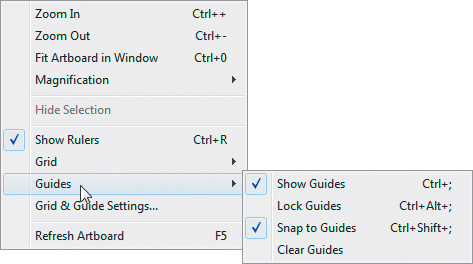
Tip
In the menus, Show Grid, Snap
To Grid, Show Guides, Snap To Guides, and Lock Guides are toggles. The
same menu commands are used to select and deselect these options.
|
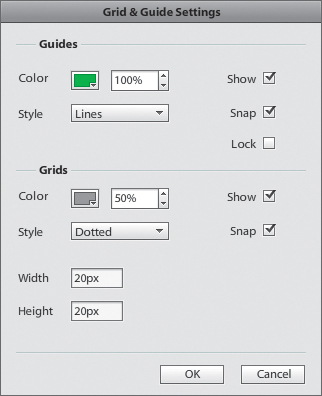
3. | In the View menu, choose Grid & Guide Settings.
The Grid & Guide Settings dialog box appears. You can change the
color, opacity, and style (straight dotted lines) for the grid and
guides. You can adjust the scale of the grid by changing the Width and
Height values. The default is a 20 × 20 pixel grid. You can show or hide
the grid and guides or turn snapping on and off. You can also lock and
unlock the guide lines.
|
4. | In the Guides section, select Show and Snap. Make sure that Lock is deselected.
|
5. | In the Grid section of the dialog box, change the opacity to 50%.
Reducing the opacity to 50% makes the grid lines less distracting as you draw new shapes and lines.
|
6. | In the Grid section, select Show and Snap.
|
7. | Make sure the grid Height and Width are both set to 20px.
|
8. | Click OK to confirm the settings and close the dialog box.
The grid appears at 50% opacity in the artboard.
|
Set guides for precise drawing
Guides are another great
tool for aligning and placing one or more objects in the artboard.
Unlike the grid, you can place horizontal or vertical guides anywhere
you want. Use the ruler for exact placement of your custom guides. The
same guides persist across all pages in the application.
Tip
The guides you set for the
main pages in the application do not appear when you edit a component in
Edit-In-Place mode. When a component is in Edit-In-Place mode, you can
place new guides that are unique to that component.
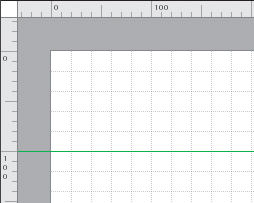
1. | Move the pointer over the top (horizontal) ruler.
|
2. | Drag toward the artboard. You will see a horizontal guide appear. Release the mouse button to place the guide in the artboard.
|
3. | Select the Select tool (dark arrow) in the Tools panel.
|
4. | Position
the pointer over the guide. The pointer changes to a two-headed arrow.
Drag the guide so that it’s positioned at exactly 100 pixels from the
top of the artboard, as shown in the vertical ruler.
Tip
To remove a single guide, drag it off the artboard.
|
5. | Move the pointer over the left (vertical) ruler.
|
6. | Drag a vertical guide into the artboard and place it at 100 pixels from the left edge, as shown in the top (horizontal) ruler.
|
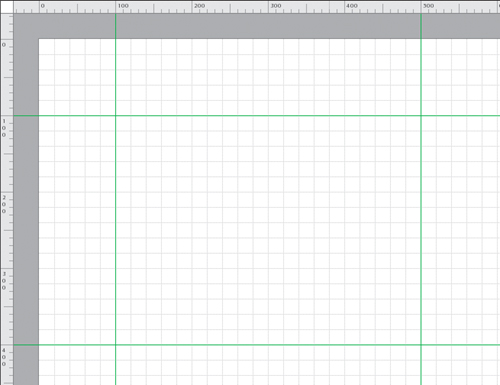
7. | Add two more guides: a vertical guide at 500 pixels and a horizontal guide at 400 pixels.
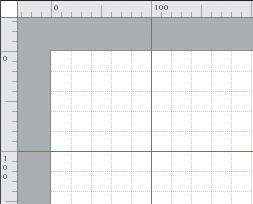
Using guides, you’ve created boundaries for a 400 × 300 panel that you’re going to draw using basic shapes and lines.
Tip
To clear all guides from the
application, choose View > Guides > Clear Guides. Guides that
you’ve set inside a component are not affected. To remove guides in a
component, edit the component in Edit-In-Place mode and then clear the
guides.
|
8. | Choose View > Guides > Lock Guides.
Locking the guides prevents them from being accidentally moved when selecting and positioning objects in the artboard.
|