When using an off-camera flash on location, most pros
put an orange gel over the flash to warm the color of the light, so it
doesn’t stand out as artificial light. This plastic gel is called CTO
(for Color Temperature Orange) and you can find it at most large camera
stores (and a lot of small ones, too). So, the problem is that not
everybody has these gels, and if they do, they don’t always remember to
tape them over their flash head, but luckily, we can warm the color
temperature of the light after the fact in Photoshop.
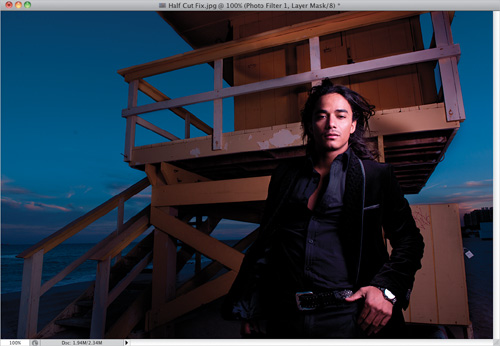
Step One. | First,
let’s look at the problem: Here’s a shot I took at sunset using an
off-camera flash (the flash is up high and to the right of my camera
position, aiming down at the subject and firing through a shoot-through
umbrella). At this point in the shoot, I didn’t remember to add a CTO
gel to warm the light, so the light from the flash is bright white
(which looks really out of place in a beach sunset shot like this. The
light should be warm, like the light from a setting sun, not a white
flash).
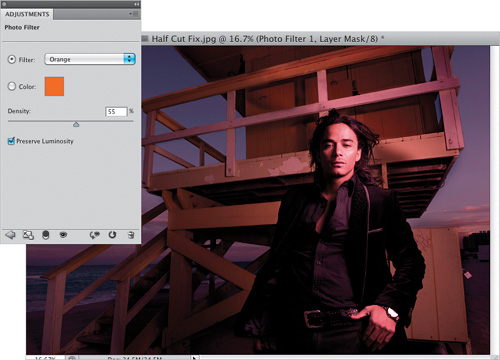
 | Step Two. | To
warm the light from the flash, go to the Adjustments panel and click on
the Photo Filter icon (it’s the second icon from the right in the
middle row). The Photo Filter controls will appear, and from the Filter
pop-up menu, choose Orange (as seen
here), then increase the Density to around 55%. So, how did I know 55%
was right? I opened a photo from a few minutes later in the shoot, when I
had added a CTO gel to my flash, and matched the color and amount, but
actually the amount doesn’t matter as much, because we’ll be able to
lower it later if it’s too much. The whole image gets the Photo Filter,
and it changes the color of the sky, and well...everything, but we just
want to change the color of the light.
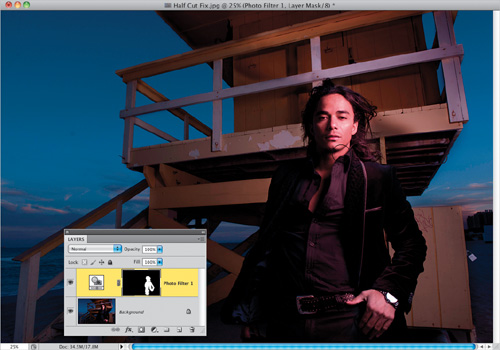
 | Step Three. | What
we need to do is hide the overall orange color, and then just apply it
where we want it (where the light is actually falling on the subject).
To do that, just press Command-I (PC: Ctrl-I)
to Invert the layer mask attached to your Photo Filter adjustment
layer, so your orange filter is hidden behind a black layer mask. Now,
get the Brush tool (B), press D
to switch your Foreground color to white, and paint over your subject’s
skin, hair, clothes, and anywhere the light from the flash is falling
(as shown here). That way, the orange only affects where the light from
the flash lands.
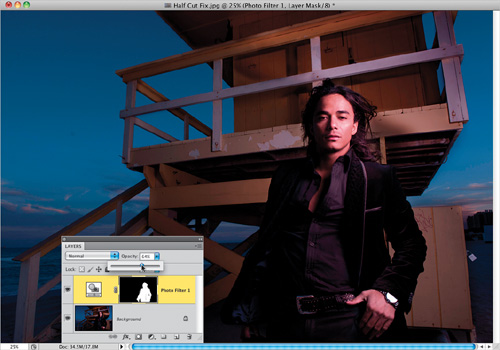
 | Step Four. | Remember
in Step Two where I said I wasn’t worried about the amount because I
could change it later? That’s now. Because we used an adjustment layer,
we can just go to the Layers panel and lower the Opacity to lower the
amount of orange (I lowered it to 64% here). If, instead of needing to
lower the amount, you need more orange, then just double-click directly
on the adjustment layer itself (in the Layers panel) and it reopens the
Photo Filter controls in the Adjustments panel, so you can increase the
Density amount. Here’s the final image, with the orange gel effect added
in Photoshop.
 |
|