For most designers, using the Flash Catalyst drawing
tools is a cinch. For anyone new to vector drawing tools, you’ll find
the best way to master them is to practice. A little experimentation,
combined with the Undo command, goes a long way.
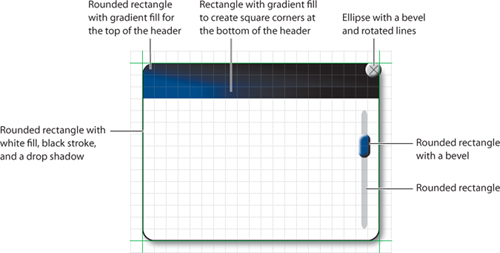
Preview a drawing example
In this exercise, you are
going to draw a simple user interface panel. Before you get started,
take a look at a sample of the finished panel.
1. | Make sure Panel is selected in the Pages/States panel.
|
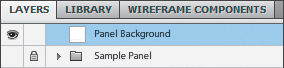
2. | In the Layers panel, show the Sample Panel row.
Here is an example of a simple control panel that was created using
basic shapes and lines. You are going to create a similar panel using
the Flash Catalyst drawing tools.
 |
3. | Hide the Sample Panel row in the Layers panel.
|
Draw rectangles
You can draw rectangles
with square or rounded corners. There are two ways to create a rounded
rectangle. You can use the Rounded Rectangle tool, or you can draw a
standard rectangle using the Rectangle tool and then adjust the Corners
value in the Properties panel.
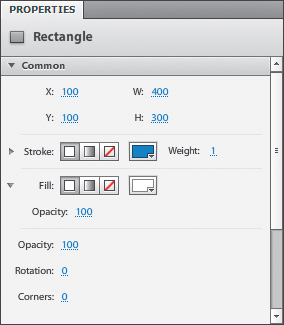
1. | In the Tools panel, select the Rectangle tool.
|
2. | Position
the pointer at the upper-left corner of the intersecting guides. Drag
to the lower-right corner of the intersecting guides to draw a 400 × 300
rectangle.
As you draw, the edges of the shape snap to the guides.
In the Common section of the Properties panel, you see the properties
for the rectangle. The width (W) is 400 and the height (H) is 300. If
it’s not, then adjust it in the Properties panel.
The guides make it easy to draw, but difficult to see the result in the artboard.
|
3. | Choose View > Guides > Show Guides to hide the guides.
|
4. | In the Properties panel, change the Corners value to 20.
The Panel Background now has rounded corners.
|
5. | In the Layers panel, rename the Rectangle Panel Background.
Tip
When drawing shapes, you can
use the grid to size the shape. For example, if grid lines are 20 pixels
high and Snap To Grid is turned on, a rectangle that is three rows high
has a height of 60 pixels.
|
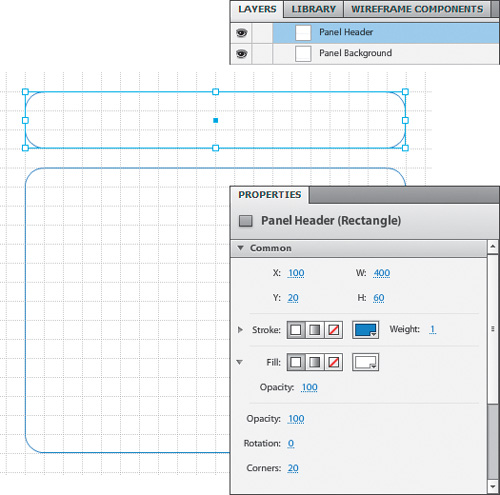
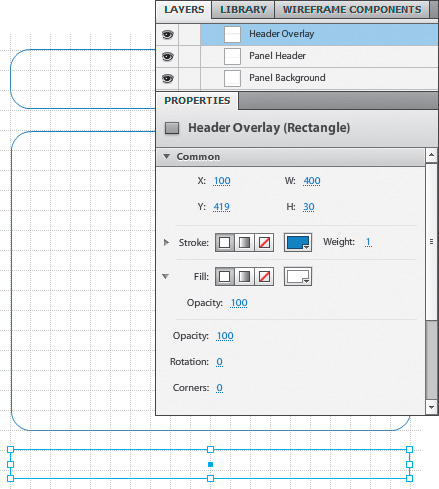
6. | Above the first rectangle, draw another one that’s 400 pixels wide and 60 pixels tall. Change the Corners value to 20. Then, in the Layers panel, name the second rectangle Panel Header.
 |
7. | Below
the Panel Background, draw another rectangle that’s exactly 400 pixels
wide by 30 pixels high. You can adjust its final size in the Properties
panel if needed. Leave the Corners value set to 0.
|
8. | In the Layers panel, name the new rectangle Header Overlay. We’ll use this to hide the rounded corners at the bottom of the header.
Now let’s draw a track for the panel scroll bar.
|
Draw rounded rectangles
OK, so technically you’ve
already drawn some rounded rectangles using the Rectangle tool and the
Properties panel. But the Rounded Rectangle tool provides a shortcut by
adding rounded corners automatically.
1. | Select the Rounded Rectangle tool.
Tip
You can change between
shape tools by using their shortcut keys. For example, to select the
Rectangle tool, press M. To select the Rounded Rectangle, press U. To
select the Ellipse tool, press L.
|
2. | Draw
a tall rectangle that’s 200 pixels high and about 10 pixels wide
(halfway between two grid lines). In the Layers panel, name the
rectangle Track.
By default, the corner radius is 10, which is fine for the scroll bar track.
Tip
To move a shape or grouped
objects, use the Select tool. To select and move a single object within a
group, use the Direct Select tool.
|
3. | Using
the Select tool (dark arrow) in the Tools panel, drag the Track
rectangle to position it along the inside lower-right edge of the larger
rectangle.
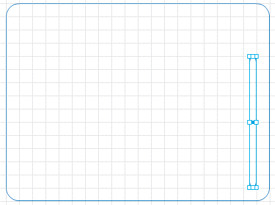
Next, we’ll draw a thumb for the scroll bar.
|
4. | Using
the Rounded Rectangle tool, draw a small rounded rectangle that
overlaps the track. Make it about 20 pixels wide by 40 pixels high.
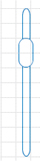
|
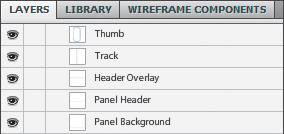
5. | In the Layers panel, name the small rectangle Thumb.
You now have five rectangles that make up the shapes you need to build
the panel. You’re going to add some style and position these elements in
a moment, but first you’ll create some shapes for the panel close
button.
|
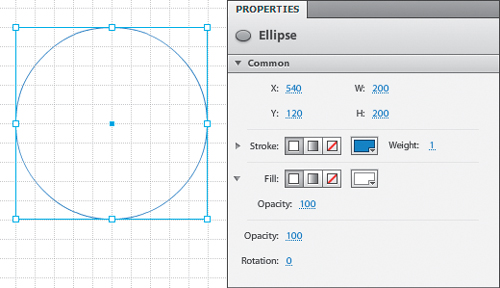
Draw ellipses
To create a close button
for the panel, let’s start by drawing a large circle. We’ll make it big
at first and then scale it down later. To draw a perfect circle, use the
Ellipse tool with the Shift key modifier.
1. | Select the Ellipse tool in the Tools panel.
|
2. | Hold
down Shift and drag to draw a perfect circle that’s 200 × 200 pixels.
In the grid, that’s a circle that is 10 rows high and 10 rows wide. You
might find that it’s easier to draw the circle and then change its size
in the Properties panel.
The ellipse is a perfect circle.
 |
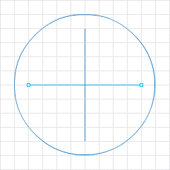
Draw basic lines
The close button should have an
X in the middle. Let’s use the grid to draw a perfect plus sign, and
then we’ll rotate the entire button to turn the plus sign into an X.
1. | Select the Line tool in the Tools panel.
|
2. | Position
the pointer 20 pixels (one grid line) below the top of the circle, in
the center. Drag to draw a vertical line that’s 160 pixels high. You can
hold down Shift as you draw to make a perfectly vertical line.
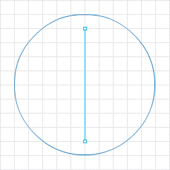
|
3. | Position
the pointer 10 pixels inside the left edge of the circle, in the
center. Drag to draw a horizontal line that’s about 160 pixels wide. You
can hold down Shift as you draw to make a perfectly horizontal line.
You now have the basic shapes for the panel close button. You’ll rotate this in a moment.
|