The nemesis of the travel photographer is the
tourist, because nothing looks worse than a beautiful, iconic tower,
palace, cathedral, or statue with a bunch of tourists roaming around.
Although there’s nothing we can do to stop tourists from walking into
our photos while we’re taking them, there is something we can do after
the fact in Photoshop (as long and we do just a little preparation in
advance, which makes our retouching job super-simple).
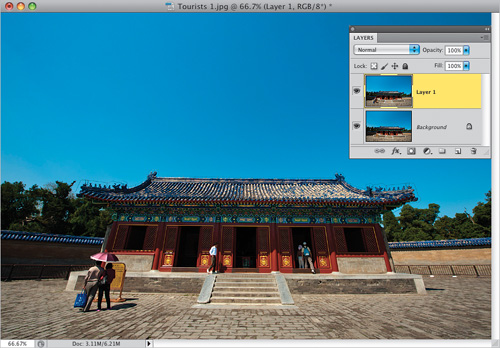
Step One. | Here’s
a shot near the Temple of Heaven in Beijing (I know, the lens
perspective is off terribly, but that’s handled in the next project). I
tried to get a shot without the tourists, but even though I was pretty
darn patient, I just couldn’t come up with a shot where there were no
tourists at least somewhere in the shot. The trick is to take a few more
shots, and hope that when all is said and done, you can combine them,
with a layer mask or two, to hide those tourists (it’s easier than it
sounds).
 | Step Two. | Here,
I took another shot of the same building, and as long the tourists in
this photo are in a different spot than the tourists in the photo in
Step One, we’ll be able to mask them out in seconds. But first, we’ll
need to get the two photos into the same document, so switch to the Move
tool (V), press-and-hold the Shift
key, then drag the second image over onto the first image. This second
image appears as its own layer above the first image (as seen here), and
the two photos will be kind of close to being lined up with each other
(using the Shift key centers the second image over the first).
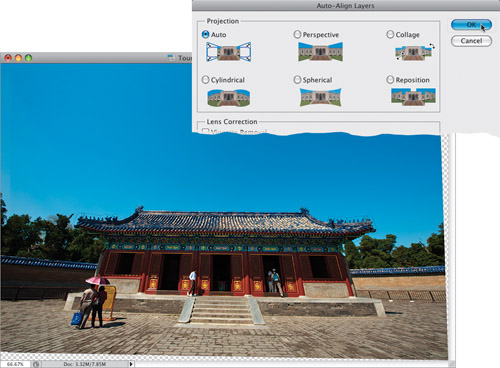
 | Step Three. | If
you’re handholding the images (and chances are, at a tourist spot, you
probably will be), then you’ll need to have Photoshop perfectly align
the two photos first, so the layer masking will work. (Note:
If you did take your shots on a tripod, you can skip this step
altogether, along with Step Four and Step Five, because your photos will
already be in perfect alignment.) Go to the Layers panel,
press-and-hold the Shift key, and click on the Background layer to
select them both. Then go under the Edit menu and choose Auto-Align Layers (as shown here).
 | Step Four. | This
brings up the Auto-Align Layers dialog (shown here). Auto should be
selected by default, but if it’s not, click on the Auto radio button,
then click OK, and Photoshop will perfectly align the two images (it
does an amazing job of it, too). To see the results, go to the Layers
panel and click on the Eye icon beside the top layer toggle it
on/off—you’ll see that everything is the same, except the tourists, and
that’s just what we need.
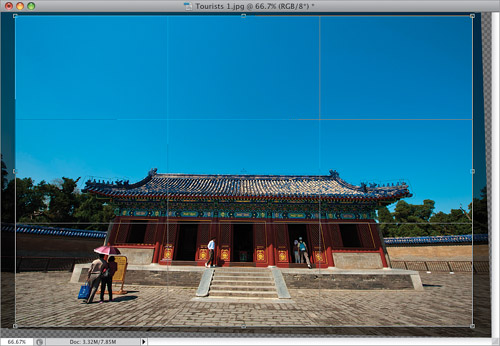
 | Step Five. | You’ll notice that, in most cases, there will be a gap at the top and/or
sides of your image, and that’s normal because Auto-Align Layers has to
tweak your images a bit to make them line up (that’s because they
weren’t taken on a tripod—they were handheld), so at this point, you’ll
need to crop away these areas. Get the Crop tool (C) and drag it out so the gaps on the sides, top, and bottom will be cropped away. Press the Return (PC: Enter) key to complete your crop.
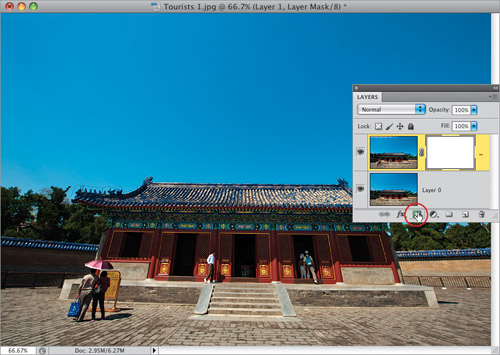
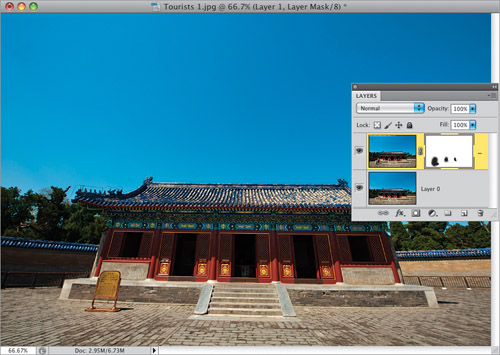
 | Step Six. | Click
on the top layer, then click on the Add Layer Mask icon at the bottom
of the Layers panel (it’s shown circled here in red).
 | Step Seven. | Next, get the Brush tool (B),
make sure your Foreground color is set to black, choose a soft-edged
brush tip (from the Brush Picker up in the Options Bar), and set your
brush size so it’s just a little smaller than the tourists you want to
remove (use the Left and Right Bracket keys
on your keyboard to change the size of your brush. They’re to the right
of the letter P on your keyboard). Now, paint over the tourists (and
their shadow) on the left side of the photo (the ones in front of the
sign), and as you paint, it covers them up, revealing the sign on the
layer below it. This works so well, because the two photos have been
perfectly aligned.
 | Step Eight. | Anywhere
you see a tourist, just paint right over them, and they’re gone (as
shown here). If you make a mistake, switch your Foreground color to
white, and paint over your mistake. Once you try this, and realize how
easy it is, you’ll see fewer and fewer tourists in your travel photos in
the future. Just keep in mind, the more photos you take, the better
chance you’ll be able to find two (or more) photos you can stack in
layers (like we did here), and then layer mask the tourists away.
 |
|