Speaking of categories overlapping, there is some
common ground between pixel-based programs, such as Painter or
Photoshop, and vector-based products (Adobe Illustrator reigns supreme
in that arena).
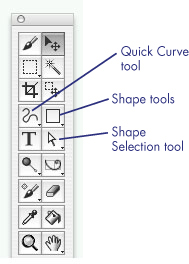
Although all Painter
images are ultimately pixels, there are some tools you can use to take
advantage of vector-like capabilities, such as dynamic (editable) Stroke
and Fill. Figure 1 shows where these tools are located.
Paths to Enlightenment
Use
either the Rectangular or Oval Shape tool to drag the corresponding
shape on your canvas. With the Move tool engaged, resize or reposition a
shape as often as you like. When you tire of ovals and rectangles and
want something a little more exciting, use the Quick Curve tool to draw
any irregular shape. All shapes are composed of a path (a sequence of
curves or line segments) and anchor points that can be altered with the
Shape Selection tool.
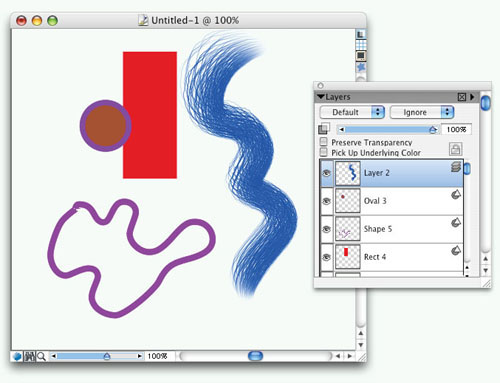
Each shape you make automatically creates its own separate layer with a distinctive icon that differs from an ordinary layer. Figure 2
has an oval and rectangular shape and a Quick Curve shape. I’ve added a
bristle brush stroke on a standard layer so you can compare the layer
icons as well as the contrast between vector flatness and pixel
juiciness.
The Shape menu
provides several commands for managing shapes. When any Shape tool is
active, the Property Bar offers choices for Stroke and Fill. Those color
swatches give you access to the current color set or the option to load
a different color set. Check boxes let you determine whether Stroke
and/or Fill is on or off.
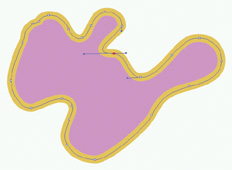
My irregular shape appears again in Figure 3,
this time with a yellow stroke and a lavender fill. The Shape Selector
tool is active, so you have access to the individual anchor points along
the path. The target point is red, indicating it can be moved or its
“wings” can be dragged around in order to alter the curves on either
side of the point. Make some Quick Curve shapes and play around with
strokes and fills, as well as manipulate anchor points and their wings.
If you want to change the width of a stroke, you’ll need to open the Set
Shape Attributes dialog from the Shapes menu.
Paths for Alignment
So
you see how it’s possible to prepare precise paths. Now what? With your
Brush tool active, take a look at the three icons near the left edge of
the Property Bar. The default mode is Freehand strokes, but you can
also choose Straight Line strokes. The third option is Align to Path,
and that’s the key to combining vector precision with painterly style.
Make your own
simple graphics using the vector tools in Painter or import existing
Illustrator files. Use File > Acquire to open images that are in
either .ai format (Adobe Illustrator) or .eps format (Encapsulated
Postscript). Those .ai files will have to be in Illustrator 8 format in
order to be recognized by Painter. When you use the Acquire command,
Painter takes a moment or two to rasterize
the image to make it compatible with the pixel-based environment.
You’ll see the paths in your Layers Palette as Shapes or Groups of
Shapes. At this point you are free to change the size or resolution of
the image.
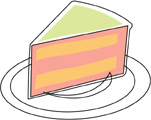
I’ve already rasterized a vector illustration for you to work on, shown in Figure 4.Some of the shapes have fills, and all of the shapes have
thin black strokes to help you see your work in progress.
This is an excellent
opportunity to use the Liquid Ink category, which functions on its own
special layer. I chose the Smooth Bristle variant, which isn’t really
smooth. If I had the time, I’d rename it “Not So Smooth Bristle.”
|
You can change the
names of brush variants and even reorganize them into different
categories if you wish. Just navigate to the Corel Painter folder on
your hard drive, then choose Brushes > Painter Brushes. Then find the
variant you want to rename. Each brush has three component files: .nib,
.stk (stroke), and .xml. All three must be renamed or there will be
trouble. Incidentally, those tiny (4k) JPEG files associated with
category names are the icons for the categories. Yes, you can replace
them with your own icons. Make a Rectangular selection of the image you
want for a new icon and use the Capture Brush Category command in the
Brush Selector Bar popup menu.
|
With the Align to Path option engaged, draw around each of the shapes using any colors you like. My working image appears in Figure 5. I temporarily turned off the fills by unchecking them in the Property Bar, with the Shape Selector tool active.

Those accidents
of overlapping color are fine, enhancing the hand-painted look. Don’t
try to fix them if you get some. The finished cake has the fills turned
on again and all the stroke lines turned off. At this point the image is
ready to be flattened and saved to any format. Keep a RIFF file with
shapes intact in case you want to redo it with different brush variants.
All Figure 6 needs is a cup of coffee.