1. Using presets
After you’ve used the Picture Effects palette to
make adjustments and apply filters to a picture, you can save the
settings as a preset that you can use to apply the same settings to
other pictures. Using presets, like paragraph and character style
sheets, is a great way to save time and ensure consistency.
To save a preset, select a picture that you’ve modified using the Picture Effects pane, and then click the Save Preset button ( )
at the top of the palette. Click Save in the Save Preset dialog box. By
default, presets are assigned a .vpf file extension and stored within
the Picture Effects Presets folder within the QuarkXPress program
folder. The Picture Effects pane in the Preferences dialog box
(QuarkXPress > Preferences with a Mac; Edit > Preferences in
Windows) allows you to select a different folder for preset files.
)
at the top of the palette. Click Save in the Save Preset dialog box. By
default, presets are assigned a .vpf file extension and stored within
the Picture Effects Presets folder within the QuarkXPress program
folder. The Picture Effects pane in the Preferences dialog box
(QuarkXPress > Preferences with a Mac; Edit > Preferences in
Windows) allows you to select a different folder for preset files.
To apply a preset to a picture, select the picture, and then click the Load Preset button ( )
at the top of the Picture Effects pane. Once you’ve applied a preset to
a picture, you can change settings, make additional adjustments, and
apply other filters.
)
at the top of the Picture Effects pane. Once you’ve applied a preset to
a picture, you can change settings, make additional adjustments, and
apply other filters.
2. Exporting modified pictures
All of the changes you make to a picture using
the Picture Effects pane are saved as part of the project file and are
applied to the original (unmodified) picture file for onscreen display
and printing. If you want, you can use the Save Picture command (File
menu) to create new graphic files that include the adjustments and
filters you’ve applied to pictures within QuarkXPress, and you have the
option to link exported pictures to the layout (and disregard the
original picture file).
You can also save imported bitmap pictures (for
example, .tif and .jpg pictures) that you’ve modified within QuarkXPress
by scaling, cropping, and so on. (You can’t save Photoshop files or
vector graphics.)
To export the selected picture or all pictures in a layout:
1. | Choose
File > Save Picture. To save only the selected picture, choose
Selected Picture from the submenu; to save all modified pictures in the
layout, choose All Pictures in Layout. (If you choose All Pictures in
Layout, only pictures in compatible formats and color modes are exported
and you’ll be warned if the layout contains unsupported graphics.)
|
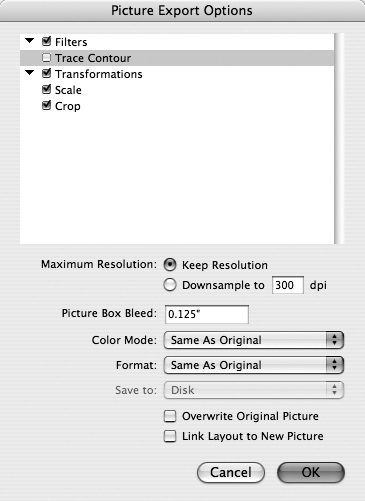
2. | Modify the settings in the Picture Export Options dialog box (Figure 1)
to suit your needs. Options include the ability to specify resolution,
change or retain the color mode and file format, and overwrite the
original picture file. If you want the layout to use the exported
picture file instead of the original graphic file, check Link Layout to
New Picture.
|
3. | Click OK to export the selected picture or all modified pictures in the layout (depending on your choice in Step 1).
|
Tip: Saving Multiple Pictures
To save some but not
all pictures, choose Utilities > Usage, display the Vista pane,
select the pictures you want to export, and then click Render.
3. Managing imported pictures
It’s
important to understand that when you import a picture into a layout,
the picture file is not saved as part of the QuarkXPress project file.
Instead, QuarkXPress saves the location of the picture file with the
project file and uses the original file for onscreen display and
printing. If a picture is modified, moved, deleted, or renamed after
you’ve imported it into a layout, you’ll receive a warning when you
print the layout or export it as a PDF file.
It’s a good idea to check the status of the
pictures in a layout from time to time—especially before printing—to
make sure that the links to all imported picture files are still intact
and that the most recent versions of all picture files are being used.
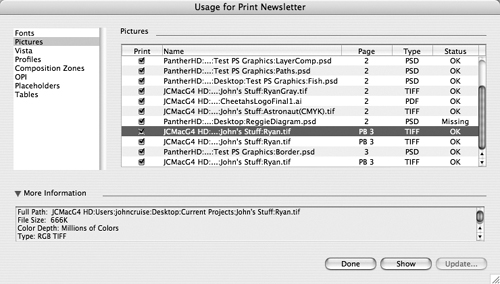
The Pictures pane (Figure 2)
in the Usage dialog box (Utilities > Usage) displays a list of all
imported pictures and lets you correct a couple of common problems. The
scroll list shows every instance of each imported picture, as well as
the page number, file type, and status of the link between the layout
and the picture. For each picture, the Status menu displays one of three
possible conditions:
OK
means exactly what it implies. The picture file is still in its original
location, and the picture hasn’t been modified since it was imported.
If all pictures are OK, you won’t receive any warnings about missing or
modified pictures when you print or export the layout.
Modified
means that the picture has been modified since it was imported. To
update a modified picture, select the file in the list, and then click
the Update button.
Missing
means that the original picture file is no longer in the location it
was in when the file was imported. (The file may have been moved,
renamed, or deleted.) To correct this problem, select the file in the
list, and then click the Update button. Locate and select the original
picture file, and then click Open.
It’s
possible to print and export a layout even if it contains missing or
modified pictures; however, in these cases QuarkXPress will use
low-resolution and outdated versions of modified pictures and low-res
versions of missing pictures.