Setting tabs
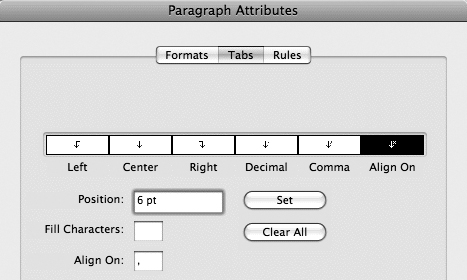
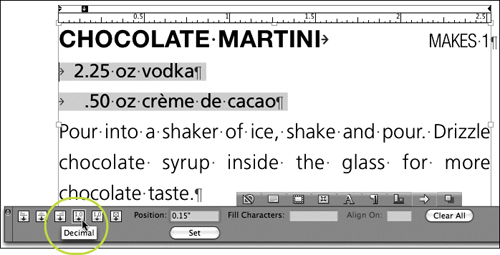
To set tabs for selected paragraphs, you can use the Tabs tab of the Paragraph Attributes dialog box (Style > Tabs) shown in Figure 1. A more interactive method of working with tabs, however, is to use the Tabs tab of the Measurements palette (Figure 2). Either way, the controls are basically the same. To set tabs for selected paragraphs:
1. | Display the Tabs tab of the Paragraph Attributes dialog box (Style > Tabs) or the Measurements palette  . .
| 2. | First
click one of the alignment buttons to specify how text aligns with the
tab stop: Left, Center, Right, Decimal, Comma, or Align On. If you click
Align On, you can enter an alignment character in the Align On field.
| 3. | Enter a value in the Position field or click on the tab ruler above the text box.
| 4. | Click Set to create the tab stop. When you set a tab stop, the default tab stops to the left of it are removed.
|
Tip: First Line Indents Versus Tabs
In
general, use a first line indent to indent the first line of a
paragraph rather than entering a tab. Each tab has to be entered
manually, but you can apply a first line indent through a paragraph
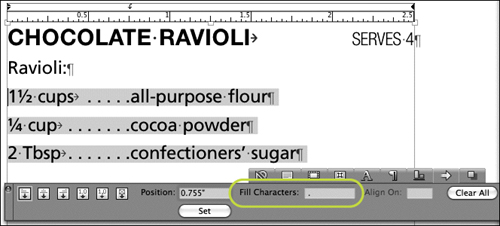
style sheet, which saves time and ensures consistency. Specifying fill characters for tabs
You can specify one
character to repeat or two characters to alternate to fill the white
space created by a tab. Fill characters help draw the eye across a
line—for example, the dotted line in a table of contents helps readers
find the page number. (The dotted line, referred to as a dot leader, is
actually a fill character of periods.) Enter one or two characters in
the Fill Characters field as you create a tab or for a tab stop selected
on the tab ruler (Figure 3).
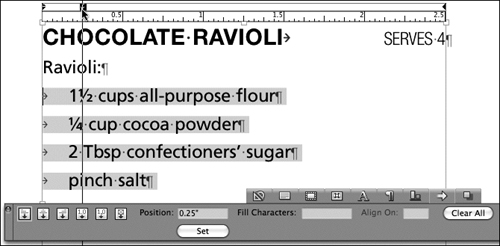
Modifying tabs
To change the position or
any other attribute of a tab, click the tab stop icon on the tab ruler.
Change any of the values in the Tabs tab of the Paragraph Attributes
dialog box (Style > Tabs) or the Measurements palette. You can also
drag the tab stop on the ruler to view a vertical guide that helps with
placement (Figure 4). To delete a tab stop, drag its icon off the ruler. To delete all tab stops, click Clear All.
Tip: Copying Tabs to Selected Paragraphs
Often,
you’ll set tabs perfectly for one paragraph, then realize you need the
same tab settings in another paragraph. To quickly copy paragraph
attributes, select all the paragraphs that need the new tab settings.
Then, Option+Shift+click (Mac) or Alt+Shift+click (Windows) the
paragraph with the right settings. Entering a right-indent tab
To force text to the right
indent of a paragraph—regardless of any tab settings—press Option+Tab
(Mac) or Alt+Tab (Windows). You might do this to place an “end-of-story
character” flush with the right margin. Creating drop caps
A common trick for drawing
the eye into a story is to create a drop cap for the first paragraph. A
drop cap is generally the first letter of a paragraph that is enlarged
and dropped down two or three lines into a paragraph—but you are not
limited to one letter or even capital letters. You can drop up to 127
characters into a maximum of 16 lines. While a drop cap appears to
affect characters, it is actually a paragraph attribute that can be
applied quickly through a paragraph style sheet. As a paragraph style,
the drop cap formatting is not dependent on specific text—you can change
the text at the beginning of a paragraph and the drop cap remains.
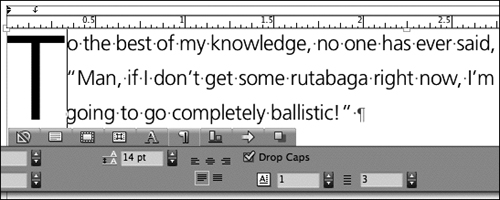
To
create a drop cap for a selected paragraph, use the Formats tab of the
Paragraph Attributes dialog box (Style > Formats) or the Paragraph
Attributes tab of the Measurements palette (Figure 5).
Check Drop Caps and enter a value in the Character Count and Line Count
fields. Once a drop cap is applied, you can select the characters and
apply a character style sheet to change the color or font. In addition,
sometimes you may need to adjust the drop cap based on the context—for
example, if the paragraph starts with a quotation mark, you may want to
adjust the character count from one character to two.
Tip: Creating Initial Caps
Drop
caps are not the only way to draw the eye into a story. Often, the
first character or characters of a paragraph are embellished in some
other way—popped up above the paragraph, enlarged significantly and
placed outside the margin, copied and screened behind the story, or even
replaced with a graphic.
|