Two things have been missing from your iPhone applications, the
first being the lack of a custom icon. This is crucial for the marketing
of your application; you need to bring your application design together to
present it to users. When a user scrolls through a long list of possible
applications on the App Store, applications with strong icon design stand
out. But remember that the user has to look at your application’s icon
every time he looks at the iPhone’s home screen. The icon has to be
distinctive to stand out, but it also has to be attractive so that the
user is willing to keep your application around. I’ve uninstalled
otherwise good applications because I couldn’t put up with their icons,
and I’m not alone.
1. Adding an Icon
The standard iPhone home screen icon used for your application
is 57×57 pixels square in PNG format with no transparency or
layers (Icon.png). You also must provide Apple with
a 512×512-pixel version of your application icon for display on the App
Store (iTunesArtwork with no extension; you will
need to provide this when you upload your app). This larger image must
be in TIFF or JPEG format, and again have no transparency or
layers.
It’s sensible to design your icon as 512×512 pixels and scale it
down to the 57×57-pixel version supplied inside your application’s
bundle. Doing things the other way around usually means that an
unattractive and often pixelated icon is shown on the App Store.
Note:
You can also provide a small icon, as a 29×29-pixel PNG file, in
your application bundle called Icon-Small.png.
Spotlight will use this icon on the device when the application name
matches a term in the search query. Additionally, if your application
includes a Settings Bundle, this icon is displayed next to your application’s name in
the Settings application. If you do not provide this icon, your
57×57-pixel image is automatically scaled and used instead.
Both the iPhone and the iTunes store will, by default, apply some
visual effects to the icon you provide. They will round the corners, and
add both drop shadows and reflected shine.
You can prevent iTunes from adding visual effects by setting the
UIPrerenderedIcon flag
inside the application’s Info.plist file. To do so,
open the <ApplicationName>-Info.plist file
for your project in the Xcode editor (it’s in the Resources folder under
Groups & Files) and click on the bottom entry, where a button with a
plus sign on it will appear to the righthand side of the key-value pair
table. Click on this button to add a new row to the table, and scroll
down the list of possible options and select “Icon already includes
gloss and bevel effects,” as shown in Figure 1. When you’ve done
so, check the box in the Value column to turn off the default visual
effects added by both iTunes and the iPhone.
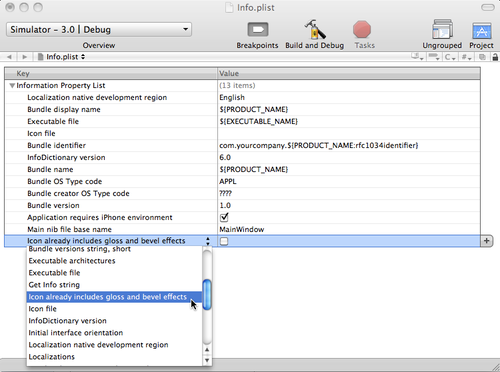
Figure 2 shows a sample
image from the Tango Desktop Project, which was released into the public
domain and is available from Wikimedia Commons. You can
find many public domain images at Wikimedia Commons. It’s advisable for
you to make modifications to the images you find there to avoid possible
confusion—because the images are public domain, other people may use
them in their own applications.

You can download the icon shown in Figure 2 from http://commons.wikimedia.org/wiki/File:Applications-internet.svg
(right-click or Ctrl-click the link labeled Applications-internet.svg and choose Save
Linked File). Open it in an image editor such as Adobe Illustrator or
the free and open source Inkscape.
Resize the file to 57×57 pixels and save it as a PNG file named
Icon.png. (If you are using Inkscape, you will need
to use File→Export Bitmap, choose the
Page option, and set the width and height to 57 before you click
Export.)
Next, open the City Guide application in Xcode. Drag and drop the
Icon.png file into the Resources group in the
Groups & Files pane, making sure to tick the box to indicate that
Xcode should “Copy items into destination’s group.” Now double-click on
the CityGuide-Info.plist file to open it in the
Xcode editor, and set the Icon file to Icon.png, as
shown in Figure 9-3.
If you build and deploy the application by clicking the Build and
Run button in the Xcode toolbar, the application will start inside
iPhone Simulator. If you quit the application by clicking the Home
button, you will see that it now has a shiny new icon, as shown in Figure 4.