7. Sprite Transparency
The smiley face texture we have been using is
circular, but sprites are always rectangular. Why is it then that we
don't end up with a rectangular box drawn around the edge of the sprite?
The reason is that we are using an image with
transparency information. Without this, the sprite would be drawn
completely to the edges of its draw rectangle. Figure 6
shows an example of drawing the smiley face texture without any
transparency. As you can see, it's not exactly the effect we want to
achieve in most cases.

We have two techniques at our disposal for making
transparent sections within our sprites: color keys and alpha channels.
Let's take a look at each of these techniques. Examples of both
techniques can be found within the Transparency example project.
NOTE
JPEG images are not recommended for use with
either of these transparency techniques. JPEG's lossy compression means
that colors are not stored accurately enough for color key transparency,
and the information required for alpha channels is not supported by
JPEG images. If you wish to use transparency, you will need to stick
with PNG image files instead.
7.1. Color Key Transparency
A color key provides the simplest mechanism for
making areas of your sprite transparent, but it is less flexible than
the alpha channel approach that we will discuss in a moment. A color key
identifies a particular pixel color within your image that will be
treated as transparent. Any and all pixels that exactly match the
specified color will become completely transparent when your sprite is
rendered, whereas all other pixels will be completely opaque.
By convention, the color fuchsia
is by default used as the color key. This has full intensity of red and
blue, and none of green, and is, by any other name, purple. This has
been chosen as it is a relatively infrequently used color within
computer graphics.
The ColorKey.png image in the Transparency
example's Content project is set up to use a color key. As you will see
when you run the project, the sprite is drawn as if it were circular,
and all the rest of the rectangular sprite area is left untouched when
the sprite is drawn.
But why has XNA decided to use the color key? And how
could we use a different color as the color key if we needed to use
fuchsia in our graphic? The answer to these questions can be found in
the Properties window for the ColorKey.png file within the Content project. If you expand the Content Processor property, you will find that hiding inside are properties named Color Key Enabled and Color Key Color, as shown in Figure 7. These default to True and 255, 0, 255, 255, respectively (the Color Key Color
values represent the red, green, blue and alpha values of the
transparent color). If you wish to disable the color key or change the
key color, modify these properties as required.

7.2. Alpha Channel Transparency
Color key transparency is a quick and simple method,
but it is binary: pixels are either fully transparent or fully opaque.
Sometimes we want more control than that, allowing individual pixels in
the image to have different degrees of transparency. We can achieve this
using an alpha channel.
As already discussed, each pixel color within an
image is made from varying the intensity of red, green, and blue. PNG
images are able to store one final additional value alongside each
pixel: the alpha value. This also ranges from 0 to 255, where 0
represents a fully transparent pixel (which will actually be completely
invisible when drawn to the screen) and 255 (which represents a fully
opaque pixel). The values inbetween form a smooth gradiation of
transparency levels.
Although the end results of using an alpha channel
are usually superior to those from color keyed graphics, the amount of
effort required to set up the graphic can be much greater. For more
information on how to use alpha channels in your graphics package of
choice, please consult its documentation.
|
Most well-featured graphics packages allow you to
work on an image's alpha channel. If you are looking for a flexible and
powerful image editor on a budget, try the freeware application
Paint.NET. Visit the web site at http://www.getpaint.net/ to download. Paint.NET has full alpha channel support, although it can take a while to get the hang of using it.
|
|
For images with alpha channels, there is no need to
set up any properties within the Content project: XNA will automatically
recognize and use the alpha data within the image. The Transparency
example project displays two instances of a graphic with an alpha
channel. The color data in the graphic is in fact completely white, but
the alpha data contains a radial fade from opaque in the image center to
fully transparent at the edges.
The project randomly changes the background color
every few seconds. Note how the alpha channel images blend in with the
background, taking on its color in their semitransparent regions. You
can also see how the two overlapping images blend with one another
rather than erasing the pixels of the sprite in the background.
|
Alpha channels can, of course, be used when tinting
sprites, too. Try changing the color of one of the alpha channel sprites
from Color.White to Color.Blue, for example, and see how the sprites now appear when the project is run.
|
|
8. Alpha Tinting
Now that we have discussed alpha channels and
transparency, we can revisit the sprite tinting feature that we
discussed a few pages back.
You may recall that we could define a color for
tinting by specifying the red, green, and blue intensity levels. But
hold on; if PNG images can store alpha information as well as color
information, can we use alpha values for tinting?
Well yes, we can. A further overload of the Color constructor allows an alpha value to be specified alongside the red, green, and blue values. If we set our SpriteBatch
object up in the appropriate way and pass the alpha value as something
other than 255 (or 1.0f, if you prefer the float-based version), the
sprite will be drawn semitransparently. This can be used to smoothly
fade objects in or out of the display, or to provide ghostly shadow
effects in your games.
To use this effect, we first need to specify a different parameter when calling the SpriteBatch.Begin method. Pass the value of BlendState.NonPremultiplied for the blendState
parameter. There are various methods that XNA uses to blend new
graphics with those already on the screen, and this is the one that
allows us to draw new sprites with varying levels of transparency.
Then it is simply a matter of providing an alpha level in your Color object: 0 for fully transparent; 255 for fully opaque. Listing 8 creates a series of smiley faces that are fully transparent on the left to opaque on the right. The results are shown in Figure 8.
Example 8. Drawing sprites with alpha tinting
// Begin a sprite batch with nonpremultiplied blending
        _spriteBatch.Begin(SpriteSortMode.Deferred, BlendState.NonPremultiplied);
        // Draw some sprites with different alpha tints
        for (int i = 0; i < 20; i++)
        {
            _spriteBatch.Draw(_smileyTexture, new Vector2(I * 20, 100),
new Color(255, 255, 255, i * 12));
        }
        // End the sprite batch
        _spriteBatch.End();
|
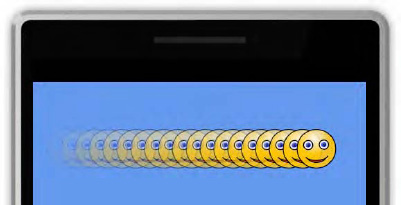
The example shown in Figure 8 can be found in the AlphaTinting project in the accompanying download.