You have now seen how easy it
is to draw a simple graphic to the screen, but sprites have a few more
tricks in store. Let's examine some of the other properties and
abilities of XNA sprites.
1. Supported Graphic Formats
We have a choice of graphic file formats to use when
loading images for use within our games. Some are distinctly better than
others. Here is a summary of the main formats that can be used:
BMP (bitmap)
files have a simple structure internally and are, therefore, easy for
graphics libraries to interact with. One of the reasons for this
simplicity is that they do not employ any form of compression at all.
For this reason, BMP files can be huge in terms of file size compared
with the other graphics formats that are available. BMP files do not
offer any form of transparency. There are no compelling reasons to use
BMP files, so please avoid using them wherever possible.
PNG
(Portable Network Graphics) files, as used for the smiley face image in
the previous example, are the most recently developed file format
supported by XNA. They can store graphics using the full 24-bit color
palette and are additionally able to support alpha (transparency)
information. They compress their content to reduce the size of the
graphic file. This compression is lossless, so no degradation of the image occurs as a result. For nonphotographic images, this is the file format that I recommend.
JPG (a contraction of JPEG,
the Joint Photographic Experts Group that developed the format) files
revolutionized the Web and have been an enabling technology in a range
of other areas too, such as digital cameras. The format's strength is
its ability to hugely compress images to file sizes that are
dramatically smaller than their uncompressed originals, far more so than
the PNG format is able to offer. The problem with this, however, is
that JPG uses a lossy compression
technique: after decompressing the image, you don't get back exactly
what you started with. Compressed JPGs quickly start to exhibit graphics
distortions, and this is most strongly apparent with graphics that
contain highly contrasting areas of color, such as those within a
computer game often do. JPG files can be useful for reducing the size of
photographic images, but are not well suited to hand-drawn game
graphics. Even with photographs, be careful not to compress the image to
a point where distortion begins to appear.
One familiar graphic format that you may notice is absent from the list is the GIF
(Graphics Interchange Format) file. XNA does not support GIF files.
This is not really much of a loss because PNG files can do almost
everything that GIF files can do, have better compression, support more
colors (24-bit color as opposed to GIF's 8-bit color), and have proper
alpha support. If you have a GIF file that you wish to use, convert it
to a PNG file and use it in that format instead.
2. Scaling
XNA can scale the sprite as we draw it, changing its size to make it smaller or larger. It can scale either uniformly (the sprite scales equally along the x and y axes) or non-uniformly (the x and y axes scale differently, stretching or squashing the image).
2.1. Using a Uniform Scaling Factor
There are several overloads of the SpriteBatch.Draw
method that support scaling in various different ways. The first and
simplest of these allows us to specify the amount of scaling that should
be applied to the sprite. The sprite width and height is multiplied by
the provided value to determine the finished size, so passing a value of
1 will leave the sprite size unchanged, 2 will double it, and so on.
NOTE
Passing a scale value of 0 will cause the width
and height to be multiplied by 0, with the result that your sprite will
vanish completely. This is particularly important to remember when you
aren't actually taking advantage of scaling but are using the other
features of the Draw methods instead. Remember that to draw your sprite at its normal size, you need to pass 1 as the scale factor.
The version of Draw that we use to access this scale parameter takes quite a few more parameters than the version we used earlier, as shown in Listing 1.
Example 1. Rendering a sprite with scaling
spriteBatch.Draw(_smileyTexture, new Vector2(100, 100), null, Color.White, 0,
                               Vector2.Zero, 3.0f, SpriteEffects.None, 0.0f);
|
From left to right, the parameters are as follows:
The sprite graphic texture to render (as before).
The position to render at (as before).
The area of the sprite texture to render (we will look at this parameter in more detail in the "Partial Image Rendering" section in a moment). Passing null tells XNA to render the entire image.
The render color (as before). We'll look at this parameter in the "Colorization" section coming up shortly.
The rotation angle. This is explained further in the next section.
The image origin. We'll discuss this soon.
The scaling factor. At last—this is where we tell XNA how much to enlarge or shrink the image.
Sprite effects. We'll look at these shortly.
Layer depth. This will be covered in a moment, too.
As you can see, this is quite a lot of extra data to
specify, but as shown it is easy to pass values that result in these
parameters having no effect.
In addition to the scaling factor, the origin parameter also has an effect on scaling. Listing 2-13 shows this passed as Vector2.Zero,
which produces a coordinate of (0, 0). The origin has two immediate
effects: it specifies which point within the image is actually being
specified by the position parameter and it controls the point around which scaling takes place.
Let's begin with the first effect. When we discussed rendering sprites back in the example project, we saw that the position parameter set the top-left corner of the rendered sprite. If we use the origin parameter, this allows us to control the location within the image that is actually set by position. For example, if we set the origin to new Vector2(10, 20), the point 10 pixels across the image and 20 pixels down the image would appear exactly at the location specified by position.
This may not sound very useful, but it becomes more
important when the second effect is considered because the origin point
within the image also becomes the center of image scaling. As the image
is scaled up or down, the origin point will stay in exactly the same
place, while the rest of the image scales around it.
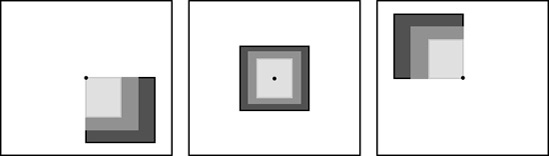
This can be seen in Figure 1,
in which the dot indicates the origin of the differently scaled
rectangular sprites. In the image on the left, the origin is set at (0,
0), so the sprites scale down and to the right. The middle image has the
origin in the center of the rectangle, causing the sprite to keep the
same center point as the rectangle is enlarged and reduced. The final
image shows the origin at the bottom-right corner of the sprite, causing
it to scale up and to the left. In all three images, the position parameter was passed as the same location.
It is also possible to scale with a negative factor,
which will cause the image to be mirrored horizontally and vertically
about the origin point.
2.2. Using a Non-uniform Scaling Factor
The Draw call in Listing 2-13
allows just a single value to be passed for the scaling factor, which
means that it only supports uniform scaling. Non-uniform scaling is no
harder to achieve, however: we just substitute a Vector2 structure in place of the float that we used before. The Vector2 x value will represent the scaling on the horizontal axis, and its y value will represent the scaling on the vertical axis.
An example non-uniform scale using this approach is shown in Listing 2. This listing doubles the width of the sprite and halves its height.
Example 2. Rendering a sprite with non-uniform scaling
spriteBatch.Draw(_smileyTexture, new Vector2(100, 100), null, Color.White, 0,
                Vector2.Zero, new Vector2(2.0f, 0.5f), SpriteEffects.None, 0.0f);
|
The origin parameter behaves in exactly the same way when using this approach as it did for uniform scaling.
2.3. Using a Destination Rectangle
The final method for scaling a sprite uses a slightly
different approach. Instead of specifying the position, an origin, and a
scale factor, we instead define the overall rectangle into which the
sprite is to be rendered.
Listing 3 shows a call to the Draw
method that scales a sprite in this way. The top-left corner of the
rendered sprite is at the coordinate (50, 50) and it has a width of 300
pixels and a height of 500 pixels. This puts the bottom-right corner at
the coordinate (350, 550).
Example 3. Rendering a sprite to fill a defined rectangle
spriteBatch.Draw(_smileyTexture, new Rectangle(50, 50, 300, 500), Color.White);
|
Exactly which of these
scaling approaches works best for you will depend on the way in which
you are using the sprite. Sometimes it is best to use a scaling factor
(particularly if you want the sprite to grow or shrink in size as the
game progresses), although other times a destination rectangle may be
the easier approach. Make sure you consider all the options to avoid
creating unnecessary work for yourself.