Transform controls live under every layer’s twirly
arrow. There are keyboard shortcuts to each Transform property. For a
standard 2D layer these are
A for Anchor Point, the center pivot of the layer
P for Position, by default the center of the composition
S for Scale (in percent of source)
R for Rotation (in revolutions and degrees)
T
for Opacity, or if it helps, “opaci-T” (which is not technically
spatial transform data but is grouped here anyhow because it’s
essential)
Once you’ve revealed one of these, hold down the Shift
key to toggle another (or to hide another one already displayed). This
keeps only what you need in front of you. A 3D layer reveals four
individual properties under Rotation to allow full animation on all
axes.
Add the Alt (Opt)
to each of these one-letter shortcuts to add the first keyframe; once
there’s one keyframe, any adjustments to that property at any other
frame generate another keyframe automatically.
There are selection tools to correspond to perform Transform adjustments directly in the viewer:
V activates the Selection tool, which also moves and scales in a view panel.
Y switches to the Pan-Behind tool, which moves the anchor point.
W is for “wotate”—it adjusts Rotation. Quite the sense of humor on that After Effects team.
Once you adjust with any of
these tools, an Add Keyframe option for the corresponding property
appears under the Animation menu, so you can set the first keyframe
without touching the Timeline panel at all.
Graph Editor
The project
02_bouncing_ball.aep in the accompanying disc’s examples folder contains
a simple animation, bouncing ball 2d, which can be created from
scratch; you can also see the steps below as individual numbered compositions.
To enable the Graph Editor, click its icon in the Timeline panel  or use the shortcut Shift+F3. Below the grid that appears in place of the layer stack are the Graph Editor controls (Figure 1).

Show Properties
By default, if nothing is
selected, nothing displays in the graph; what you see depends on the
settings in the Show Properties menu  . Three toggles in this menu control how animation curves are displayed in the graph:
Tip
To work in the Graph Editor without worrying about what is selected, disable Show Selected Properties and enable the other two. |
Show Selected Properties displays whatever animation property names are highlighted.
Show Animated Properties shows everything with keyframes or expressions.
Show Graph Editor Set displays properties with the Graph Editor Set toggle enabled.
Show Selected Properties is the
easiest to use, but Show Graph Editor Set gives you the greatest
control. You decide which curves need to appear, activate their Graph
Editor Set toggle, and after that it no longer matters whether you keep
them selected.
Tip
The
other recommended change prior to working through this section is to
enable Default Spatial Interpolation to Linear in Preferences >
General (Ctrl+Alt+; or Cmd+Opt+;). Try this if your initial animation doesn’t seem to match that shown in Figure 3.
|
To begin the bouncing ball animation, include Position in the Graph Editor Set by toggling its icon  . Alt+P (Opt+P) sets the first Position keyframe at frame 0; after that, any changes to Position are automatically keyframed.
Basic Animation and the Graph View
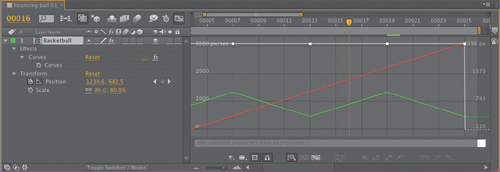
Figure 2
shows the first step: a very basic animation blocked in using Linear
keyframes, evenly spaced. It won’t look like a bouncing ball yet, but
it’s a typical way to start when animating, for new and experienced
animators alike.
To get to this point, do the following:
Having set the first keyframe at frame 0, move the ball off the left of the frame.
At frame 24, move the ball off the right of the frame, creating a second keyframe.
Create a keyframe at frame 12 (just check the box, don’t change any settings).
Now add the bounces: At frames 6 and 18 move the ball straight downward so it touches the bottom of the frame.
This leaves five Position
keyframes and an extremely unconvincing-looking bouncing ball
animation. Great—it always helps to get something blocked in so you can
clearly see what’s wrong. Also, the default Graph Editor view at this
point is not very helpful, because it displays the speed graph, and the
speed of the layer is completely steady at this point—deliberately so,
in fact.
To get the view shown in Figure 2, make sure Show Reference Graph is enabled in the Graph Options menu  . This is a toggle even advanced users miss, although it is
now on by default. In addition to the not-very-helpful speed graph you
now see the value graph in its X (red) and Y (green) values. However,
the green values appear upside-down! This is the flipped After Effects Y
axis in action; 0 is at the top of frame so that 0,0 is in the top-left
corner, as it has been since After Effects 1.0, long before 3D
animation was even contemplated.
Notes
Auto Select Graph Type selects speed graphs for spatial properties and value graphs for all others. |
Ease Curves
The simplest way to “fix” an
animation that looks too stiff like this is often to add eases. For this
purpose After Effects offers the automated Easy Ease functions,
although you can also create or adjust eases by hand in the Graph
Editor.
Warning
Mac
users beware: The F9 key is used by the system for the Exposé feature,
revealing all open panels in all applications. You can change or disable
this feature in System Preferences > Dashboard & Exposé. |
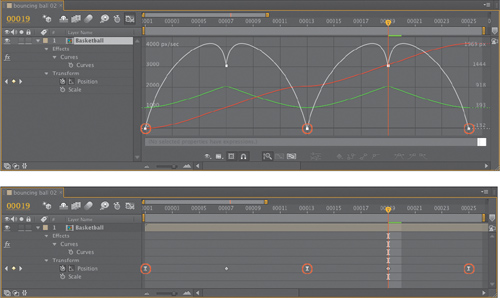
Select all of the “up” keyframes—the first, third, and fifth—and click Easy Ease  (F9).
When a ball bounces, it slows at the top of each arc, and Easy Ease
adds that arc to the pace; what was a flat-line speed graph now is a
series of arcing curves (Figure 3).
Technically, you could have applied Easy Ease Out  (Ctrl+Shift+F9/Cmd+Shift+F9) to the first keyframe and Easy Ease In
  (Shift+F9)
to the final one, because the ease in each case only goes in one
direction. The “in” and “out” versions of Easy Ease are specifically for
cases where there are other adjacent keyframes and the ease should only
go in one direction (you’ll see one in a moment). In this case it’s not
really necessary.
Meanwhile, there’s a clear
problem here: The timing of the motion arcs, but not the motion itself,
is still completely linear. Fix this in the Composition viewer by
pulling Bezier handles out of each of the keyframes you just eased:
1. | Deselect all keyframes but leave the layer selected.
|
2. | Make sure the animation path is displayed (Ctrl+Shift+H/Cmd+Shift+H toggles).
|
3. | Click on the first keyframe in the Composition viewer to select it; it should change from hollow to solid in appearance.
|
4. | Switch to the Pen tool with the G
key; in the Composition viewer, drag from the highlighted keyframe to
the right, creating a horizontal Bezier handle. Stop before crossing the
second keyframe.
|
5. | Do the same for the third and fifth keyframes (dragging left for the fifth).
|
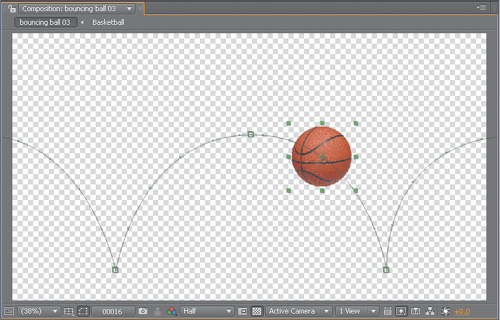
The animation path now looks more like you’d expect a ball to bounce (Figure 4).
Preview the animation, however, and you’ll notice that the ball crudely
pogos across the frame instead of bouncing naturally. Why is that?
Separate XYZ
The Graph Editor reveals
the problem. The red X graph shows an unsteady horizontal motion due to
the eases. The problem is that the eases should be applied only to the
vertical Y dimension, whereas the X animation travels at a constant
rate.
New to After Effects CS4 was
the ability to animate X and Y (or, in 3D, X, Y, and Z) animation
curves separately. This allows you to add keyframes for one dimension
only at a given point in time, or to add keyframes in one dimension at a
time.
Select Position and click Separate Dimensions  . Where there was a single Position property, there are now two marked X Position and Y Position. Now try the following:
1. | Disable the Graph Editor Set toggle for Y Position so that only the red X Position graph is displayed.
|
2. | Select the middle three X Position keyframes—you can draw a selection box around them—and delete them.
|
3. | Select the two remaining X keyframes and click the Convert Selected Keyframes to Linear button  . .
|
Now take a look in the
Composition viewer—the motion is back to linear, although the temporal
eases remain on the Y axis. Not only that, but you cannot redraw them as
you did before; enabling Separate Dimensions removes this ability.
Instead, you can create them in the Graph Editor itself.
1. | Enable the Graph Editor Set toggle for Y Position, so both dimensions are once again displayed.
|
2. | Select
the middle Y Position keyframe, and you’ll notice two small handles
protruding to its left and right. Drag each of these out, holding the
Shift key if necessary to keep them flat, and notice the corresponding
change in the Composition viewer (Figure 5).

Tip Show Graph Tool Tips displays values of whatever curve is under the mouse at that exact point in time. |
|
3. | Select
the first and last Y Position keyframes and click Easy Ease; the
handles move outward from each keyframe without affecting the X Position
keyframes.
|
4. | Drag
the handles of the first and last Y Position keyframes as far as they
will go (right up to the succeeding and preceding keyframes,
respectively).
|
Tip
Separate
Dimensions does not play nicely with eases and cannot easily be
round-tripped back, so unfortunately you’re best to reserve it for
occasions when you really need it. |
Preview the result and
you’ll see that you now have the beginnings of an actual bouncing ball
animation; it’s just a little bit too regular and even, so from here you
give it your own organic touch.
Transform Box
The transform box lets you
edit keyframe values in all kinds of tricky or even wacky ways. Toggle
on Show Transform Box and select more than one keyframe, and a white box
with vertices surrounds the selected frames. Drag the handle at the
right side to the left or right to change overall timing; the keyframes
remain proportionally arranged.
Notes
There is a whole menu  of options to show items that you might think are only in Layer view:
layer In/Out points, audio waveforms, layer markers, and expressions.
 |
So, does the transform box help in this case? Well, it could, if you needed to
scale the animation timing around a particular keyframe: Drag the anchor to that frame, then Ctrl-drag (Cmd-drag)
reverse the animation: Ctrl-drag/Cmd-drag
from one edge of the box to the other (or for a straight reversal,
simply context-click and choose Keyframe Assistant > Time-Reverse
Keyframes)
Notes
The Snap button  snaps to virtually every visible marker, but not—snap!—to whole frame values if Allow Keyframes Between Frames is on snaps to virtually every visible marker, but not—snap!—to whole frame values if Allow Keyframes Between Frames is on  . . |
diminish the bounce animation so that the ball bounces lower each time: Alt-drag (Opt-drag) on the lower-right corner handle (Figure 6)

If you Ctrl+Alt-drag (Cmd+Opt-drag) on a corner that will taper values at one end, and if you Ctrl+Alt+ Shift-drag (Cmd+Opt+Shift-drag)
on a corner, it will skew that end of the box up or down. I don’t do
that kind of stuff much, but with a lot of keyframes to scale
proportionally, it’s a good one to keep in your back pocket.
Holds
At this point you may have a
fairly realistic-looking bouncing ball; maybe you added a little
Rotation animation so the ball spins forward as it bounces, or maybe
you’ve hand-adjusted the timing or position keys to give them that extra
little organic unevenness. Hold keyframes won’t help improve this
animation, but you could use them to go all Matrix-like with it, stopping the ball mid-arc before continuing the action. A Hold keyframe  (Ctrl+Alt+H/Cmd+Shift+H) prevents any change to a value until the next keyframe.
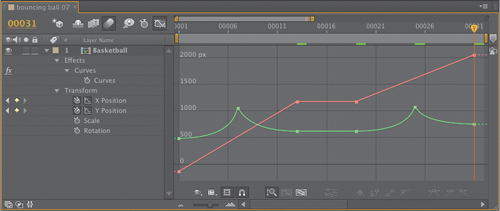
Drag all keyframes from the one
at the top of the middle arc forward in time a second or two. Copy and
paste that mid-arc keyframe (adding one for any other animated
properties or dimensions at that point in time) back to the original
keyframe location, and toggle it to a Hold keyframe (Figure 7).
Beyond Bouncing Balls
In
the (reasonably likely) case that the need for a bouncing ball
animation never comes up, what does this example show you? Let’s recap:
You can control a Bezier motion path in the Composition viewer using the Pen tool.
Realistic
motion often requires that you shape the motion path Beziers and add
temporal eases; the two actions are performed independently on any given
keyframe, and in two different places (in the viewer and Timeline
panel).
Animation can get a little trickier in 3D, but the same basic rules apply .
Three preset keyframe transition types are available, each with a shortcut at the bottom of the Graph Editor: Hold  , Linear
  , and Auto Bezier
  . Adjust the handles or apply Easy Ease and the preset becomes a custom Bezier shape.
Copy and Paste Animations
Yes, copy and paste; everyone
knows how to do it. Here are some things that aren’t necessarily
obvious about copying and pasting keyframe data:
Copy a set of
keyframes from After Effects and paste them into an Excel spreadsheet or
even an ordinary text editor, and behold the After Effects keyframe
format, ready for hacking.
You
can paste from one property to another, so long as the format matches
(the units and number of parameters). Copy the source, highlight the
target, and paste.
Tip
You can
use an Excel spreadsheet to reformat underlying keyframe data from other
applications; just paste in After Effects data to see how it’s
formatted, and then massage the other data to match that format (if you
have Excel skills, so much the better). Once done, copy and paste the
data back into After Effects. |
Keyframes
respect the position of the current time indicator; the first frame is
always pasted at the current time (useful for relocating timing, but
occasionally an unpleasant surprise).
There’s a lock on the Effect Controls tab to keep a panel forward even when you select another layer to paste to it.
Copy and paste keyframes from an effect that isn’t applied to the target, and that effect is added along with its keyframes.
Close-up: Roving Keyframes
Sometimes
an animation must follow an exact path, hitting precise points, but
progress steadily, with no variation in the rate of travel. This is the
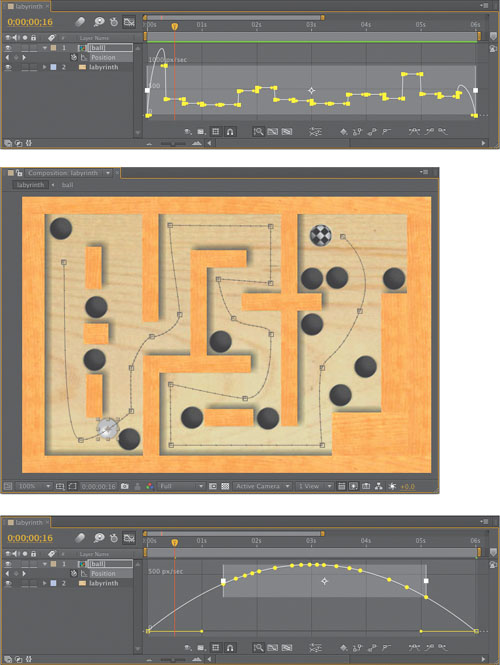
situation for which Roving keyframes were devised. Figure 8
shows a before-and-after view of a Roving keyframe; the path of the
animation is identical, but the keyframes proceed at a steady rate.
|
Pay close attention to the current time and what is selected when copying, in particular, and when pasting animation data.
Layer vs. Graph
To summarize the distinction between layer bar mode and the Graph Editor, with layers you can
block in keyframes with respect to the overall composition
establish broad timing (where Linear, Easy Ease, and Auto-Bezier keyframes are sufficient)
The Graph Editor is essential to
refine an individual animation curve
compare spatial and temporal data
scale animation data, especially around a specific pivot point
perform extremely specific timing (adding a keyframe in between frames, hitting a specific tween point with an ease curve)
In either view you can
edit expressions
change keyframe type (Linear, Hold, Ease In, and so on)
make
editorial and compositing decisions regarding layers such as
start/stop/duration, split layers, order (possible in both views, easier
in Layer view)
By no means, then, does the
Graph Editor make Layer view obsolete; Layer view is still where the
majority of compositing and simple animation is accomplished.
Notes
You
must enable Allow Keyframes Between Frames in the Graph Editor or they
all snap to exact frame increments. However, when you scale a set of
keyframes using the transform box, keyframes will often fall in between
frames whether or not this option is enabled. |