To edit text—whether it’s in a box, flowing along a path, or in a table cell—you need to use the Text Content tool  .
To select it, press T. (If the Text Linking or Text Unlinking tool is
selected, press T until the Text Content tool is selected.) If you’re
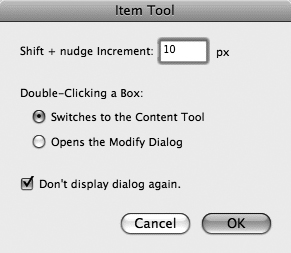
using the Item tool, double-click in text to automatically switch to the
Text Content tool. If you prefer that double-clicking the Item tool
opens the Modify dialog box, as it did in prior versions of QuarkXPress,
you can set a preference for that behavior (Preferences > Tools >
Item Tool, Figure 1).
.
To select it, press T. (If the Text Linking or Text Unlinking tool is
selected, press T until the Text Content tool is selected.) If you’re
using the Item tool, double-click in text to automatically switch to the
Text Content tool. If you prefer that double-clicking the Item tool
opens the Modify dialog box, as it did in prior versions of QuarkXPress,
you can set a preference for that behavior (Preferences > Tools >
Item Tool, Figure 1).
Tip: Show Invisible Characters
When
you’re working with text, it’s helpful to see the spaces, tabs,
paragraph returns, and other nonprinting characters. This helps you make
accurate selections when formatting, cutting and pasting, and so on. To
show invisible characters onscreen, choose View > Invisibles.
Positioning the text insertion point
To start typing, click
the Text Content tool in text or in a text box, on a line, or in a
table cell. You can move the text insertion point with the mouse, but if
you’re editing a significant amount of text, you may not want to move
your hands off the keyboard. In that case, you can use the arrow keys on
your keyboard to move the insertion point left, right, up, and down.
Add the Command (Mac) or Control (Windows) key to move an entire word to
the left or right, up to the top of a paragraph, or down to the bottom
of the paragraph. Press Command+Option (Mac) or Control+Alt (Windows)
with the arrows to move to the start or end of a line or the start or
end of a story.
Selecting text
QuarkXPress
provides various methods for selecting text for editing and formatting.
You can click and drag, click the mouse, or use the arrows on the
keyboard. To select text by clicking the mouse:
Word: Click twice in the word.
Line: Click three times in the line.
Paragraph: Click four times in the paragraph.
Story: Click five times in the story or choose Edit > Select All.
Selecting text with the
arrow keys is similar to moving the text insertion point. Press the
arrows along with modifier keys to select text to the left, right,
above, and below the text insertion point:
Previous or next character: Press Shift with the left or right arrow key.
Previous or next line: Press Shift with the up or down arrow key.
Previous or next word: Press Command+Shift (Mac) or Control+Shift (Windows) with the left or right arrow key.
Previous or next paragraph: Press Command+Shift (Mac) or Control+Shift (Windows) with the up or down arrow key.
Start or end of line: Press Command+Option+Shift (Mac) or Control+Alt+Shift (Windows) with the left or right arrow key.
Start or end of story: Press Command+Option+Shift (Mac) or Control+Alt+Shift (Windows) with the up or down arrow key.
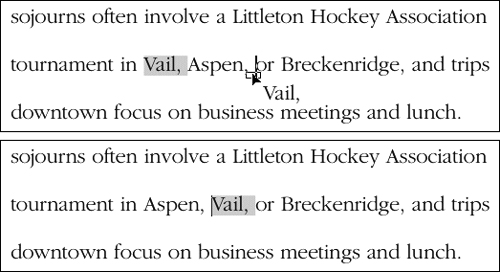
Dragging and dropping text
When Drag and Drop Text
is enabled, you can select text and drag it to a new location with the
mouse—basically another way to cut and paste text. To do this, click on
the selected text, drag the text insertion point to a new location, and
release the mouse button (Figure 2). Press the Shift key while you drag to copy the text rather than move it.
Tip: Enabling Drag and Drop Text
To
enable Drag and Drop Text, check it in the Input Settings tab of the
Preferences dialog box. When the feature is disabled, you can press
Command+Control to drag and drop selected text (Mac only).
Locking text
If you want to prevent
yourself or others from accidentally—or purposely—editing the text in a
story, choose Item > Lock > Story. When you try to edit the story,
a lock icon displays. (While it’s easy to unlock a story, you at least
have to think about why it was locked and whether it should be edited.)
When using Find/Change and Spell Check, you can specify whether to
search locked text.
Changing case
If you receive text with
incorrect capitalization, you can automatically change the case without
retyping the text. To do this, select the text and choose Style >
Change Case and then UPPERCASE, lowercase, or Title Case. In general,
for all uppercase formatting, it’s better to apply the All Caps type
style (Style > Type Style > ALL CAPS) because you can easily
remove it and restore the previous capitalization.