IT tutorials
 
Graphics
 

QuarkXPress 8 : Modifying text boxes

2/7/2012 4:56:22 PM
- Free product key for windows 10
- Free Product Key for Microsoft office 365
- Malwarebytes Premium 3.7.1 Serial Keys (LifeTime) 2019
QuarkXPress gives you precise control over how text is positioned within a box, including the number of columns in the box, how far text is inset from the edges of the box, whether text is rotated within the box, and more. All the positioning controls are available in the Text tab of the Modify dialog box (Item menu) shown in Figure 1. Review these controls to see all the design possibilities: Text Angle, Text Skew, Flip Horizontal. Many of these commands are available in the Measurements palette for quick access as well.
Figure 1. The Text tab of the Modify dialog box controls how text is positioned within the selected text box.


Setting up columns

You can specify the number of columns for a text box and the amount of space between them in the Cols. field and the Gutter field on the Text tab of the Measurements palette (Figure 2). If you need columns of different widths, draw separate text boxes and link them.

Figure 2. The Cols. and Gutter fields on the Text tab of the Measurements palette let you quickly adjust columns.


Positioning text vertically

By default, the first line of text is placed at the top of a box, and the text flows down with line spacing controlled by leading. The placement of the first line is controlled by the First Baseline settings in the Text tab of the Modify dialog box (Item menu). You can change the positioning by clicking the Vertical Alignment icons on the Text tab of the Measurements palette (Figure 3). From left to right, the options are Top, Centered, Bottom, and Justified.
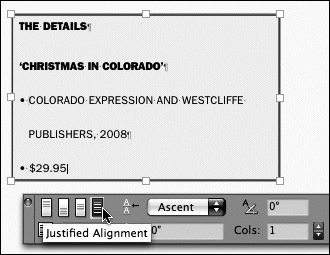
Figure 3. The Vertical Alignment icons on the Text tab control the vertical placement of text within a box.


For justified vertical alignment, QuarkXPress overrides the paragraph leading and space before and after paragraphs to evenly spread the text throughout the box. You can specify the maximum amount of space added between paragraphs in the Interparagraph ¶ Maximum field on the Text tab of the Measurements palette or Modify dialog box. The Justified Alignment option works best if you remove the last paragraph return in the box.

Specifying text insets
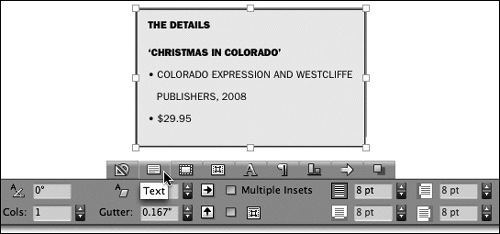
When a text box has a background color or frame, you often need to inset it from the edges of the text box. To do this, enter a value in the Inset Text on All Edges field on the Text tab of the Measurements palette (Figure 4). For rectangular text boxes, you can check Multiple Insets and enter values for the Top, Bottom, Left, and Right insets.

Figure 4. Here, text is inset 8 points from all edges of the box.


Using a baseline grid

A baseline grid consists of horizontal lines that text “sits” on. Setting up a baseline grid for an entire document or an individual text frame makes it easy to align text horizontally across columns regardless of varying leading and spacing values before and after paragraphs. Generally, the distance specified between gridlines in the baseline grid is the same as the leading value for body text (around 12 points, for example). Some graphic designers swear by the baseline grid for carefully positioning text, whereas others find it too formulaic.

To create a baseline grid for a master page, choose Page > Master Guides & Grid when a master page is displayed. To create a grid for an individual text box, use the Grid Styles palette (Window menu) shown in Figure 5. 
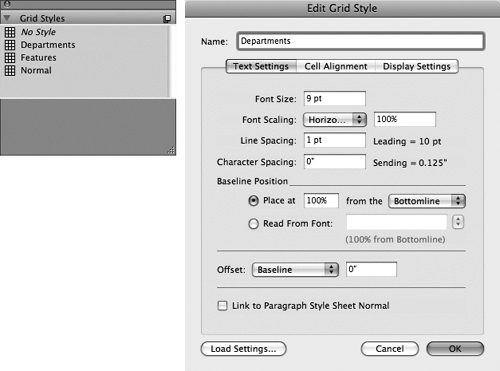
Click the palette menu and choose New to open the Edit Grid Style dialog box and set up the spacing and guide colors for the baseline grid (Figure 6). You can then drag grid styles from the Grid Styles palette to individual text boxes. Choose View > Page Grids and View > Text Box Grids to display baseline grids onscreen.
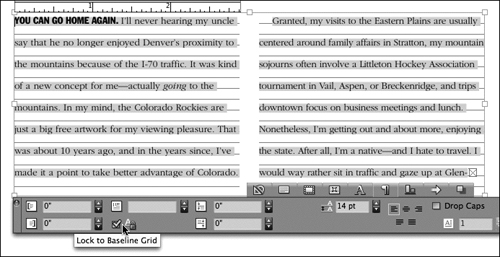
Figure 5-6. At left, the Grid Styles palette lets you create and apply baseline grid styles. Use the Edit Grid Style dialog box to set up the spacing and display of the grid.

Once you set up a baseline grid for a page or text box, you still need to “snap” paragraphs to it. Select the paragraphs and click Lock to Baseline Grid in the Text tab of the Measurements palette (Figure 7). You can also check Lock to Grid in the Formats tab of the Paragraph Attributes dialog box (Style menu).

Figure 7. The Lock to Baseline Grid icon on the Text tab of the Measurements palette aligns selected paragraphs with the grid applied to the text box or page.
 
Others
 
- Adobe Flash Professional CS5 : Using the History Panel
- Adobe Flash Professional CS5 : Working with Compound Shapes, Editing with Find and Replace
- Adobe InDesign CS5 : Using Scripts - Exploring JavaScript
- Adobe InDesign CS5 : Using Scripts & Script tips
- Adobe Flash Catalyst CS5 : Changing stroke and fill (part 2) - Change stroke color and weight, Add and modify gradient fills
- Adobe Flash Catalyst CS5 : Changing stroke and fill (part 1) - Change the fill color
- Adobe Illustrator CS5 : Working with Layers - Showing and Hiding Layers and Objects, Merging Layers and Groups
- Adobe Illustrator CS5 : Working with Layers - Duplicating Layers and Objects, Locking Layers and Objects
- Dreamweaver CS5 : Editing Content in the Browser (part 2) - Registering an InContext Editing site & Making edits online
- Dreamweaver CS5 : Editing Content in the Browser (part 1) - Setting up InContext Editing templates
 
 
Top 10
 
- Microsoft Visio 2013 : Adding Structure to Your Diagrams - Finding containers and lists in Visio (part 2) - Wireframes,Legends
- Microsoft Visio 2013 : Adding Structure to Your Diagrams - Finding containers and lists in Visio (part 1) - Swimlanes
- Microsoft Visio 2013 : Adding Structure to Your Diagrams - Formatting and sizing lists
- Microsoft Visio 2013 : Adding Structure to Your Diagrams - Adding shapes to lists
- Microsoft Visio 2013 : Adding Structure to Your Diagrams - Sizing containers
- Microsoft Access 2010 : Control Properties and Why to Use Them (part 3) - The Other Properties of a Control
- Microsoft Access 2010 : Control Properties and Why to Use Them (part 2) - The Data Properties of a Control
- Microsoft Access 2010 : Control Properties and Why to Use Them (part 1) - The Format Properties of a Control
- Microsoft Access 2010 : Form Properties and Why Should You Use Them - Working with the Properties Window
- Microsoft Visio 2013 : Using the Organization Chart Wizard with new data
Technology FAQ
- Is possible to just to use a wireless router to extend wireless access to wireless access points?
- Ruby - Insert Struct to MySql
- how to find my Symantec pcAnywhere serial number
- About direct X / Open GL issue
- How to determine eclipse version?
- What SAN cert Exchange 2010 for UM, OA?
- How do I populate a SQL Express table from Excel file?
- code for express check out with Paypal.
- Problem with Templated User Control
- ShellExecute SW_HIDE
programming4us programming4us