IT tutorials
 
Graphics
 

Adobe Flash Professional CS5 : Working Within the Flash Environment - Working with Page Setup in Macintosh

6/17/2013 9:29:58 PM
- Free product key for windows 10
- Free Product Key for Microsoft office 365
- Malwarebytes Premium 3.7.1 Serial Keys (LifeTime) 2019
You can use the Page Setup dialog box in Macintosh to select the size and location in the printer of the paper you want to use. You can also select the page orientation (portrait or landscape) that best fits the entire document or any selection. Portrait orients the page vertically (taller than it is wide) and landscape orients the page horizontally (wider than it is tall). When you shift between the two, the margin settings automatically change. Margins are the blank spaces between the edges of a page and the image. The printer only prints within these margins. You can use the Print Margins dialog box to change margins and layout. The layout options allow you to specify the frames you want to print, and the frame size and display on the page.

Work with Page Setup in Macintosh

1. Open a document.

2. Click the File menu, and then click Page Setup.

3. Click the Settings list arrow, and then click Page Attributes.

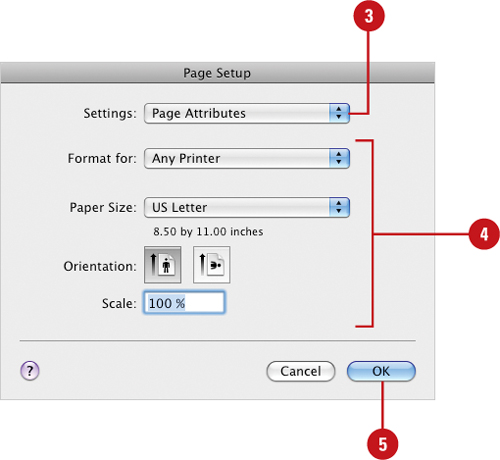
4. Select from the various Page Attributes options:

  • Format For. Click the Format For list arrow, and then select a printer. If your printer is not accessible from the list, click the Edit Printer List, and then add your printer (you may need the printer disc, or access to the Internet, to load the latest drivers).

  • Paper Size. Click the Paper Size list arrow, and then select from the available options. The default printer will determine the available paper sizes.

  • Orientation. Click the Portrait, Landscape Left, or Landscape Right button.

  • Scale. Enter a percentage value to increase (over 100) or decrease (under 100) the size of the printed document.

5. Click OK.

Change Print Margins and Layout in Macintosh

1. Open a document.

2. Click the File menu, and then click Print Margins.

3. Enter Left, Right, Top, and Bottom page margins, and then select the Center check boxes to center material on the page.

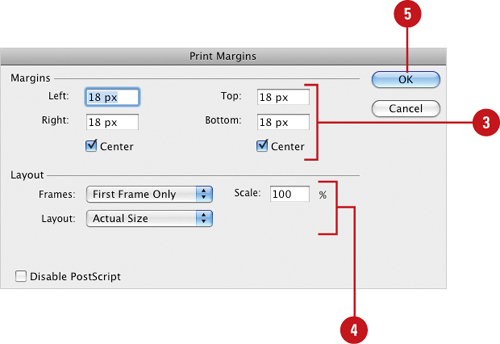
4. Select from the Layout options:

  • Frames. Click the Frames list arrow, and then click First Frame Only or All Frames.

  • Layout. Click the Layout list arrow, and then select a layout option: Actual Size, Fit On One Page, or one of the Storyboard options.

  • Scale. Enter a scale percentage value.

5. Click OK.
 
Others
 
- Adobe Flash Professional CS5 : Working Within the Flash Environment - Setting Warning Preferences
- Adobe Flash Professional CS5 : Working Within the Flash Environment - Setting Text Preferences, Setting Clipboard Preferences
- QuarkXPress 8 : Special effects for pictures - Exporting modified pictures, Managing imported pictures
- QuarkXPress 8 : Special effects for pictures - Making adjustments, Applying filters
- Adobe InDesign CS5 : Working with Objects and Layers - Shearing Objects
- Adobe InDesign CS5 : Working with Objects and Layers - Scaling Objects
- Adobe InDesign CS5 : Working with Objects and Layers - Using the Free Transform Tool
- Adobe Illustrator CS5 : Working with Objects - Reflecting and Shearing Objects
- Adobe Illustrator CS5 : Working with Objects - Rotating and Scaling Objects
- Corel Painter X : Mixed-Up Media - Isn’t That Special (part 2) - Spraying Color—or Candy
 
 
Top 10
 
- Microsoft Visio 2013 : Adding Structure to Your Diagrams - Finding containers and lists in Visio (part 2) - Wireframes,Legends
- Microsoft Visio 2013 : Adding Structure to Your Diagrams - Finding containers and lists in Visio (part 1) - Swimlanes
- Microsoft Visio 2013 : Adding Structure to Your Diagrams - Formatting and sizing lists
- Microsoft Visio 2013 : Adding Structure to Your Diagrams - Adding shapes to lists
- Microsoft Visio 2013 : Adding Structure to Your Diagrams - Sizing containers
- Microsoft Access 2010 : Control Properties and Why to Use Them (part 3) - The Other Properties of a Control
- Microsoft Access 2010 : Control Properties and Why to Use Them (part 2) - The Data Properties of a Control
- Microsoft Access 2010 : Control Properties and Why to Use Them (part 1) - The Format Properties of a Control
- Microsoft Access 2010 : Form Properties and Why Should You Use Them - Working with the Properties Window
- Microsoft Visio 2013 : Using the Organization Chart Wizard with new data
Technology FAQ
- Is possible to just to use a wireless router to extend wireless access to wireless access points?
- Ruby - Insert Struct to MySql
- how to find my Symantec pcAnywhere serial number
- About direct X / Open GL issue
- How to determine eclipse version?
- What SAN cert Exchange 2010 for UM, OA?
- How do I populate a SQL Express table from Excel file?
- code for express check out with Paypal.
- Problem with Templated User Control
- ShellExecute SW_HIDE
programming4us programming4us