Understanding Vector and Raster Graphics
Illustrator
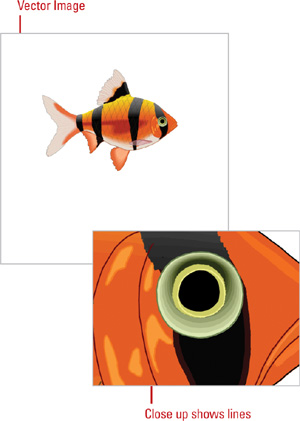
is an application that gives you great control over vector graphics,
which include vector shapes and vector objects. Vector graphics are
created using mathematical shapes, not pixels, and that’s why vector
shapes are considered resolution-independent. For example, if you
enlarge a vector image to 100 times its original size, Illustrator
merely changes the mathematical formulas to reflect the new size, and
since vector shapes are constructed of mathematical data instead of
pixels, file sizes are extremely small.
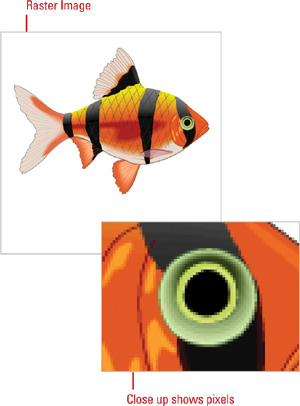
Raster graphics, such as
bitmaps and photographs, are images creating using individual pixels
that identify one piece of color information. The reason raster images
are considered resolution-dependent is that once the image is created or
scanned, any enlargement of the image forces Illustrator to enlarge and
average the existing color information in the document. This process,
called interpolation, is what causes enlarged raster images to become blurred, or pixelated.


Understanding Paths
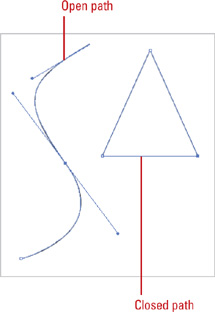
When you draw an object, you create one or more lines called a path. A path is made up of one or more curved or straight lines, known as segments. The start and end points for a segment is called an anchor point.
An anchor point is a bending point to modify the line segment. A path
can be open or closed. An open path has open-ended endpoints, such as a
line, while a closed path has connected endpoints, such as a circle.
Paths can have two types of anchor points: smooth points or corner
points. A smooth point connects two curved segments to create a smooth
line, while a corner point connects two straight or curved segments to
create a path direction change. You can draw a path using both smooth
and corner points. The outline of a path is called a stroke, which you
can format with different characteristics. You can specify stroke weight
(thickness), color, or a dashed pattern. The interior of an open or
closed path is called a fill, which you can also format with a color or
gradient.
You can change the shape of a
path by dragging its anchor point. A selected anchor point or endpoint
appears as a solid square, while an unselected one appears as a white
square. When you select an anchor point with a curved segment, a
direction line appears with direction points on each end, which you can
drag to change the shape of the path. When you change the shape of a
smooth point with curved segments on each side, both segments get
changed. When you change a shape of a corner point, the corner is
maintained, but adjusted based on the change.
Working with Anchor Points
In Illustrator, you can show or hide anchor points, direction lines, and direction points by choosing the View menu, and then choosing Show Edges or Hide Edges. If you want to show or hide direction lines for selected anchor points, select the Direct Selection tool, select the anchor point that you want, and then click Show Handles For Multiple Selected Anchor Points or Hide Handles For Multiple Selected Anchor Points button in the Control panel.
You can specify options
in the Selection & Anchor Display preferences to always show handles
when multiple anchor points are selected (this option is turned off by
default).

Selecting a Drawing Mode
In
Illustrator, you can specify how and where you want to draw an object.
You can draw on top of an object, behind an object, or inside an object
using one of the following drawing modes (New!):
Draw Normal, Draw Behind, or Draw Inside. Draw Normal mode is the
default drawing mode and the one used in previous versions of
Illustrator. The Draw Behind mode allows you to draw behind all objects
on a selected layer (no other objects selected). If an object is
selected, the new object is drawn directly behind it. The Draw Inside
mode allows you to draw inside a single selected object, which
automatically creates a clipping mask from the select object. You can
select a drawing mode at the bottom of the Tools panel or use the
Shift+D keyboard shortcut to cycle through each one.
Select a Drawing Mode
 Select the Drawing Mode
tool on the Tools panel:
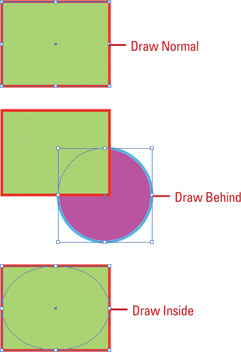
- Draw Normal. Draws an object on top of any other object; the default mode.
- Draw Behind. Draws an object behind all objects (no selection) or directly behind a selected object.
- Draw Inside. Draws an object inside a single selected object.


Timesaver
Press Shift+D to cycle through the Drawing Mode tools.
Did You Know?
You can create a clipping mask using the Draw Inside mode.
Select the path you want to draw, and then click the Draw Inside mode
button on the Tools panel. Subsequent paths are clipped by the selected
path until you switch to the Draw Normal mode. The clipping masks
created using the Draw Inside mode retain the appearance on the clipping
path unlike the Make command on the Clipping Mask submenu on the Object
menu.