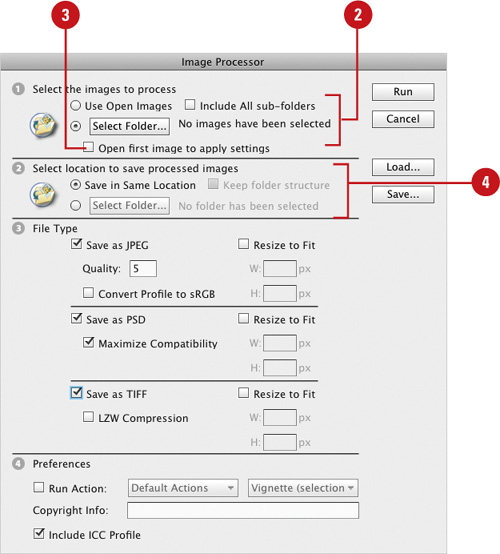
The Image Processor command in Photoshop
allows you to convert and process multiple files without first creating
an action, which is something you need to do with the Batch command. The
Image Processor options make it easy to convert a set of files to
either JPEG, PSD, or TIFF, or all three formats at the same time. When
you take a lot of digital pictures, you can process the raw files all at
once using the same options. If you are working on a collage with
specific size and color requirements, you can use Image Processor to
resize images to specific dimensions and embed a color profile or change
the color mode to sRGB (the default working space for most Adobe color
settings and the one recommended for web and digital camera images). In
addition, you can include copyright metadata into any of the converted
images.
Use the Image Processor Command
1. Click the File menu, point to Scripts, and then click Image Processor.
|
2. Click the Use Open Images option or click Select Folder to select the images or folder to process. You now also have the option to choose to include sub-folders.
 |
3. Select the Open First Image To Apply Settings check box to apply the same settings to all the images.
This allows you to adjust the settings in the first image, and then apply the same settings to the rest of the images.
|
4. Click the Save in Same Location option or click Select Folder
to select the location in which to save processed images. You also now
have the option to keep the original folder structure when saving.
If you process the same file multiple times and save it to the same
location, each file is saved with a unique file name so it’s not
overwritten.
|
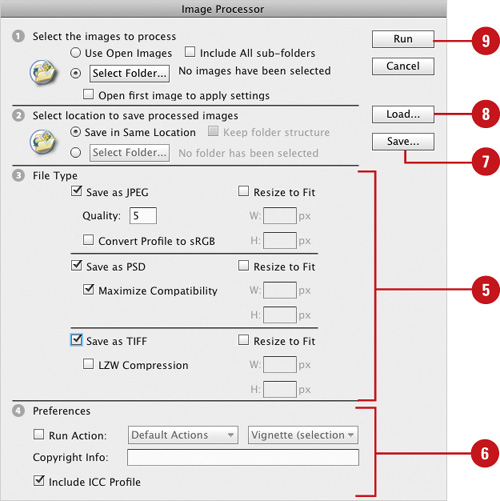
5. Select from the following options:
- Save As JPEG. Saves image in JPEG format.
- Quality. Enter a quality value between 0 and 12 (3 or 4 recommended for web graphics).
- Resize To Fit. Resizes the images to fit the width and height in pixels.
- Convert Profile To sRGB. Converts the color profile to sRGB; select the Include ICC Profile check box to save it.
- Save As PSD. Saves images in the PSD Photoshop format.
- Maximize Compatibility. Saves a composite of a layer image for programs that can’t read layered images.
- Save As TIFF. Saves images in the TIFF format.
- LZW Compression. Saves TIFF files using the LZW compression scheme.
 |
6. Select from the following Preferences options:
- Run Action. Runs a selected Photoshop action.
- Copyright Info. Includes file information entered in the IPTC copyright metadata.
- Include ICC Profile. Embeds the color profile with the saved image files.
|
7. To save your settings, click Save, enter a name, and then click Save.
|
8. To load saved settings, click Load, select the settings file, and then click Open.
|
9. Click Run.
|
You can rename files and folders in a batch,
or group, to save time. With Bridge, you can select the same settings
for all the files you want to process. Launch Adobe Bridge, select the
files you want to rename or select a folder in the Folders panel that
contains the files you want to rename. Launch the Batch Rename command
from the Bridge Tools menu. You will need to decide whether to rename in
the same folder, move, or copy the files and choose a destination
folder if you choose to move or copy them. Then you can choose how the
new file names will look by choosing options from drop-down menus or
entering your own text to create file names (click plus (+) to add and
minus (-) to remove data options). You can also choose to preserve the
original file name in the XMP Metadata and choose your preferred
operating system compatibility.