Selecting Color Modes and Resolution
Selecting a Color Mode
A color mode, also known as color space,
determines how Photoshop displays and prints an image. You choose a
different color mode (based on models used in publishing) for different
tasks. You can choose a color mode when you create a new document or
change a color mode for an existing document. The common color modes
include:
Grayscale. Best for printing black-and-white and duotone images. This mode uses one channel and has a maximum of 256 shades of gray.
RGB (Red, Green, and Blue). Best for online and multimedia color images. Red, green, and blue are also the primary colors on a monitor.
CMYK (Cyan, Magenta, Yellow, and Black). Best for commercial printing of color images.
LAB (Luminosity, A and B channels).
Best for performing image correction. This mode puts all grayscale
information on the L channel and splits the colors to the A and B
channels.
Selecting Image Resolution
Photoshop works primarily with raster documents. Raster documents are images composed of pixels. A pixel
is a unit of information that holds the color and detail information of
the image. Think of a Photoshop document as a brick wall, with the
individual bricks in the wall representing the individual pixels in the
image. Documents opened in Photoshop have a specific resolution. The resolution
of the image, along with its width and height, represents how many
pixels the image contains. Since pixels (the bricks in the wall)
represent information, the more pixels a document contains, the more
information Photoshop has to manipulate or enhance the image.
A typical 17-inch monitor
displays pixels at a resolution of 1,024 × 768 pixels per inch. You can
figure out how many pixels are present on a 17-inch monitor by
multiplying 1,024 × 768, which equals 786,432 pixels on the screen. The
resolution is equal to how many pixels fit into each monitor inch,
otherwise known as ppi (pixels per inch). A typical monitor displays pixels at 72 pixels per inch.
To determine the size of
an image in inches, we divide the pixels by the ppi. For example, an
image 1,024 pixels wide at 72 ppi would be 14.2 inches wide (1,024 / 72 =
14.2). To determine the pixels present in an image, you multiple the
size by the ppi. For example, a 3 inch image at 72 ppi would have a
total of 216 pixels (3 × 72 = 216). As the image resolution drops, so
does the output quality of the image. Pixelization
occurs when the resolution is so low that the edges of the pixel begin
to appear. The higher the resolution (more pixels), the sharper your
image will be. However, the higher the resolution, the larger the file
size will become. To optimize your image file size, you need to use the
correct resolution for the specific task. Use 72 ppi for web pages,
CD/DVDs, and multimedia; use 150 ppi for inkjet printers, 200 ppi for
photo printers, and 300 ppi for commercial printing.
When working with images, it’s
always a good idea to start with a larger image size. You can always
reduce the size of the image (subtract pixels) without losing any
quality. If you need to enlarge an image, you run the risk of losing
image quality. When you enlarge an image, the number of pixels doesn’t
increase as the image does, so the pixels become larger, which results
in a rougher, or more pixelated, image.
Creating a New Document Using Presets
When
you create documents for specific purposes, such as, web, film, video,
or for use on a mobile device, you know the importance of creating
documents that will perfectly match the output requirements of the
intended file destination. The preset file sizes available in the Preset
menu let you create images at a size and pixel aspect ratio that
compensate for scaling when you incorporate them into various output
modes. When you work with the Preset menu, the guesswork involved in
creating compatible photo, web, mobile device, film and video documents
in Photoshop is a thing of the past.
Create a New Document Using Presets
 Click the File menu, and then click New.
|
 Click the Preset list arrow, and then select from the available presets:
Photo Web Mobile & Devices Film & Video Custom
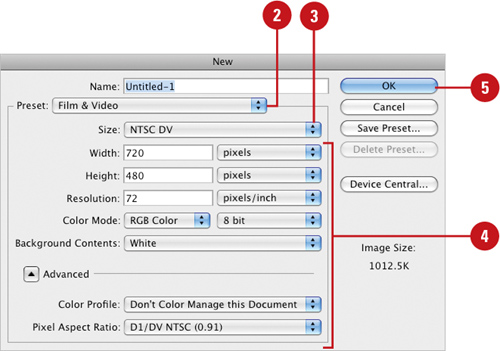 |
 Click the Size list arrow, and then select the preset you want. The options vary depending on the type of document you want to create.
- Photo. For example, Landscape 4 × 6.
- Web. For example, 640 × 480.
- Mobile & Devices. For example, 176 × 208.
- Film & Video. For example, HDTV 1080p/29.97.
|
 If you want, adjust the available options.
|
 Click OK.
|
Photoshop now includes a Video
Preview option that lets you preview your documents on a display device
such as a standard or DVD screen. The device must be attached to your
computer through the use of a FireWire port. Once the device is
attached, open a document, click the File menu, point to Export, and
then click Send Video Preview to Device. To set output options before
viewing your document on the device, click the File menu, point to
Export, and then click Video Preview. The Video Preview option supports
RGB, grayscale, and indexed color images, in either 8 or 16 bits per
channel. You can adjust the aspect ratio for proper display of images.
First, select the aspect ratio of the display device, either Standard
(4:3) or Widescreen (16:9), and then select a placement option, such as
Center or Crop to 4:3, for the image. To maintain an image’s
(non-square) pixel aspect ratio, select the Apply Pixel Aspect Ratio To
Preview check box.