2. ListView and ListActivity
ListView is similar to Gallery, but uses a vertically scrolling list
in place of Gallery’s horizontally scrolling list. To create a ListView
that takes up the entire screen, Android provides the
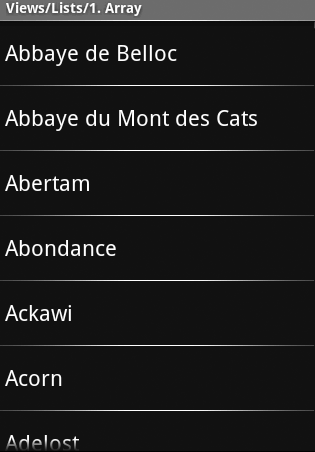
ListActivity class (Figure 3).
The ApiDemos application includes many examples of ListActivity.
The simplest is the List1 class,
which displays a huge number of cheese names in a list. The cheese names
are kept in a simple String array
(who knew there were that many cheese varieties!):
public class List1 extends ListActivity {

    @Override
    public void onCreate(Bundle savedInstanceState) {
        super.onCreate(savedInstanceState);

        // Use an existing ListAdapter that will map an array
        // of strings to TextViews
        setListAdapter(new ArrayAdapter<String>(this,
                android.R.layout.simple_list_item_1, mStrings));
    }

    private String[] mStrings = {
            "Abbaye de Belloc", "Abbaye du Mont des Cats", "Abertam", "Abondance",
              "Ackawi",
            "Acorn", "Adelost", "Affidelice au Chablis", "Afuega'l Pitu", "Airag",
              "Airedale",
            ...

Filling the ListView in the ListActivity is a simple matter of
calling setListAdapter and passing it
an ArrayAdapter that contains a
reference to the list of strings.
3. ScrollView
A ScrollView is a container for another View that lets the user scroll
that View vertically (a scrollbar is optional). A ScrollView often
contains a LinearLayout, which in turn contains the Views that make up
the form.
Don’t confuse ScrollView with ListView. Both Views present the
user with a scrollable set of Views, but the ListView is designed to
display a set of similar things, such as the cheeses in the previous
section. The ScrollView, on the other hand, allows an arbitrary View to
scroll vertically. The Android documentation warns that one should never
house a ListView within a ScrollView, because that defeats the
performance optimizations of a ListView.
A ScrollView is a FrameLayout, which means that it can have only
one child View. The most popular View for this purpose is a
LinearLayout.
The following layout code from ApiDemos, scroll_view_2.xml, shows how to set up a
ScrollView. The XML layout resource is sufficient; this example includes
no extra Java code:
<ScrollView xmlns:android="http://schemas.android.com/apk/res/android"
    android:layout_width="fill_parent"
    android:layout_height="wrap_content"
    android:scrollbars="none">
    <LinearLayout
        android:id="@+id/layout"
        android:orientation="vertical"
        android:layout_width="fill_parent"
        android:layout_height="wrap_content">

        <TextView
            android:layout_width="fill_parent"
            android:layout_height="wrap_content"
            android:text="@string/scroll_view_2_text_1"/>

        <Button
            android:layout_width="fill_parent"
            android:layout_height="wrap_content"
            android:text="@string/scroll_view_2_button_1"/>

    </LinearLayout>
</ScrollView>
Here are some of the highlights of the code:


4. TabHost
Most modern UIs provide an interface element that lets the
user flip through many pages of information quickly using tabs, with
each “screen” of information available when its tab is pressed.
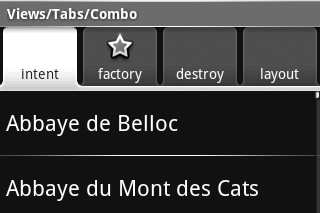
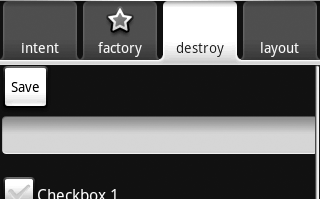
Android’s option is the TabHost View. Figures Figure 4 through Figure 7 show how it operates.


Android enables the developer to choose between three different
approaches for setting the tab’s content. The developer can:
Set the content of a tab to an Intent. Figures Figure 4 and Figure 6 use this method.
Use a TabContentFactory to create the tab’s content on-the-fly. Figure 5 uses this
method.
Retrieve the content from an XML layout file, much like that
of a regular Activity. Figure 7 uses this
method.
We’ll examine each of these possibilities using a modified
Activity from the ApiDemos application. The fourth tab is not part of
the ApiDemos, but combines some other TabHost demonstration Activities
in ApiDemos.
Let’s start by looking at the tabs4.xml layout file (Example 4).
Example 4. Layout file for TabHost (tabs4.xml)
<FrameLayout xmlns:android="http://schemas.android.com/apk/res/android"
    android:layout_width="fill_parent"
    android:layout_height="fill_parent">

    <TextView android:id="@+id/view4"
        android:background="@drawable/green"
        android:layout_width="fill_parent"
        android:layout_height="fill_parent"
        android:text="@string/tabs_4_tab_4"/>

</FrameLayout> |
Here are some of the highlights of the code:
And now we’ll dissect the Java code that produces the tabs (Example 5).
Example 5. Java for TabHost
public class Tabs4 extends TabActivity implements TabHost.TabContentFactory {

    protected void onCreate(Bundle savedInstanceState) {
        super.onCreate(savedInstanceState);

        final TabHost tabHost = getTabHost();

        LayoutInflater.from(this).inflate(R.layout.tabs4, tabHost.getTabContentView(),
          true);

        tabHost.addTab(tabHost.newTabSpec("tab1")
                .setIndicator("intent")
                .setContent(new Intent(this, List1.class)));

        tabHost.addTab(tabHost.newTabSpec("tab2")
                .setIndicator("factory",
                  getResources().getDrawable(R.drawable.star_big_on))
                .setContent(this));

        tabHost.addTab(tabHost.newTabSpec("tab3")
                .setIndicator("destroy")
                .setContent(new Intent(this, Controls2.class)
                    .addFlags(Intent.FLAG_ACTIVITY_CLEAR_TOP)));

        tabHost.addTab(tabHost.newTabSpec("tab4")
                .setIndicator("layout")
                .setContent(R.id.view4));
    }

    public View createTabContent(String tag) {
        final TextView tv = new TextView(this);
        tv.setText("Content for tab with tag " + tag);
        return tv;
    }
}
|