The Views in the following section are the meat and potatoes of your
application; essential widgets that you’ll use over and over and that your
users will be familiar with from other applications.1. TextView and EditText
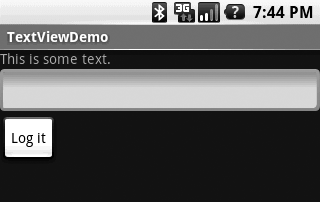
A TextView, as shown in the line “This is some text” in Figure 1, is just what you’d expect: a
place to display a text string. The vanilla TextView is for display
only, whereas EditText is a predefined subclass of TextView that
includes rich editing capabilities.

Each TextView has the attributes you’d expect of such a component:
you can change its height, width, font, text color, background color,
and so forth. TextViews also have some useful unique attributes:
autoLink
If set (true), finds URLs in the displayed text and automatically
converts them to clickable links.
autoText
If set (true), finds and corrects simple spelling errors in the
text.
editable
If set (true), indicates that the program has defined an input method to
receive input text (default is false for TextView, and true for
EditText).
inputMethod
Identifies the input method (EditText defines one for generic
text).
Example 1 shows how
to use a TextView and an EditText with Buttons. It also shows the XML layout file (main.xml), which uses pretty standard and
recommended layout parameters.
Example 1. Layout file for TextView and EditView example
<?xml version="1.0" encoding="utf-8"?>
<LinearLayout xmlns:android="http://schemas.android.com/apk/res/android"
    android:orientation="vertical"
    android:layout_width="fill_parent"
    android:layout_height="fill_parent"
   >
<TextView
    android:id="@+id/txtDemo"
    android:layout_width="fill_parent"
    android:layout_height="wrap_content"
    />
<EditText
    android:id="@+id/eTxtDemo"
    android:layout_width="fill_parent"
    android:layout_height="wrap_content"
    />
<Button
    android:id="@+id/btnDone"
    android:layout_width="wrap_content"
    android:layout_height="wrap_content"
    android:text="Log it"
    />
</LinearLayout>
|
Example 2 contains the
accompanying Java source (TextViewDemo.java).
Example 2. Java for TextView and EditView: TextViewDemo.java
package com.oreilly.demo;

import android.app.Activity;
import android.os.Bundle;
import android.util.Log;
import android.view.View;
import android.widget.Button;
import android.widget.EditText;
import android.widget.TextView;

public class TextViewDemo extends Activity {
    private static TextView txt1;
    private static EditText etxt1;
    private static Button btn1;

    // Create a button click listener for the Done button.
    private final Button.OnClickListener btnDoneOnClick = new Button.OnClickListener() {
        public void onClick(View v) {
          String input = etxt1.getText().toString();
          //Log the input string
          Log.v("TextViewDemo", input);
          etxt1.setText("");
        }
    };

    /** Called when the activity is first created. */
    @Override
    public void onCreate(Bundle savedInstanceState) {
        super.onCreate(savedInstanceState);
        setContentView(R.layout.main);

        //Get pointers to the Views defined in main.xml
        txt1 = (TextView) findViewById(R.id.txtDemo);
        etxt1 = (EditText) findViewById(R.id.eTxtDemo);
        btn1 = (Button) findViewById(R.id.btnDone);

        //Set the string displayed in TextView1
        txt1.setText("This is some text.");

        //Set the OnClickListener for the Done button
        btn1.setOnClickListener(btnDoneOnClick);
    }
}
|
Here are some of the highlights of the code:
Now the user can enter and edit text in the EditText, and when he
clicks on “Log it”, the OnClickListener is called and
the text is written to the logcat log. The string in the EditText is
cleared out, and the widget is ready for another entry.