In this article, we
will allow users to pick a contact as their best friend from their
address book. After they have picked their best friend, we will retrieve
information from the address book about their friend and display it
nicely on the screen—including their name, photo, and email address. We
will also give the user the ability to show their friend’s home city in
an interactive map and send them an email—all within a single app
screen.
Implementation Overview
This project covers quite a bit
of area, but you don’t have to enter an extensive amount of code. We’ll
start by creating the interface, and then add address book, map, and,
finally, email features. Each of these will require frameworks to be
added and modifications to the #import
lines in our view controller’s interface file. In other words, if
something doesn’t seem to be working, make sure you didn’t skip any
steps on adding the frameworks!
Setting Up the Project
Start Xcode and create a new View-based iPhone application called BestFriend, then open the BestFriendViewController.h interface file and add two outlets for UILabels named name and email, an outlet for a UIImageView named photo, an outlet for a MKMapView object named map, and an instance variable of the type MKPlacemark, called zipAnnotation.
The application will also implement two actions: newBFF, which will be called to enable the user to choose a new friend from the address book; and sendEmail to send an email to your buddy.
Add these to your interface file, including the appropriate @property directives for each of the outlet variables. Your interface file should now resemble Listing 1.
Listing 1.
#import <UIKit/UIKit.h>

@interface BestFriendViewController : UIViewController {
    IBOutlet UILabel *name;
    IBOutlet UILabel *email;
    IBOutlet UIImageView *photo;
    IBOutlet MKMapView *map;
    MKPlacemark *zipAnnotation;
}

@property (nonatomic, retain) UILabel *name;
@property (nonatomic, retain) UILabel *email;
@property (nonatomic, retain) UIImageView *photo;
@property (nonatomic, retain) MKMapView *map;

- (IBAction)newBFF:(id)sender;
- (IBAction)sendEmail:(id)sender;

@end
|
Next, add the corresponding @synthesize lines to the BestFriendViewController.m file following the @implementation line:
@synthesize name;
@synthesize photo;
@synthesize email;
@synthesize map;
Finally, release these in the dealloc method:
- (void)dealloc {
    [name release];
    [email release];
    [photo release];
    [map release];
    [super dealloc];
}
By the Way
If you’re questioning why zipAnnotation isn’t added as a property, it’s because we only need to access the instance variable throughout the BestFriendViewController class. It wouldn’t hurt to define it as such, but we won’t be manipulating it as we do with the other interface elements.
Next, let’s open the BestFriendViewController.xib interface file and build the application UI.
Creating the Application’s UI
With all the
appropriate outlets and actions in place, we can quickly build the
application’s user interface. Instead of trying to describe where
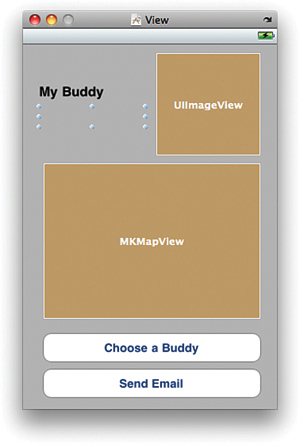
everything goes, take a look at Figure 1 to see my approach.
Follow these steps to build the application’s UI:
1. | Add two labels (UILabel)
one (larger) for your friend’s name, the other for his or her email
address. In my UI, I’ve chosen to clear the contents of the email label.
|
2. | Add a UIImageView
that will hold your buddy’s photograph from the Address Book. Use the
Attributes Inspector to change the image scaling to Aspect Fit.
|
3. | Drag a new instance of MKMapView into the interface. This is the map view that will ultimately display your location and the city your buddy is in.
|
4. | Finally, add two buttons (UIButton)—one to choose a buddy and another to email your buddy.
|
Configuring the Map View
After
adding the map view, select it and open the Attributes Inspector. Use
the Type drop-down menu to pick which type of map to display (satellite,
hybrid, and so on), and then activate all the interaction options. This
will make the map show the user’s current location and enable the user
to pan and zoom within the map view (just like in the map application!).
Connecting the Outlets and Actions
You’ve done this a thousand times
(okay, maybe a few dozen), so this should be pretty familiar. Within
Interface Builder, Control-drag from the File’s Owner icon to the
labels, image view, and map view choosing name, email, photo, and map as necessary.
Next, use the Connection Inspector for the two buttons to connect the Touch Up Inside events to the newBFF and sendEmail actions.
Finally, use the Connection Inspector on the map view to connect its delegate
outlet to the File’s Owner icon. This will tell the map that, when it’s
time to display an annotation, it should be looking to the BestFriendViewController class to find the mapView:viewForAnnotation method.
With
those connections, you’re done with the interface! Even though we will
be presenting an email and address book interface—these elements are
going to be generated entirely in code.