The iPhone is great for
storing pictures and, with the new high-quality camera in the iPhone 4,
great for taking pictures, too. By integrating the photo library with
your apps, you can directly access any image stored on the device or
take a new picture and use it within your application.
The magic that makes this possible is the UIImagePickerController
class. This class will give us a view controller and view where the
user can navigate their photos and videos and access the camera. We’ll
add this to our main application view as a modal view using the method presentModalViewController within our main MediaPlaygroundViewController instance.
We will need to implement the UIImagePickerControllerDelegate protocol’s imagePickerController:didFinishPickingMediaWithInfo to detect when an image has been chosen and to properly dismiss the image picker.
Implementing the Image Picker
When a user touches the Pick Image button, our application triggers the method chooseImage. Within this method we will allocate the UIImagePickerController, configure the type of media (camera or library) that it will be browsing, set its delegate, and then display it.
Enter the chooseImage method shown in Listing 1.
Listing 1.
 1: -(IBAction)chooseImage:(id)sender {
 2:     UIImagePickerController *imagePicker;
 3:     imagePicker = [[UIImagePickerController alloc] init];
 4:
 5:     if ([toggleCamera isOn]) {
 6:         imagePicker.sourceType=UIImagePickerControllerSourceTypeCamera;
 7:     } else {
 8:         imagePicker.sourceType=UIImagePickerControllerSourceTypePhotoLibrary;
 9:     }
10:     imagePicker.delegate=self;
11:     [[UIApplication sharedApplication] setStatusBarHidden:YES];
12:     [self presentModalViewController:imagePicker animated:YES];
13:     [imagePicker release];
14: }
|
In lines 2–3, imagePicker is allocated and initialized as an instance of UIImagePickerController.
Lines 5–9 sets the sourceType property of the image picker to UIImagePickerControllerSourceTypeCamera if the toggleCamera switch is set to on or UIImagePickerControllerSourceTypePhotoLibrary if it isn’t. In other words, the user can use the toggle switch to choose from photo library images or the camera.
Did you Know?
There is another possible source you may want to use: UIImagePickerControllerSourceTypeSavedPhotosAlbum. This is used to view the camera photo roll.
Did you Know?
If you’d like to determine exactly what sort of camera devices are available on your system, you can test using the UIImagePickerController method isCameraDeviceAvailable, which returns a Boolean value:
[UIImagePickerController isCameraDeviceAvailable:<camera type>]
Where the camera type is
UIImagePickerControllerCameraDeviceRear
or
UIImagePickerControllerCameraDeviceFront
Line 10 sets the image picker delegate to be the MediaPlayerViewController class. This means we will need to implement some supporting methods to handle when the user is finished choosing a photo.
In Line 11, we hide the
application’s status bar. This is necessary because the photo library
and camera interfaces are meant to be viewed fullscreen. First we use [UIApplication sharedApplication] to grab our application object, and then use the application’s setStatusBarHidden method to hide the bar.
Line 12 adds the imagePicker view controller over the top of our existing view.
In line 13, the imagePicker is released. The object, however, will not be released from memory until the modal view that contains it is dismissed.
Displaying the Chosen Image
With what we’ve written so
far, the user can now touch the Pick Image button, but not much is going
to happen when they navigate to an image. To react to an image
selection, we will implement the delegate method imagePickerController: didFinishPickingMediaWithInfo.
This method will automatically be called when the user makes a selection in the image picker. The method is passed an NSDictionary
object that can contain several things: the image itself, an edited
version of the image (if cropping/scaling is allowed), or information
about the image. We must provide the key value to retrieve the value we
want. For this application, we will be accessing the object returned by
the UIImagePickerControllerOriginalImage key, a UIImage. This UIImage will then be displayed within the chosenImage UIImageView in our interface.
Did you Know?
To learn more about the data that can be returned by the image picker, read the UIImagePickerControllerDelegate Protocol reference within the Apple developer documentation.
Add the imagePickerController:didFinishPickingMediaWithInfo delegate method shown in Listing 2 to the MediaPlaygroundViewController.m file.
Listing 2.
1: - (void)imagePickerController:(UIImagePickerController *)picker
2:         didFinishPickingMediaWithInfo:(NSDictionary *)info {
3:     [[UIApplication sharedApplication] setStatusBarHidden:NO];
4:     [self dismissModalViewControllerAnimated:YES];
5:     chosenImage.image=[info objectForKey:
6:                        UIImagePickerControllerOriginalImage];
7: }
|
After the image is chosen, we can redisplay the status bar in line 3, and then dismiss the image picker using dismissModalViewControllerAnimated in line 4.
Lines 5–6 do all the remaining work! We access the UIImage that the user has chosen by grabbing the object in the info dictionary that is referenced by the UIImagePickerControllerOriginalImage key. This is assigned to the image property of chosenImage, displaying the image, in all its glory, in the application’s view.
Cleaning Up After the Image Picker
There is still a scenario
that must be accounted for before we can call the image-picking portion
of our MediaPlayground application complete. A user can click a “cancel”
button within the image picker, leaving the picker without choosing
anything! The imagePickerControllerDidCancel
delegate method was made for exactly this situation. Implement this
method to reshow the status bar, and then dismiss the image picker by
calling dismissModalViewControllerAnimated: as follows:
- (void)imagePickerControllerDidCancel:
                        (UIImagePickerController *)picker {
    [[UIApplication sharedApplication] setStatusBarHidden:NO];
    [self dismissModalViewControllerAnimated:YES];
}
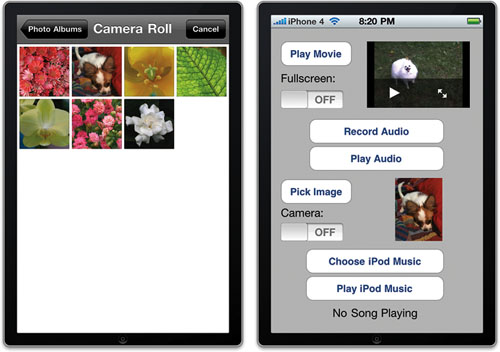
You should now be able to use the Pick Image button and display photos from the photo library and camera, as shown in Figure 1.