Using the Search Function for Grouped Dates
If you have a lot of dates in the filter listing,
you can search for specific years, months, or dates to include or
exclude from the filter. Searches are done on the entire data list, not
just the items currently filtered on.
The search function for grouped dates includes a
drop-down, allowing you to search by year, month, or date. It does not
allow you to search for an entire date, such as 04/19/2010.
Year— Search results will be grouped by year.
Month— Search results will be grouped by year and then month. The search term must be the long version of the month, such as January.
Date—
Search results will be grouped by year, then month, then day. Because
the search will return partial matches, you should use the two-digit
variation for dates. For example, to search for the 1st of a month,
enter 01 instead of 1. If you enter 1, every date with a 1, such as 10,
11, 12, will be returned.
All—
Search results will be grouped by year, then month, then day. This
option looks for a match anywhere in the date. For example, if your
dataset includes dates from 2009 and the search term is 09, all dates
from 2009 will be returned. If you want only the 9th day returned, use
the Date option.
Because searches are additive, proper application of
the Add Current Selection to Filter in the search results allows you to
include or exclude the results from the filter.
Filtering for Specific Days from All Months in a Specific Year
To filter for specific days from each month of a specific year, follow these steps:
1. | Open the drop-down of the date column to filter.
|
2. | Select Date from the Search drop-down.
|
3. | Type in the two-digit date.
|
4. | Deselect Select All Search Results.
|
5. | Scroll
down the filter listing and select the year of the data to include in
the filter. Selecting the year will automatically select all the months
and dates in the year’s group.
|
6. | Click OK.
|
7. | Open the drop-down of the date column to filter again.
|
8. | Select Date from the Search drop-down.
|
9. | Type in the two-digit date. |
10. | Deselect Select All Search Results.
|
11. | Select Add Current Selection to Filter.
|
12. | Scroll down the filter listing and select the year of the data to include in the filter.
|
13. | Click OK.
|
14. | Repeat steps 7 to 13 if you want to include more dates in the filter.
|
Using Text, Number and Date Special Filters
Special filters are available in the filter
drop-down depending on which data type (text, numbers, or dates)
appears most often in a column. All the special filters, except for
ones that take action immediately, open the Custom AutoFilter dialog,
allowing two conditions to be combined using AND or OR.
If the column contains mostly text, Text Filters
will be available with the options Equals, Does Not Equal, Begins With,
Ends With, Contains, and Does Not Contain. Selecting one of these opens
a Custom AutoFilter dialog in which text can be entered. Wildcards can
also be used in the text fields. Use an asterisk (*) to replace
multiple characters or a question mark (?) to replace a single
character.
If the column contains mostly numbers, Number
Filters will be available with the options Equals, Does Not Equal,
Greater Than, Greater Than Or Equal To, Less Than, Less Than or Equal
To, Between Top 10, Above Average, and Below Average. Selecting Top 10,
Above Average, or Below Average will automatically update the filter to
reflect the selection.
If Top 10 is selected, you can specify the top or
bottom items or percent to view. For example, you could choose to view
the bottom 15% or the top 7 items.
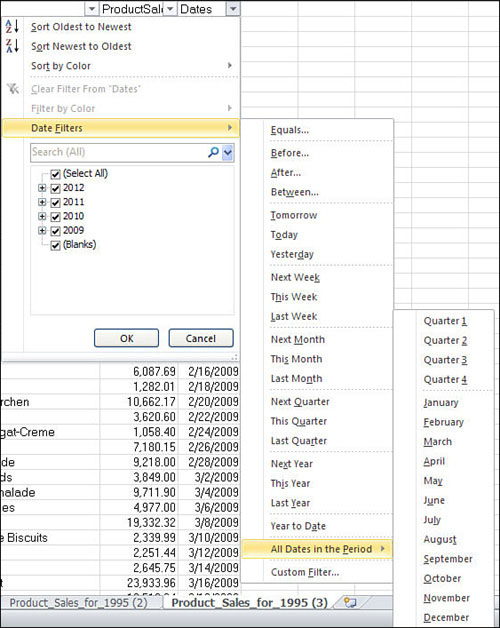
For columns with dates, the special filter offers a
wide selection of options, including additional options under All Dates
in the Period, as shown in Figure 4.
The Custom AutoFilter dialog for dates includes calendars to aid in
data entry. The options dealing with quarters refer to the traditional
quarter of a year, January through March being the first quarter, April
through June being the second quarter, and so on.

Filtering a Numeric Column for a Value Range
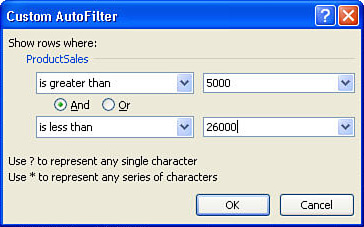
To filter a numeric column for a value range as shown in Figure 5, follow these steps:
1. | Open the drop-down of the numeric column to filter.
|
2. | Select Number Filters, Greater Than. The Custom AutoFilter appears.
|
3. | The top-left drop-down should already have Is Greater Than selected, but if not, select it from the drop-down.
|
4. | The top-right drop-down lists all the values in the column. You may select one of those or enter your own value.
|
5. | Between the top and bottom drop-down, make sure AND is selected.
|
6. | In the bottom-left drop-down, select Is Less than.
|
7. | In the bottom-right drop-down, select a value from the list or enter your own value. |
8. | Click OK. The sheet will update, showing only the values that fell within the selected range.
|

Filtering by Color or Icon
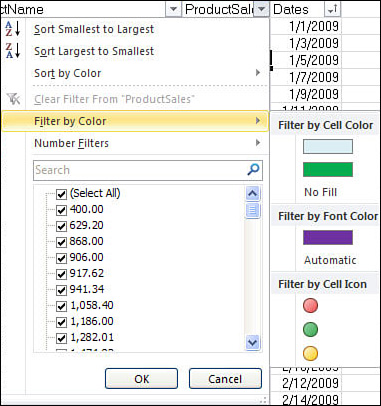
Data can be filtered by font color, color (set by
cell fill or conditional formatting) or icon by going to the Filter by
Color option in the filter listing, as shown in Figure 6.
There, colors and/or icons used in the column are shown. Filter
selections are additive, so if you first select to filter all green
rows and then red circles, the filter range will reflect rows that have
a green fill and red circle.
