OneNote 2010 is the first version of OneNote to
include the Microsoft Office ribbon interface and the Quick Access
Toolbar. Aside from providing convenient access to the most popular
commands available in OneNote, these interface elements also provide an
unprecedented level of customization, allowing you to precisely
fine-tune the OneNote interface to your preferences and needs.
I encourage you to try out these
options without fear of messing anything up. You can easily reset any
customizations you experiment with if you don’t want to keep the result
or if you want to start over.
Changing the Location of the Quick Access Toolbar
The Quick Access Toolbar is a small row of frequently used command icons (see Figure 1).
Although it typically appears to the left of the title bar in the
OneNote program window, you can choose to display it underneath the
ribbon instead. You can make this change as a purely cosmetic preference
or to increase the amount of space available for toolbar customization.

To change the location of the Quick Access Toolbar, do the following:
1. | Click the small drop-down arrow to the right of the Quick Access Toolbar.
|
2. | On
the menu that appears, click Show Below the Ribbon. The toolbar now
appears on its own row between the ribbon and the top of the section
tabs in the current notebook.
|
When
displayed underneath the ribbon, the Quick Access Toolbar has a bit
more space available for adding additional command buttons (see “Adding or Removing Quick Access Toolbar Commands” in the procedure that follows).
|
To restore the original
location of the Quick Access Toolbar after you’ve moved it, repeat the
preceding steps. The option in step 2 will now appear as Show Above the
Ribbon.
|
Adding or Removing Quick Access Toolbar Commands
After you first install OneNote 2010, it will display the following four preset commands on the Quick Access Toolbar:
Back
Undo
Dock to Desktop
Full Page View
The first two buttons are
good to have available at all times, as you may frequently want to
navigate back to the previous notes page that you looked at or you might
need to undo an unintentional change that you made to your notes. If
you find the Dock to Desktop and Full Page View options useful, you can
keep them around; otherwise you can remove them from the Quick Access
Toolbar and replace them with commands you tend to use more often.
To turn any preset commands on or off, do the following:
1. | Click the small drop-down arrow to the right of the Quick Access Toolbar.
|
2. | On the menu that appears, do either (or both) of the following:
To add a new command to the Quick Access Toolbar, click it in the list. While you rest the mouse pointer over
the Print command in the list, a ToolTip appears to confirm what will
happen when you click it (see Figure 2).
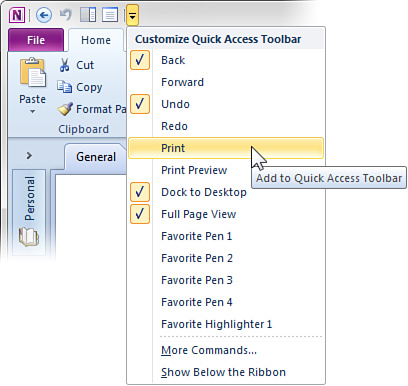
To
remove a command from the Quick Access Toolbar, click it in the list.
Commands that are currently on the toolbar will appear with an
orangehighlighted check mark icon to the left of the command’s name.
|
|
The customization menu
disappears as soon as you make a selection. If you want to make
additional customizations from the presets on the Quick Access Toolbar
menu, just repeat the previous steps for each additional command.
|
If the command you want to add
to the Quick Access Toolbar isn’t listed on the customization presets
menu but you see it on one of the ribbon tabs, you can just as quickly
add the commands you want by doing the following:
1. | Navigate to the ribbon tab that contains the command you want to add to the Quick Access Toolbar.
|
2. | Move the mouse pointer over the command button and then right-click it.
|
3. | On the shortcut menu that appears, click Add to Quick Access Toolbar (see Figure 3). OneNote will instantly append the command to the end of the Quick Access Toolbar.

|
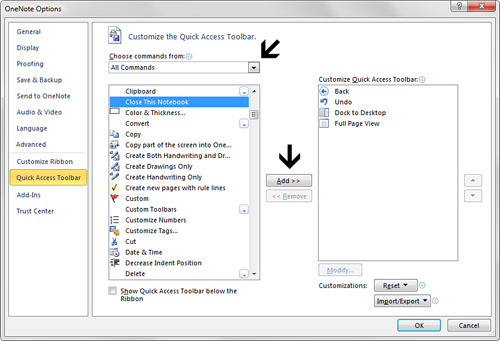
If the commands you want to add
to the Quick Access Toolbar appear neither on the customization presets
menu nor on the ribbon, you can display the advanced interface for the
customization of the toolbar (see Figure 4). Here, you can find and add just about any command that’s available in OneNote 2010.
Do the following:
1. | Click the small drop-down arrow to the right of the Quick Access Toolbar.
|
2. | On the menu that appears, click More Commands.
|
3. | In
the OneNote Options dialog box that appears, the Quick Access Toolbar
will appear selected. Under Choose Commands From, click the drop-down
arrow and then select All Commands (see Figure 4).
|
4. | Scroll through the alphabetical list to browse commands.
|
5. | To
add a command to the Quick Access Toolbar, click to select it in the
list on the left and then click the Add button between the two lists
(see Figure 12.17).
|
6. | When
the commands you want appear in the list on the right, you can select
individual commands and then click the Up and Down arrow buttons on the
far right of the dialog box to organize the commands in the order you
want them to appear.
|
7. | To save your changes, click OK.
|
Exporting Your Quick Access Toolbar Customizations for Use on Other Computers
If you’ve spent a fair amount
of time making significant customizations to the Quick Access Toolbar
and you want to duplicate these settings on another computer where you
have a second copy of OneNote 2010 installed (or if you want to share
your settings with a friend who uses OneNote 2010), you can export your
settings to a file.
To do this, do the following:
1. | Click
the File tab, click Options, and then, in the OneNote Options dialog
box that appears, click Quick Access Toolbar in the list of categories
on the left.
|
2. | At
the bottom of the list on the right, click the Import/Export button,
and then click Export All Customizations on the shortcut menu that
appears .
|
3. | In the File Save dialog box, accept or change the filename that is provided and then click Save.
|
4. | Click OK.
|
By importing this settings
file into OneNote 2010 on another computer, your Quick Access Toolbar
customizations will be applied to that installation of OneNote.
|
By clicking the Import/Export button (see Figure 4) and then clicking Export all Customizations on the shortcut menu that appears ,
you can save all of your customizations. On the computer that is to
receive your saved settings, you can use this same button to then select
the Import Customization File command and apply the stored settings.
Note that these settings files contain any custom settings for both the
Quick Access Toolbar as well as any ribbon customizations that you might
have made.
|
Resetting Your Quick Access Toolbar Customizations
If you’ve made
extensive customizations to the Quick Access Toolbar that you no longer
want to keep, or if you made a mistake and you want to restore the Quick
Access Toolbar to its initial settings, do the following:
1. | Click
the File tab, click Options, and then, in the OneNote Options dialog
box that appears, click Quick Access Toolbar in the list of categories
on the left.
|
2. | At the bottom of the list on the right, click the Reset button (see Figure 4) and then click Reset Only Quick Access Toolbar.
|
3. | Click OK.
|