OneNote supports automatic wiki link creation. If you type the name of a
page or section within double brackets (for example, [[Meeting
Notes]]), OneNote will automatically link to the section or page with
that title, allowing you to click the link and jump to that part of your
notes without having to manually navigate to it.
If you use wiki links for
pages that don’t yet exist, OneNote will automatically create a blank
new page in the current section to remind you that you wanted to link to
such a page later on. If you’d prefer to do this manually instead, you
can turn off automatic wiki link creation by doing the following:
1. | On the File tab, click Options.
|
2. | In the OneNote Options dialog box, click the Advanced category on the left side.
|
3. | On the right side, under Editing, uncheck the Enable Link Creation by Typing [[ ]] Around a Phrase check box.
|
4. | Click OK to save your changes.
|
Disabling Linked Notes Creation in a Docked Window
By default, OneNote will
assume that you want to begin a Linked Notes session whenever you dock
the OneNote program window to your Windows desktop or whenever you choose to open a new docked window .
If you prefer to take notes in a docked window without starting a Linked Notes session, do the following:
1. | Click the File tab, and then click Options.
|
2. | In the OneNote Options dialog box, click the Advanced category on the left side.
|
3. | On the right side, scroll down to the Linked Notes heading, and then uncheck the Allow Creation of New Linked Notes check box.
|
4. | Click OK to save your changes.
|
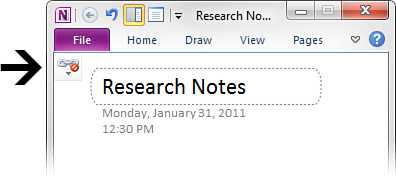
Once you’ve followed these
steps, you will not be able to use the Linked Notes feature in any new
docked OneNote windows. To remind you of this, the Linked Notes icon in
the upper-left corner of the docked window will be shown with a red,
slashed circle over it (see Figure 1).
To
restore Linked Notes functionality in your docked OneNote windows or
your docked side notes, repeat the steps in the previous procedure, but
be sure to select the check box option in step 3. Click OK to save your
new preference.
Once Linked Notes
functionality has been restored, the red, slashed circle over the link
icon will disappear. You can then click the icon for additional options.
|
If you previously created Linked
Notes by opening a docked window and you don’t want to keep these link
relationships between your notes and the source files you looked at
during your note-taking session, you can delete the links. See “Removing Links from Linked Notes” in the procedure that follows.
|
Removing Links from Linked Notes
If you no longer need the
information that OneNote saves about the source documents and pages for
linked notes, or you started a Linked Notes session unintentionally and
want to remove the links it created, do the following:
1. | Click the File tab and then click Options.
|
2. | In the OneNote Options dialog box, click the Advanced category on the left side.
|
3. | On
the right side, scroll down to the Linked Notes heading, and then
uncheck the Save Document Snippets and Page Thumbnail for Better Linking
to the Right Place in the Document check box.
|
4. | Click OK to save your changes.
|
|
Only use this option if you’re
certain that you will no longer need the link relationship between the
content in your notes and the source of that content. If you’re changing
this setting in a shared notebook, consider how the removal of these
links might affect other notebook authors. Removing the links from
Linked Notes cannot be undone.
|
Turning the Scratch-out Gesture On or Off
If you’re using the
handwriting features in OneNote 2010 on a Tablet PC or Touchcompatible
device, you can choose whether you want to use the scratch-out gesture
for removing ink strokes while taking notes.
By default, this option is disabled. To turn it on, do the following:
1. | Click the File tab and then click Options.
|
2. | In the OneNote Options dialog box, click the Advanced category on the left side.
|
3. | On the right side, scroll down to the Pen heading, and then uncheck the Disable the Scratch-out Gesture While Inking check box.
|
4. | Click OK to save your changes.
|
To disable the options again, repeat the previous steps but click to select the check box in step 3.
Turning Pen Pressure Sensitivity On or Off
If you’re using
the handwriting features in OneNote 2010 on a Tablet PC or
Touchcompatible device, you can choose whether you want to use variable
pen pressure, the way ink might flow when you rest or press the pen on
the paper in different ways. Using this feature can give your
handwritten or drawn notes a more natural appearance, but it can also
increase the file size of your OneNote notebooks.
By default, this option is disabled. To turn it on, do the following:
1. | Click the File tab and then click Options.
|
2. | In the OneNote Options dialog box, click the Advanced category on the left side.
|
3. | On
the right side, scroll down to the Pen heading and then click to select
the Use Pen Pressure Sensitivity (Increases File Size) check box.
|
4. | Click OK to save your changes.
|
To disable the options again, repeat the previous steps but be sure to clear the check box in step 3.
Automatically Switching Between Inking, Selecting, Typing, and Panning
If you’re using
the handwriting features in OneNote 2010 on a Tablet PC or
Touchcompatible device, OneNote automatically switches its selection
mechanism when you switch between inking and typing and when selecting
and panning content.
If you frequently work with
mixed content on a page and you want OneNote to stay in the mode you
selected, you can turn this option off by doing the following:
1. | Click the File tab and then click Options.
|
2. | In the OneNote Options dialog box, click the Advanced category on the left side.
|
3. | On
the right side, scroll down to the Pen heading, and then uncheck the
Automatically Switch Between Inking, Selecting, Typing and Panning check
box.
|
4. | Click OK to save your changes.
|
Enabling or Disabling Text Recognition in Pictures
When you search your notes for a
specific word or phrase, OneNote will try to find them not just in
typed text but also in pictures that contain the word or phrase (for
example, in a scanned business card image). If you don’t want OneNote to
recognize text in pictures in your notes, you can disable this feature
by doing the following:
1. | Click the File tab and then click Options.
|
2. | In the OneNote Options dialog box, click the Advanced category on the left side.
|
3. | On
the right side, scroll down to the Text Recognition in Pictures heading
and then click to select the Disable Text Recognition in Pictures check
box.
|
4. | Click OK to save your changes.
|
|
If you find that
searching through unusually large notebooks is happening more slowly
than you would like, you can temporarily disable the text recognition
feature for your pictures. To restore this feature again later, repeat
the previous steps but uncheck the check box in step 3.
|
Enabling or Disabling Word Recognition in Audio and Video Clips
When you search your notes
for a specific word or phrase, OneNote is capable of finding them in the
sound recording in audio or video files that you imported in your
notes. This is especially useful if you frequently take audio or video
notes and need to find specific information that does not appear typed
out on a page.
Because this feature
takes additional system resources to work, it is turned off by default.
If you want to enable it, do the following:
1. | Click the File tab and then click Options.
|
2. | In the OneNote Options dialog box, click the Audio & Video category on the left side.
|
3. | On
the right side, scroll down to the Audio Search heading and then click
to select the Enable Searching Audio and Video Recordings for Words
check box.
|
4. | Click OK to save your changes.
|
Search performance will be
noticeably slower with this option turned on than when you do a normal
search. The rate of success for finding spoken words in audio clips or
the audio portions of video clips in your notes greatly depends on the
quality of the recording, the volume of the speaker, and the amount of
ambient noise. If necessary, you can experiment with the audio recording
settings and the video recording settings on the Audio & Video page
in the OneNote Options dialog box until you find the right
configuration for the type of audio you frequently record and that you
want to include when searching for spoken words.