Copying and pasting moves small amounts of
data quickly and easily. Copying and pasting is the way to go for
reusing boilerplate text in a new proposal, copying a picture into a
report, or borrowing from a colleague's invincible resume. You can copy
task data from a Project table, and then paste it into Word to create an
agenda for a team meeting. Copying numbers from an Excel column into
Project table cells works equally well.1. Copying Project Data to Other ProgramsCopying
data from Project tables to another program is blissfully easy; it's
like a simple form of exporting. You select the table cells you want in
Project, and then paste them into the destination file. Copying and
pasting between Project 2010 and other Office 2010 programs brings
formatting along with your data, which makes your job easier. For
example, if you copy task data
from Project to an Outlook email message to show task status, the tasks
appear in the email message in a table with the same indenting,
highlighting, grouping, and other formatting as the Project table, as
shown in Figure 1. 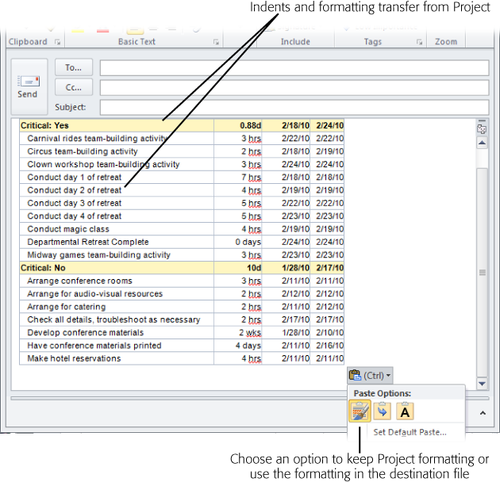
Here are the steps for copying data from a Project table, using Excel as an example destination program: In Project, display the view and table that contains the fields you want to copy. To
copy tasks and their costs to an Excel spreadsheet (or other
table-oriented file), display the Gantt Chart view. Then choose
View→Data→Tables→Cost to display columns of cost-related fields. (You
can also apply a table by right-clicking the Select All cell above the
ID column and then, from the drop-down list, choosing the table.)
Tip: If
necessary, choose Insert→Column to add the fields you want to copy to
the table. To simplify copying nonadjacent columns, drag the columns in
the Project table into the order you want, and then select the cells or
columns.
In the table, select the data you want to copy. You
can select specific cells or entire columns. If the cells are adjacent,
drag from the upper-left cell to the bottom-right cell. To select
nonadjacent cells, for instance when you don't want all the columns in
the table, Ctrl-drag over each set of cells (hold the Ctrl key down as
you drag over nonadjacent sets of cells). Select entire columns by
dragging across the column headings. Press Ctrl+C or choose Task→Clipboard→Copy to copy the selected cells to the Clipboard. If you click the Copy down arrow, you can choose Copy to copy data, or Copy Picture to copy an image of the selection. In the destination spreadsheet, click the top-left cell of the destination cells. The
cell you click is the starting point for the data you copy. The data
copies from there into cells to the right and below. Even data that's
nonadjacent in Project pours into adjacent cells in the destination
file. To paste data in Excel 2010, press Ctrl+V or choose Home→Clipboard→Paste. The
data copies into the destination cells. With Office 2010, column
headers paste into Excel, even if you don't select them in the Project
table.
2. Copying Data from Other Programs into ProjectCopying
data into Project requires more finesse because Project is fussy about
the type of data that goes into its fields. For example, if you try to
copy plain numbers into a Start date cell, Project complains about the
mismatch in an error message. To copy data into Project without that
kind of drama, take the time to match up the data. For example, you may
have to rearrange columns so they're the same in both files. Where you
rearrange columns doesn't matter; you can rearrange the columns in the
Project table or in the external file. Perhaps the simplest approach is
to copy each column individually into its Project cousin. Copying data between Project files works the same way, as the box on Copying Data Between Project Files explains. Otherwise, copying to Project is the same as copying from it: In the source program (Word, for example), open the file, and then select the data you want to copy. You
can copy data from a Word document, an Excel spreadsheet, or a table in
an Access database. If necessary, rearrange the columns of data to
match the columns in the destination Project table. Press Ctrl+C or choose Home→Clipboard→Copy. Ctrl+C works whether you use Excel 2003, 2007, or 2010. In Project, open the Project file, and then apply the view and table you want. If
you didn't rearrange the data before you copied it to the Clipboard,
then you can insert, hide, or drag columns in the Project table to match the source file's column order. In
the Project table area, click the top-left cell where you want to paste
the data, and then press Ctrl+V or choose Task→Clipboard→Paste. Pasting
data into a Project table doesn't insert new blank rows, so the values
you paste overwrite values in the Project cells, starting from the cell
you click to the right and down. If you don't want to overwrite data,
then insert enough blank rows to hold the data you're pasting—or paste
the data in blank rows at the bottom of the table. If the data from the source file doesn't match the data type in Project, then you see an error message like the one shown in Figure 2.

Tip: Project
is happy as long as you paste data into a field with the correct data
type. For example, you can paste any kind of text into a text-based
field like Task Name. However, values you paste into Start cells had
better be dates if tasks are auto-scheduled. You can also paste data
into custom fields, as long as the data types match. For example, values
you copy into a custom Project field like Duration1 must be a length of
time like 2d.
Copying
data from one Project schedule to another is handy when you want to
reuse similar tasks from another project—for example, one you completed
last year. Copying is the same whether you're copying within the same
Project file, from one Project file to another, or from another program
into Project. For example, to copy cells from a table in one Project
file to a table in another file, select the cells in the source Project
file, and then choose Task→Clipboard→Copy. Then in the destination
Project file, select the first cell and then choose
Task→Clipboard→Paste. Remember, when you copy cells, the paste starts at
the first cell you click and continues to the right and down,
overwriting any existing data in those cells. When
you copy data within the same Project file or between two different
Project files, you can also copy entire rows in a table. Unlike copying
cells, Project inserts new rows when you copy entire rows. Here are the
steps: In
the table area, select the rows to copy by dragging over the row ID
cells. You can select nonadjacent rows by Ctrl-clicking each ID cell. Press
Ctrl+C or choose Task→Clipboard→Copy. If you select resource rows in
the Resource Sheet, you still choose Task→Clipboard→Copy. To
paste the rows in the new location (within the file or in a second
Project file), click the ID cell for the row below where you want to
copy the data, and then press Ctrl+V (or choose Task→Clipboard→Paste).
|
3. Creating Pictures of Project InformationFrom
the time you initiate a project until you put the last tasks to bed,
you communicate project information to stakeholders and team members. A picture of a project schedule shows where a project stands better than row after row of data. The Copy
Picture command captures all or part of the current view and can create
an image fine-tuned for displaying on a computer screen, printing, or
publishing on the web. For example, you can create an image of the
high-level schedule to publish on your Intranet or a Resource Graph to
email to a functional manager (that is, the resources' manager outside
the project). After you create the image, you can paste it into any
destination you want. To create a picture of a view, follow these steps: Display the view you want to take a picture of. If
you want to see specific rows in the view, then select them before you
start the Copy Picture command. Adjust the timescale to show the date
range you want in the picture. Partially hidden columns in the view
don't appear in the picture; make sure the last column you want in the
picture is displayed completely in the view. Choose Task→Clipboard. Click the Copy down arrow, and then choose Copy Picture. The Copy Picture dialog box opens, as shown in Figure 3. In the "Render image" section, choose the option for how you're going to use the picture. Project automatically selects "For screen", which is perfect for a picture you're copying into a program like Excel. Select "For printer" if you're creating an image for a report most people will read on paper. 
"For
screen" and "For printer" both create an image and place it on the
Clipboard. To create an image file, select "To GIF image file", and then
enter the path and filename. (Click Browse to navigate to the folder in
which you want to save the file.) For example, a GIF file format is
what you need for publishing a picture on a web page. Choose the option for the rows you want to include. If
you haven't selected rows in the table, Project automatically selects
the "Rows on screen" option, which includes only the visible rows. If
you want specific rows or all rows in the project, be sure to select
those rows before you start the Copy Picture command. In that case,
Project automatically selects the "Selected rows" option. Choose the option to show the timescale that's visible in the view or a date range you specify. "As
shown on screen" includes only the dates visible on the screen. To show
dates from project start to finish or custom dates, select the From
option, and then fill in the From and To boxes with the start and finish
dates. Click OK. Project
copies the picture to the Clipboard if you selected the "For screen" or
"For printer" option. Project creates the file for the "To GIF image
file" option. In
the destination file, click the location where you want to paste the
picture, and then press Ctrl+V or choose Home→Clipboard→Paste. For a GIF file, use the destination program's command for inserting a picture. For example, with Microsoft programs, choose either Insert→Picture or Insert→Object.
You can copy graphics
or pictures into Project, for instance to display an Excel graph of
bugs reported over time or photos of the customer's employees assigned
to the project. Only certain places within Project can host these
graphic files: A Gantt chart's timescale area. The
Objects box or the Notes box in the Task Form or Resource Form
(right-click the form, and then, on the shortcut menu, choose Objects or
Notes). The Notes tab in the Task Information, Resource Information, or Assignment Information dialog boxes. The header, footer, or legend of a view or report you print.
Copying a picture into Project is similar to copying picture files in other programs. Here are the steps: To copy an Excel graph as a picture, in Excel, select the graph, and then press Ctrl+C. In Project, display the location where you want to copy the graphic file (or Clipboard graphic). Press Ctrl+V. Project pastes the graphic at the selected location.
|