When delivering a presentation, you can move from slide
to slide manually by clicking the mouse button, pressing keys, or clicking
commands, or you can have PowerPoint display each slide for a predefined length
of time and then display the next slide. In automatically advancing
presentations, the length of time a slide appears on the screen is controlled by
its slide timing.
To apply a timing to one slide, to a group of slides, or to an entire
presentation, you first select the slides, and then under Advance Slide in the
Timing group on the Transitions tab, you select the After check box and enter
the number of minutes and/or seconds you want each slide to remain on the
screen. By default, each slide timing is divided equally among the animated
items on that particular slide. So if a slide has a title and four bullet points
that are all animated and you assign a timing of 1 minute to the slide, the five
elements will appear at 12-second intervals.
Tip:
Tip
If you are delivering the presentation in Slide Show view and want to
prevent PowerPoint from advancing to the next slide according to a slide
timing, press the letter S on your keyboard, or right-click the current
slide and click Pause. To continue the presentation, press the letter S
again, or right-click the slide and click Resume.
If you don’t know how much time to allocate for the slide timings of
a presentation, you can rehearse the presentation while PowerPoint automatically
tracks and sets the timings for you, reflecting the amount of time you spend on
each slide during the rehearsal. During the presentation, PowerPoint displays
each slide for the length of time you indicated during the rehearsal. In this
way, you can synchronize an automatic slide show with a live narration or
demonstration.
In this exercise, you’ll set the timing for one slide and
then apply it to an entire presentation. Then you’ll rehearse the
presentation and have PowerPoint set slide timings according to the amount of
time you display each slide during the rehearsal.
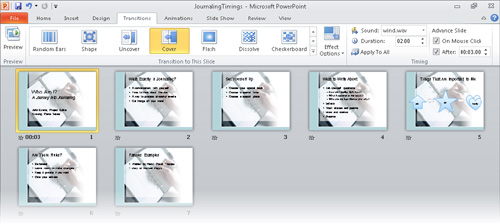
On the Transitions tab, in the
Timing group, in the Advance Slide area, select the After
check box, and then at the right end of the adjacent box, click the up
arrow three times to change the setting to 00:03.00.
Because both check boxes in the Advance Slide area are selected, the
slide will advance either after 3 seconds or when you click the mouse
button.
Tip:
Tip
The ability to click the mouse in addition to setting slide
timings is useful when you’re running short on time during
a presentation and need to speed things up.
On the View Shortcuts toolbar,
click the Reading View button.

Slide 1 is displayed for 3 seconds, and then PowerPoint moves to slide
2.
Press Esc to return to Normal view, and then on the View Shortcuts toolbar, click the Slide Sorter button.

Below the lower-left corner of slide 1 is the slide timing you just
applied.
Slide 1 is the only slide with a slide
timing.
Note:
The appearance of buttons and groups on the ribbon changes
depending on the width of the program window.
With slide 1 selected, in
the Timing group, click the Apply To All button.

The slide timing you applied to slide 1 is now applied to all the
slides.
Tip:
Tip
When you click Apply To All, all the transition effects of the
current slide are copied to the other slides. If you have applied
different transitions to different slides, those individually
specified transitions are overwritten. So it’s a good idea
to apply all the effects that you want the slides to have in common
first. Then you can select individual slides and customize their
effects.
Switch to Reading view, watch as the slides advance, and then when the
black screen is displayed, click the mouse button to return to Slide
Sorter view.
Select slide 1. In the Advance Slide area of the Timing group, clear the After check box, and then click Apply To All.
The slide timings disappear from below the slides.
With slide 1 selected, on the
Slide Show tab, in the Set Up group, click the Rehearse Timings button.

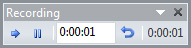
PowerPoint switches to Slide Show view, starts the presentation, and
displays the Rehearsal toolbar in the upper-left corner of the
screen.
A Slide Time counter is timing the length of time
slide 1 remains on the screen.
Wait several seconds, and then on the Rehearsal toolbar, click the Next button.

The counter starts over at 0:00:00.
Work your way slowly through the presentation, clicking Next to move to the next slide.
Let’s repeat the rehearsal for the current slide.
On the Rehearsal toolbar, click the
Repeat button to reset the slide
time for that slide to 0:00:00.

A message appears, advising that the recording has been paused.
In the message box, click Resume
Recording.
Tip:
Tip
If you want to start the entire rehearsal over again, click the
Close button on the Rehearsal toolbar, and when a message asks
whether you want to keep the existing timings, click No.
When you reach the end of the presentation, a message box displays the
elapsed time for the presentation and asks whether you want to apply the
recorded slide timings.
Click Yes.
The screen switches back to Slide Sorter view.
The recorded timings have been added below each
slide.

Click the Transitions tab.
The timing for the active slide, slide 1, appears in the After box in
the Advance Slide area of the Timing group.
If the After setting for slide
1 is not a whole second, click
the Up button to the right of the box
to adjust the time up to the next whole second.
You can manually adjust the timing of any slide by selecting it and
changing the setting in this box.
Switch to Reading view.
The slides advance according to the recorded timings.
Press Esc at any time to stop the presentation.
Note:
Save the JournalingTimings presentation, and then close it.
For a really smooth delivery, you might want to record your presentation
so that you can hear yourself in action and correct any flaws before you
have to perform before a live audience. You might also want to record a
presentation that people will view on their own computers rather than at a
speaker-led meeting. When you record a presentation, you can specify whether
you want to record only slide and animation timings or only narrations and
laser pointer movements, and you can record an entire presentation or only a
specific slide.
To record a presentation:
Ensure that your computer has a sound card, microphone, and
speakers. Test the microphone before beginning the recording.
Open the presentation you want to record.
With slide 1 displayed, on the Slide Show tab, in the Set Up
group, click the Record Slide Show button.
Tip:
Tip
If you don’t want to record the entire presentation,
click the Record Slide Show arrow, and then click Start
Recording From Current Slide.
The Record Slide Show dialog box opens.
If you don’t want to record timings or narrations and
laser pointer movements, clear the corresponding check box. Then
click Start Recording.
PowerPoint switches to Slide Show view, starts the presentation,
and displays the Recording toolbar in the upper-left corner of the
screen. A Slide Time counter tracks the length of time the slide
remains on the screen.
Discuss the points associated with the current slide, just as if
you were delivering the presentation to a live audience, and then on
the shadow navigation toolbar in the lower-left corner of the
screen, click the Next button to move to the next slide.
Tip:
Tip
You can pause the recording by clicking the Pause button on
the Recording toolbar, and you can repeat the recording for the
current slide by clicking the Repeat button. You can stop
recording by pressing the Esc key.
When you have finished delivering the presentation, press the Esc
key to stop recording.
The presentation is displayed in Slide Sorter view. The narration
appears on each slide as a sound object and the slide timings appear
below the lower-left corner of each slide.
Test the recording by running the presentation in Reading
view.
Each slide is accompanied by its recorded narration.
If you are not satisfied with the narration for a particular slide, you
can delete its sound icon just like any other object, and then record that
slide again.
If you are archiving a presentation and want to add comments to a specific
slide, you don’t have to record the entire presentation. Click the
slide in Normal view, and on the Insert tab, in the Media group, click the
Audio arrow, and then click Record Audio. After recording your comments,
name the sound file for that slide, and click OK. The narration is then
attached to a sound icon on the slide.