In Project Standard or Professional, inserting subprojects is the key to managing multiple projects, no matter how much or how little the projects have in common. Inserting subprojects usually falls into one of the following situations:A large project with subprojects.
Suppose you're managing a project so large that it requires several
project managers to handle different parts. For example, a project to
build a new airplane may have subprojects for the fuselage, engines,
electronics, wiring, and so on. The separate systems progress
individually, but they must come together before the rubber can hit the
tarmac. When you set up a master project that contains the separate
subprojects, the project managers for the subprojects (whether they're
subcontractors or part of your organization) each work on their own
Project files. However, you can see the big picture of all the
subprojects simply by opening the master project.
Tip: Master
projects and subprojects are in way over their heads trying to manage
humongous projects with casts of thousands, budgets in the millions,
hordes of risks and issues, and project interdependencies galore. For a
stable of big projects, Project Server is what you need to stay on top
of everything.
Several unrelated projects.
If you spend each day juggling several small projects, you'd probably
like to juggle those projects within Project as well. By creating a
master project and inserting
all your Project files into it, you can open all your projects by
opening the master Project file. Even better, you can work on the
projects without switching Project windows and create links between
tasks in different projects. Similarly, you can produce consolidated
views or reports for all your projects.
Tip: If you don't require Project's help calculating the schedule for small projects, the new Team Planner view is an easy way to assign resources to tasks, move assignments around, and see where things stand.
Reporting on overall progress. You can insert projects into another Project file temporarily to produce consolidated views or reports for several projects.
Although you can insert a Project file into any other Project file, the most common approach is to create a master
project—a Project file that contains other projects inserted into it.
Here's how a master project works when you insert Project files: All
the inserted subprojects assemble cheerfully in one Project window, so
you can work on and save them all as if they were a single file. The
inserted projects look like summary tasks, which you can expand to show
all the subtasks, or collapse to see the big picture. You
can work on subproject tasks as if they belong to the master
project—modifying, sorting, filtering, and grouping the aggregated
tasks. Because a
master project is a regular Project file, you can add tasks to it—for
example, for the work you do supervising the other project managers. A
master project maintains continuous contact with its inserted projects.
If someone modifies information in a subproject, those changes are
immediately visible in the master file. Conversely, if you make a change
to a project from the master project, those changes are immediately
visible to anyone looking at the original Project file for that inserted
project.
1. Creating a Master ProjectSetting
up a master project is usually just a matter of creating the master
Project file and then inserting the subproject Project files into it. (The
less-common alternative is to create a master project when you already
have a single large project that you want to break into subprojects. The
box on Creating a Master Project from One Large Project tells you how.) Here's how you create a master project from several individual projects: Choose
File→New, and then, in the Available Templates screen, double-click
"Blank project". (Or click "Blank project" and then click Create.) Project creates a new blank Project file, ready to accept your subprojects. You've
forged ahead on a massive project, putting all the tasks into one
Project file. One day, you realize that this big, awkward file is making
it harder for you to manage the project and, more importantly, delegate
subprojects to other project managers. All is not lost—you can turn
your gargantuan project into a master project with subprojects without
breaking a sweat. Here's how: Create
a Project file for each subproject within your large project. In each
new file, be sure to set the project start date to the start date of the
original colossal project and pick the same calendar as the original project.
In
the original Project file, drag over the ID cells for all the tasks you
want to move to the first new subproject file. Then choose
Task→Clipboard→Copy to copy all the information about the selected tasks
to the Clipboard. (If you drag over the Name cells instead, Project
copies only the task names.) Switch
to the corresponding Project file for the new subproject, and then
choose Task→Clipboard→Paste Special to copy all the tasks from the
original Project file. In the Paste Special dialog box, in the As list,
choose Project Data, and then click OK. Repeat steps 2–4 for each new subproject until you've copied all the tasks from the original Project file into subproject files. Create a Project file for the master project, and then insert all the subproject files into it, as described on Section 19.1.1. Create
task dependencies between the subprojects to restore them to the
chronological order they had in the original large project.
|
Select the first blank row. If
you create a master project to track several levels of subprojects,
then you can insert projects anywhere in the task hierarchy. For
example, if a subproject is large enough to have its own subprojects,
then you can insert Project files underneath the higher-level
subproject. When you insert the project, it pushes the task you selected
down one row and inserts itself at the same level as the task
immediately above it. Choose Project→Insert→Subproject. The Insert Project dialog appears. Navigate to the folder that contains the first project you want to insert. Select the project you want to insert, make sure the "Link to project" checkbox is turned on, and then click Insert. Project adds a summary task for the inserted project, as shown in Figure 1. 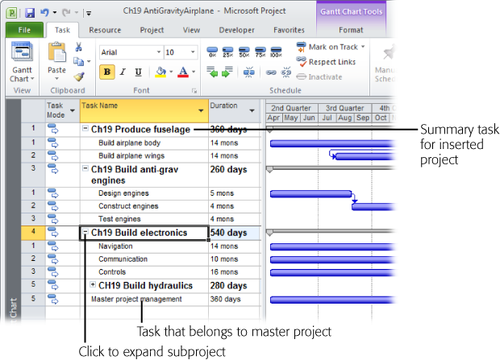
Project
automatically turns on the "Link to project" checkbox, which tells
Project to update the master project whenever the inserted project
changes. You almost always want immediate updates. In some cases, you
want subprojects inserted into a master project as read-only entries, as
the box on Preventing Changes to Subprojects
explains. One time you might turn off the "Link to project" checkbox is
when you decide to turn your master project back into one large
project. You can unlink all the projects so that their tasks now belong
to the master Project file. Of course, when you do this, you should be
sure that no one makes changes to the original subproject files. Repeat steps 2–4 to insert additional projects. Remember,
you specify where to insert projects by selecting the row below which
you want to insert the project. The project in the row you select shifts
down, so the inserted projects don't overwrite what's already there.
You can also reorder inserted projects by dragging an inserted project
summary task to another position in the task table.
Note: When you insert projects into a master project, the ID cells for tasks seem to go crazy, as you can see in Figure 1.
Project assigns sequential ID numbers to each subproject, beginning
with 1. However, the tasks that belong to inserted projects have ID
numbers, which also begin with 1. So you're likely to see several tasks
with the same ID number.
Work on the inserted projects as you would regular tasks. Choose Task→Schedule→Indent Task or Outdent Task
to move the inserted project to the correct level of the task
hierarchy—for example, to include several sub-subprojects underneath a
top-level inserted project. You can link tasks within inserted projects
to one another, or to regular tasks in the master project, or you can link one inserted project summary task to another. If
you need help identifying tasks and resources from different
subprojects, you can insert the Subproject File column into your Gantt
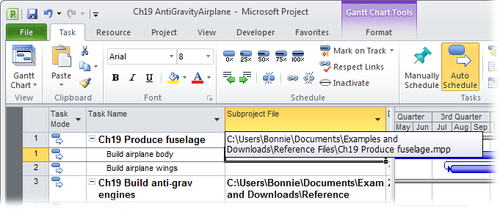
Chart table. Right-click the Gantt Chart table heading area, and then choose Insert Column. In the drop-down list, choose Subproject File. Figure 2 shows the Subproject File cells with the file paths and names for each inserted project. The
Subproject Read Only field shows whether or not an inserted project is
read-only. To keep track of subproject editability, insert this column
in the Gantt Chart table as well. If an inserted project is read-only,
the field value is Yes. Otherwise, it's No.
Tip: If
your master project and subprojects contain some of the same resources,
the Resource Sheet in the master project also contains duplicate
entries for those resources, one for each project Resource Sheet
containing that resource. The problem is you have to select the correct
resource entry (the one for the subproject) when you assign resources
within that subproject. You can tell the resource entries apart by inserting
the Project column into the Resource Sheet view.
Suppose
you supervise several newbie project managers, and you want an easy way
to review all the projects they manage, but you don't want to change
those subprojects by mistake. You can insert projects into a master
project as read-only. Then you can view the inserted projects from the
master project, but you can modify them only by opening their source
Project files. To insert projects as read-only, in the Insert Project
dialog box, click the down arrow on the Insert button, and then, from
the drop-down list, choose Insert Read-Only. You can also change an inserted project to read-only after
it's inserted. Select the inserted project summary task, and then press
Shift+F2 to open the Inserted Project Information dialog box (or choose
Task→Properties→Information). Select the Advanced tab, and then turn on
the "Read only" checkbox. One
exception to a subproject's read-only status occurs when you open both
the master project and the subproject. Then Project changes the
read-only subproject file whether you make the change in the master
project or the subproject source file. |
|