After you insert a clip art image or picture into a
PowerPoint presentation, you can modify it to suit your needs.
PowerPoint 2010 includes many new image-editing features that can
eliminate the need to edit your images in an external application.
The Picture
Tools—Format tab appears whenever you select an image. Using this
contextual tab, you can make both minor and major adjustments to an
image, such as changing its color or adjusting its contrast. Although
the buttons on this tab use the term “picture,” most of these features
also apply to clip art and screenshot images in your presentation.
|
Many of the options on the
Picture Tools—Format tab include a link to the Format Picture dialog box
where you can customize an image even further. You can also access this
dialog box by right-clicking an image and selecting Format Picture from
the menu that appears.
|
Adjusting Images
The Adjust group on the
Picture Tools—Format tab enables you to remove background images,
correct images, adjust color settings, and apply artistic effects. Be
aware that not all these options are available, depending on the format
of the image you want to modify.
Removing an Image Background
To remove the background of a
selected image, click the Remove Background button on the Picture
Tools—Format tab. The Background Removal tab appears, as shown in Figure 5.
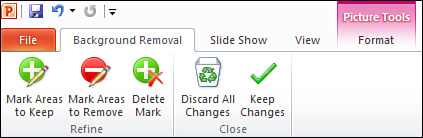
This tab offers the following options:
Mark Areas to Keep— Designate the areas to keep with a Pencil tool.
Mark Areas to Remove— Designate the areas to remove with a Pencil tool.
Delete Mark— Remove the background areas you marked to remove.
Discard All Changes— Restore the image to its original state.
Keep Changes— Save changes and closes the Background Removal tab.
|
It takes some time to learn to
use this powerful tool effectively. If you don’t like the end result,
click the Undo button in the upper-left corner of the PowerPoint screen
to restore your image’s background.
|
Applying Picture Corrections
To brighten and sharpen a selected image, follow these steps:
1. | Select the picture you want to correct.
|
2. | On the Picture Tools—Format tab, click the Corrections button.
|
3. | From the gallery that appears, select an option in either the Sharpen and Soften section or the Brightness and Contrast section.
|
4. | Pause your mouse over each style to preview what it looks like when applied to your picture.
|
5. | When you find a style you like, click the style to apply it.
|
For additional
picture correction options, click the Picture Corrections Options link
at the bottom of the gallery. The Format Picture dialog box opens, where
you can make additional modifications.
Adjusting Picture Colors
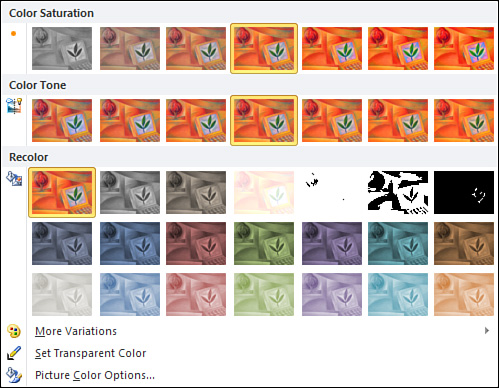
To
change and adjust a selected image’s colors, click the Colors button on
the Picture Tools—Format tab. In the gallery that appears, as shown in Figure 6, you can
Modify your
image’s color by specifying its purity based on a percentage (Color
Saturation), specifying how light or dark the color is (Color Tone), or
changing to a new color (Recolor).
Click
the More Variations link to open the Colors palette. You can choose a
color from the palette or click the More Colors link to open the Colors
dialog box.
Click
the Set Transparent Color link to click a pixel in the selected image,
thereby making all pixels of the same color transparent.
Click the Picture Color Options link to open the Format Picture dialog box.
Applying Artistic Effects
To apply artistic effects to a
selected image, such as a paint brush effect or a pencil sketch effect,
click the Artistic Effects button on the Picture Tools—Format tab. In
the gallery that appears, select your desired effect. To apply
additional effects in the Format Picture dialog box, click the Artistic
Effects Options link.
Compressing Pictures
Compressing pictures enables you
to reduce the file size of your presentation, which makes it easier to
manage and run on the web.
To compress a selected picture, follow these steps:
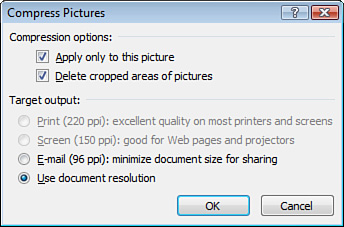
1. | Click
the Compress Pictures button on the Picture Tools—Format tab (a small
button in the Adjust group). The Compress Pictures dialog box opens, as
shown in Figure 7.
|
2. | The
Apply Only to This Picture check box is selected by default. If you
want to compress all the pictures in your presentation, remove this
check mark.
|
3. | The
Delete Cropped Areas of Pictures check box is selected by default,
which permanently removes any areas you cropped and reduces file size.
If you don’t want to do this, remove this check mark.
|
4. | By
default, the Use Document Resolution option button is selected as your
Target Output. Optionally, you can switch to a resolution suited to
Print, Screen, or E-mail. Depending on your image format, all these
options might not be available.
|
5. | Click the OK button to compress your picture.
|
Changing to a Different Picture
If you decide that you want to
insert a different picture, but retain all the formatting you’ve
applied to an existing presentation picture, on the Picture Tools—Format
tab, click the Change Picture button (a small button in the Adjust
group).
The
Insert Picture dialog box opens, where you can select a new picture.
PowerPoint inserts the new picture and keeps all existing formatting.
Resetting a Picture
If you’ve made a lot of changes to
a picture and then decide you want to go back to the original, on the
Picture Tools—Format tab, click the Reset Picture button (a small button
in the Adjust group). PowerPoint restores your picture to its original
appearance. If you want to reset picture formatting and
size (from compression, for example), click the down arrow to the right
of the Reset Picture button and select Reset Picture & Size from
the menu.
Working with Picture Styles
The Picture Styles group on the
Picture Tools—Format tab enables you to apply one of many preselected
styles to your images. You can also add a border, apply special effects,
and modify your layout.
Applying a Picture Style
To apply a picture style,
select one of the styles in the Picture Styles group, or click the down
arrow to the right of the group to open a gallery of additional options,
as shown in Figure 8.
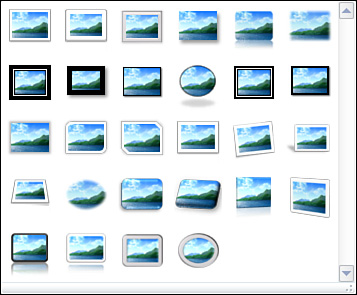
This gallery
displays additional picture styles such as Reflected Bevel Black,
Rotated White, and Soft Edge Oval. Pause your mouse over each style to
preview what it looks like when applied to your picture. When you find a
style you like, click it to apply.
Applying Picture Borders
To
add a border to a selected image, on the Picture Tools—Format tab,
click the Picture Border button. The Picture Border palette appears, as
shown in Figure 9.
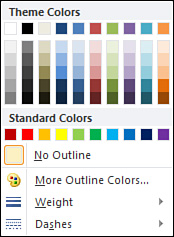
Choose from the following options:
- Apply one of the theme or standard colors. The theme colors are compatible with your slide’s color scheme.
- Select No Outline to hide the existing border.
- Select
More Outline Colors to open the Colors dialog box, in which you can
select from many other colors or create a custom color.
- Select Weight to specify the border weight—from 3/4 point to 6 points.
- Select
Dashes to specify a dash style, such as square dot, dash dot, or long
dash. Unless you create a thick outline, dashes probably won’t be
visible.
|
For more options, select More Lines from the Weight or Dashes menu to open the Format Picture dialog box.
|
Applying Picture Effects
You can add shadow, glow,
bevel, and 3-D effects to pictures by using the tools on the Picture
Effects palette. To apply picture effects to a selected picture, on the
Picture Tools—Format tab, click the Picture Effects button. The Picture
Effects menu appears. Each menu choice leads to a gallery of additional
options.
Depending
on the shape you select, not all options are available. To preview a
potential effect on your presentation, pause the mouse over it in the
gallery.
Choose from the following options on the Picture Effects menu:
Preset— Apply one of 12 ready-made effects designed to work well with your picture.
Shadow— Apply an outer, inner, or perspective shadow to the shape. Select No Shadow to remove the shadow.
Reflection—
Apply one of several reflection variations, such as a half or full
reflection. Selecting No Reflection removes the shape effect.
Glow—
Apply one of several glow variations in different colors and sizes.
Select No Glow to remove the glow effect. Select More Glow Colors to
open the Colors palette, where you can select another color.
Soft Edges— Apply a soft edge, ranging in width from 1 to 50 points. Select No Soft Edges to remove the effect.
Bevel— Apply one of several bevel options, such as a circle or divot. Select No Bevel to remove the effect.
3-D Rotation— Apply a parallel, perspective, or oblique rotation to the selected shape. Remove the effect by selecting No Rotation.
|
For more choices, select the
Options link at the bottom of each gallery to open the Format Picture
dialog box. The exact wording of the Options link varies based on the
name of the gallery, such as Shadow Options or 3-D Rotation Options.
|
Converting Images to SmartArt Graphics
If you want to convert an image,
or a series of images, to a SmartArt Graphic, select the images, and on
the Picture Tools—Format tab, click the Picture Layout button. From the
gallery that appears, select the SmartArt style you want to apply to
your images.
Arranging Images
Like other PowerPoint
objects, you can arrange the images you insert into your presentation.
The Arrange group on the Picture Tools—Format tab offers numerous options
for arranging images. For example, you can align, group, and rotate
images and send overlapping images backward or forward to achieve a
desired effect.
Cropping Images
If you don’t want to include
an entire image in your presentation, you can crop it to your exact
specifications. For example, you might want to zero in on an object in
the center of an image, or remove extra content at the top of an image.
To crop a selected image, on the
Picture Tools—Format tab, click the Crop button. From the menu that
appears, select one of the following options:
Crop—
Drag the mouse to determine your cropping area. Handles surround the
image enabling you to specify the exact content you want to retain.
Crop to Shape— Select a shape from the gallery that appears. PowerPoint modifies the image to fit the selected shape.
Aspect Ratio— Crop to a specific aspect ratio, such as a 1:1 square, 2:3 portrait, or 3:2 landscape.
Fill— Resize the image to fill the entire image area, maintaining the original aspect ratio.
Fit— Resize the image to fit the specified image area, maintaining the original aspect ratio.
Modifying an Image’s Height and Width
To modify a selected
image’s height or width, on the Picture Tools—Format tab, enter a new
measurement in the Shape Height or Shape Width boxes. Alternatively, use
the scrolling arrows to make incremental adjustments either smaller or
larger.
For more image-sizing options,
click the dialog box launcher (down arrow) in the lower-right corner of
the Picture Styles group to open the Format Picture dialog box. On the
Size tab of this dialog box, you can specify size, rotation, scale, and
more.