IT tutorials
 
Office
 

Microsoft Outlook 2010 : Managing a Calendar - Adding an Appointment

- Free product key for windows 10
- Free Product Key for Microsoft office 365
- Product Key Free : Microsoft Office 2019 – Serial Number
11/9/2011 6:10:57 PM
An appointment in Outlook is an activity you enter for a specific time that, unlike a meeting, doesn’t typically involve other people or resources. When you schedule an appointment, you block out a day, a time, and a location for that appointment to occur. As mentioned earlier, Outlook also lets you set a reminder that flashes on your screen and plays a sound to alert you to the appointment.

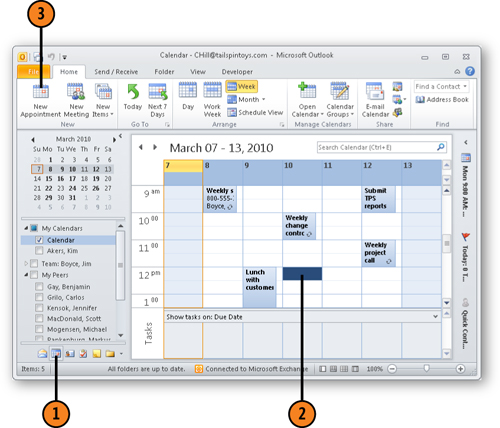
1. Add an Appointment with the Menu

  1. Click the Calendar icon on the Navigation Pane.

  2. Select a block of time for the appointment.

  3. Click New Appointment on the Home tab.


    Note:

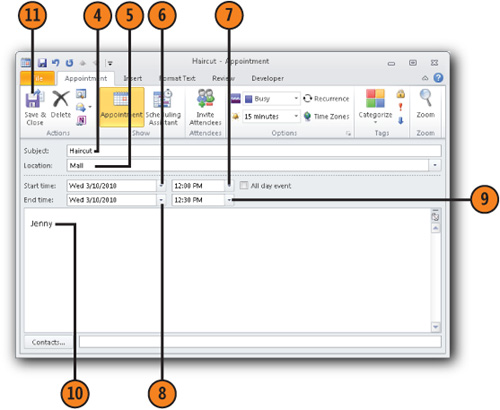
    Keep your appointment subjects as short as possible so that they’re easy to read in the Calendar view.


  4. Type a description of the appointment in the Subject box.

  5. Type the location of the appointment in the Location box.

  6. Click the down arrow to the right of the Start Time date, and select the day of the appointment.

  7. Click the down arrow to the right of the Start Time hour, and select the starting time of the appointment.

  8. Click the down arrow to the right of the End Time date, and select the ending day of the appointment if the appointment spans multiple days.

  9. Click the down arrow to the right of the End Time hour, and select the ending time of the appointment.

  10. Add notes if you want.

  11. Click the Save & Close button.


Note:

If you’d like to add extended information about an appointment, click in the text area at the bottom of the Appointment window. Type a longer description here, such as directions to the appointment location, important information about the appointment, and so on.


Note:

You can print your appointments to the default printer by clicking the Print button on the File tab.


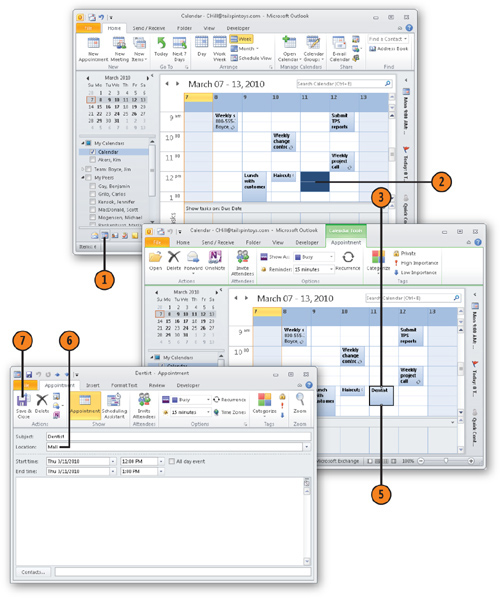
2. Add an Appointment Right on the Calendar

  1. Click the Calendar icon on the Navigation pane.

  2. Click and drag to select a block of time for the appointment on the Calendar.

  3. Begin typing the Subject of the appointment, and the subject appears in the blocked-out space on the Calendar.

  4. Press Enter.

  5. Double-click the appointment to open the appointment form.

  6. Add the location, notes, and other information to the appointment.

  7. Click the Save & Close button.


Note:

If you use Outlook with a Microsoft Exchange Server account, others can easily see your free/busy time. They know when you’re busy and can schedule meetings with you based on this information.


Note:

To categorize the appointment, right-click the appointment and choose Categorize, and then choose a category from the submenu.

 
Others
 
- Microsoft Outlook 2010 : Managing a Calendar - Viewing Your Calendar
- Microsoft OneNote 2010 : Customizing the OneNote Workspace (part 2) - Adding Commands to the Ribbon
- Microsoft OneNote 2010 : Customizing the OneNote Workspace (part 1) - Changing the Location of the Quick Access Toolbar
- Microsoft Project 2010 : Using Groups (part 2) - Custom Groups
- Microsoft Project 2010 : Using Groups (part 1) - Built-in Groups
- Microsoft Access 2010 : Creating an AutoExec Macro
- Microsoft Access 2010 : Converting a Macro to VBA Code
- Microsoft Word 2010 : Adding Supplementary Elements - Working with Pages
- Microsoft Word 2010 : Creating an XPS Document
- Microsoft Visio 2010 : Tips for Creating Process and Flowchart Diagrams (part 1)
 
 
Top 10
 
- Microsoft Visio 2013 : Adding Structure to Your Diagrams - Finding containers and lists in Visio (part 2) - Wireframes,Legends
- Microsoft Visio 2013 : Adding Structure to Your Diagrams - Finding containers and lists in Visio (part 1) - Swimlanes
- Microsoft Visio 2013 : Adding Structure to Your Diagrams - Formatting and sizing lists
- Microsoft Visio 2013 : Adding Structure to Your Diagrams - Adding shapes to lists
- Microsoft Visio 2013 : Adding Structure to Your Diagrams - Sizing containers
- Microsoft Access 2010 : Control Properties and Why to Use Them (part 3) - The Other Properties of a Control
- Microsoft Access 2010 : Control Properties and Why to Use Them (part 2) - The Data Properties of a Control
- Microsoft Access 2010 : Control Properties and Why to Use Them (part 1) - The Format Properties of a Control
- Microsoft Access 2010 : Form Properties and Why Should You Use Them - Working with the Properties Window
- Microsoft Visio 2013 : Using the Organization Chart Wizard with new data
Technology FAQ
- Is possible to just to use a wireless router to extend wireless access to wireless access points?
- Ruby - Insert Struct to MySql
- how to find my Symantec pcAnywhere serial number
- About direct X / Open GL issue
- How to determine eclipse version?
- What SAN cert Exchange 2010 for UM, OA?
- How do I populate a SQL Express table from Excel file?
- code for express check out with Paypal.
- Problem with Templated User Control
- ShellExecute SW_HIDE
programming4us programming4us