Adding Commands to the Ribbon
Although the Quick Access
Toolbar is intended to provide access to your most frequently used
commands at all times, it’s important to understand that it does not
replace the ribbon, which is your main and most important toolbox in
OneNote 2010.
For this reason, Microsoft has included the same sophisticated
customization interface for ribbon commands, ribbon groups, and ribbon
tabs.
To create your own custom ribbon tab with a ribbon group of commands, do the following:
1. | Click
the File tab, click Options, and then, in the OneNote Options dialog
box that appears, click Customize Ribbon in the list of categories on
the left.
|
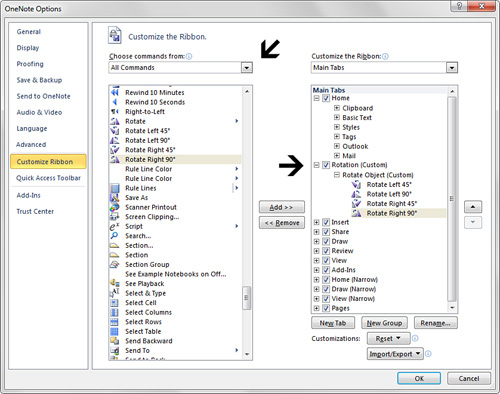
2. | Near the top middle, under Customize the Ribbon, click the Choose Commands From drop-down and then select All Commands (see Figure 5).
|
3. | Scroll
through the list on the left to look for your first command. In this
example, scroll down to commands beginning with the letter R and then
click to select the Rotate Left 45° command.
|
4. | In
the list on the right, click to select Home in the Main Tabs list, and
then click the New Tab button at the bottom of the list. OneNote creates
a new ribbon tab called New Tab (Custom) and it creates on that tab a
new ribbon group called New Group (Custom).
|
5. | Right-click
New Tab (Custom) and then click Rename on the shortcut menu that
appears. In the Rename dialog box that appears, replace the selected
text by typing Rotation as the new name for this tab, and then click OK.
|
6. | Right-click
New Group (Custom) and then click Rename on the shortcut menu that
appears. In the Rename dialog box that appears, replace the selected
text by typing Rotate Object as the new name for this group, and then
click OK (see Figure 12.18).
|
7. | With
the Rotate Left 45° command still selected in the list on the left,
click the Add button between the two lists. OneNote adds the command to
the new ribbon group on the new tab you just created.
|
8. | In the list on the left, click to select the Rotate Left 90° command and then click the Add button between the two lists.
|
9. | In the list on the left, click to select the Rotate Right 45° command and then click the Add button between the two lists.
|
10. | In the list on the left, click to select the Rotate Right 90° command and then click the Add button between the two lists.
|
11. | When all four rotation commands appear in the new ribbon group under the new tab you created (see Figure 5), click OK to save your changes.
|
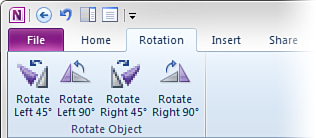
The tab you just created now appears where it was shown in the list (see Figure 5)—between
the Home and the Insert tabs. If you click the new Rotation tab, you’ll
see the four commands you added to it, which are in the ribbon group
that you called Rotate Object (see Figure 6).
To try out the commands you just added, do the following:
1. | Create a new, blank page and then click the Draw tab.
|
2. | In the Insert Shapes group, click the rectangle shape.
|
3. | When the mouse pointer changes to a crosshair icon, click and drag a rectangle on the blank page.
|
4. | Click
the Rotation tab you created. Because your drawing object is still
selected, all four rotation commands should now be available.
|
5. | Click any of the four commands to see the rotation angle of your selected rectangle change.
|
As with the Quick Access
Toolbar customizations, I encourage you to experiment with these
settings as soon as you feel comfortable with using OneNote.
Removing Commands from the Ribbon
To remove commands from the
ribbon, you can either hide the tab that contains the commands, or you
can delete custom commands as well as custom groups or entire custom
tabs.
To hide a ribbon tab, do the following:
1. | Click
the File tab, click Options, and then, in the OneNote Options dialog
box that appears, click Customize Ribbon in the list of categories on
the left.
|
2. | In the list on the right, clear the check mark next to the tab you want to hide, and then click OK.
|
The tab and its
associated groups and commands will no longer appear on the ribbon. It’s
still available, however, so whenever you want to turn it back on,
repeat the previous steps and then click the check box next to the tab
you want to restore.
To remove a custom command or a custom ribbon group from its associated ribbon tab, do the following:
1. | Click
the File tab, click Options, and then, in the OneNote Options dialog
box that appears, click Customize Ribbon in the list of categories on
the left.
|
2. | In
the list on the right, click the + sign next to the name of the custom
ribbon tab that contains the ribbon group or the commands you want to
remove.
|
3. | Do one of the following:
To remove an entire custom ribbon group, click to select it in the list. To
remove a specific command, click the + sign next to the name of the
ribbon group containing that command, and then click to select the
command in the list.
|
4. | Click the Remove button between the two lists to remove either the selected ribbon group or the selected command.
|
5. | Click OK to save your changes.
|
Restoring deleted ribbon
groups cannot be easily done. You must re-create the groups and their
commands the same way you initially created them. For this reason, don’t
breeze by these features while you’re still learning them and take care
when deciding which ribbon customizations you want to delete.
Renaming Ribbon Tabs or Groups
There might be times when you
want or need to rename existing tabs or ribbon groups. For example, if
you’re customizing a ribbon group with new commands, these commands
might no longer fit their group or tab label. Rather than creating a new
tab or group, you can rename the existing one.
To rename ribbon tabs or groups, do the following:
1. | Click
the File tab, click Options, and then, in the OneNote Options dialog
box that appears, click Customize Ribbon in the list of categories on
the left.
|
2. | In
the list on the right, click to select the tab or ribbon group you want
to rename. If necessary, click the + signs next to the name of the tabs
containing the groups you want to rename.
|
3. | At the bottom of the list, click the Rename button.
|
4. | In the Rename dialog box that opens, type a new name for the tab or group and then click OK.
|
5. | Click OK to save your changes.
|
Exporting Your Ribbon Customizations for Use on Other Computers
If you’ve made any
customizations to the OneNote interface—either just to the Quick Access
Toolbar, just to the ribbon, or to both—you can save your custom
settings in a file that you can then transfer to another computer that
has OneNote 2010 installed.
To export your OneNote 2010 interface customizations, do the following:
1. | Click
the File tab, click Options, and then, in the OneNote Options dialog
box that appears, click Customize Ribbon in the list of categories on
the left.
|
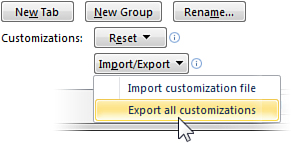
2. | At
the bottom of the list on the right, click the Import/Export button,
and then click Export All Customizations on the shortcut menu that
appears (see Figure 7).
|
3. | In the File Save dialog box, accept or change the filename that is provided and then click Save.
|
4. | Click OK.
|
By importing this settings
file into OneNote 2010 on another computer, your ribbon customizations
will be applied to that installation of OneNote.
Resetting Your Ribbon Customizations
If you’ve made extensive
customizations to the ribbon that you no longer want to keep, or if you
made a mistake and you want to restore the ribbon to its default
settings, do the following:
1. | Click
the File tab, click Options, and then, in the OneNote Options dialog
box that appears, click Customize Ribbon in the list of categories on
the left.
|
2. | To restore only a specific ribbon tab, click it in the list on the right.
|
3. | At the bottom of the list on the right, click the Reset button (see Figure 5)
and then click Reset Only Selected Ribbon tab. Alternately, if you want
to reset all ribbon customizations, click the Reset button and then
click Reset All Customizations.
|
4. | Click OK. |