Instead of using the AutoFilter menu each time you want to filter data in a PivotTable, you can create a slicer (New!)
button that enables you to quickly filter data in a PivotTable with a
single click. Each slicer is shown on the screen with button labels that
indicate the data being filtered. A slicer includes a header, filtering
buttons, a Clear Filter button, a scroll bar, and move and resize
controls. You can have more than one slicer and move them around on the
worksheet. You can also format slicers with styles to match the look and
feel of your worksheet and easily reuse them in other PivotTables,
PivotCharts, and Online Analytical Professing (OLAP) Cube functions. If
you have multiple PivotTables, you can share a slicer between them as
needed. When you share a slicer, you create a connection to another
PivotTable, which is called a shared slicer. A slicer only used by one
PivotTable is called a local slicer.
Create, Format, and Delete a Slicer
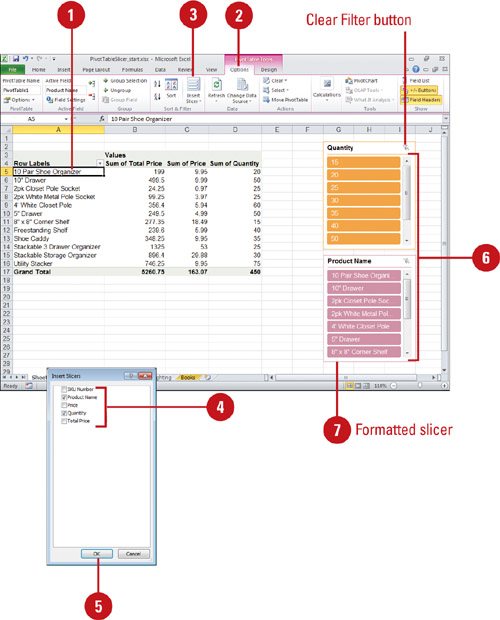
 Click any data field in the PivotTable for which you want to create a slicer. Click any data field in the PivotTable for which you want to create a slicer.
 Click the Options tab under PivotTable Tools. Click the Options tab under PivotTable Tools.
 Click the Insert Slicer button. Click the Insert Slicer button.
 Select the check boxes with the PivotTable fields for which you want to create a slicer. Select the check boxes with the PivotTable fields for which you want to create a slicer.
 Click OK. Click OK.
A slicer appears for every checked field.
 In each slicer, click the items you want to filter. In each slicer, click the items you want to filter.
- To select more than one item, press and hold Ctrl, and then click the items.
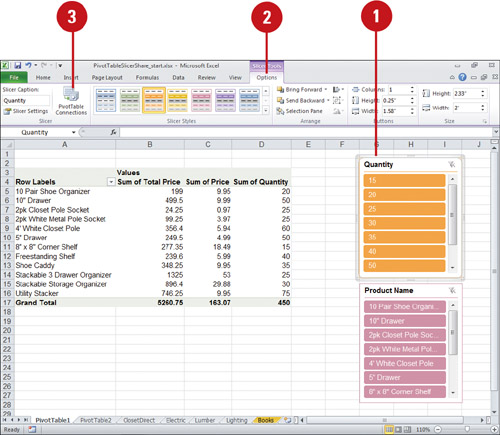
 To format a slicer, click the slicer you want to format, click the Options tab under Slicer Tools, and then click a style in the Slicer Styles group. To format a slicer, click the slicer you want to format, click the Options tab under Slicer Tools, and then click a style in the Slicer Styles group.
 To delete a slicer, click the slicer, and then press Delete. To delete a slicer, click the slicer, and then press Delete.
Share and Use a Slicer
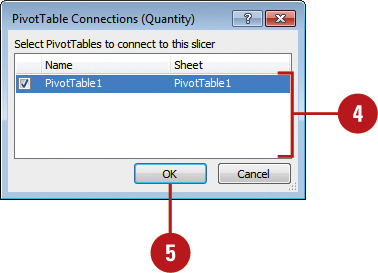
- Click the slicer you want to share in another PivotTable.
- Click the Options tab under Slicer Tools.
- Click the PivotTable Connections button.
 - Select the check boxes with the PivotTables to which you want to connect.
- Click OK.
- Click the Data tab.
- Click the Existing Connections button.
- Click the Show list arrow, and then click All Connections.
 Select the connection you want, and then click Open. Select the connection you want, and then click Open.
- If you don’t see a connection, click Browse for More, click New Source to use the Data Connection Wizard.
 Click PivotTable Report, and then click OK. Click PivotTable Report, and then click OK.
 Click anywhere in the PivotTable where you want to insert a slicer from another PivotTable. Click anywhere in the PivotTable where you want to insert a slicer from another PivotTable.
 Click the Options tab under PivotTable Tools. Click the Options tab under PivotTable Tools.
 Click the Insert Slicer button arrow, and then click Slider Connections. Click the Insert Slicer button arrow, and then click Slider Connections.
 Select the check boxes with the PivotTable fields for which you want to create a slicer. Select the check boxes with the PivotTable fields for which you want to create a slicer.
- You clear the check boxes to disconnect a slicer.
 Click OK. Click OK.
In addition to creating a slicer in a PivotTable, you can also create a stand-alone slicer (New!)
that can be referenced by Online Analytical Processing (OLAP) Cube
functions or that you can associate with any PivotTable. To create a
stand-alone slicer, click the Insert tab, click Slicer, click the Show
list arrow, click All Connections, select the connection you want (If
you don’t see a connection, click Browse For More, click New Source to
use the Data Connection Wizard), click Open, click the check boxes with
the fields for which you want to create a slicer, and then click OK.
|